Saturday, January 29, 2011

Don't Look At Our Behinds

Brazilian embroidery is so beautiful, so exquisite, so neat ... and, well ... so DIMENSIONAL --on the front!

This is the back:
Doesn't it look like a can o' colorful worms, singin', dancin' and havin' a party out behind the barn?

It's supposed to look that way!
     Traditional embroidery is neatly stitched front and back -- but not Brazilian embroidery, the rambunctious, riotous, colorful Poster Child for the Creative Stitch.
     Brazilian dimensional embroidery marches to its own drummer. Brazilian dimensional embroidery has, in fact, a whole band of drummers marching in the direction of their choice, led by a fairly short list of dimensional stitches that are commonly used (and then re-used, re-invented, re-created into new stitch innovations).

The reason I'm shamelessly posting pictures of my behind -- Excuse me! I meant to say the "behind of my embroidery" -- is to let stitchers new to B.E. realize it's OK to worry less about the back of their needlework.
     Take a look at the Judging Criteria prepared by the BDEIG Standards Committee. Print this pdf and take it to your County or State Fair Superintendents and ask them to use it to judge Brazilian embroidery entries. Ask them to please not judge the back of the work. 
     B.E. stitchers just don't worry too much about the back side of their work -- it's the front side that should get all the attention, both in fair judging and in general admiration. 
     A lot of Brazilian embroidery is stitched on the heavier-thread-count Trigger cloth or Blazer poplin to hide any floss tails that might shadow through. However, there are a lot of other fabrics that lend themselves well to B.E., especially fancy fabrics, and it never hurts to keep the back side of the embroidery as neat as possible -- especially if a stitcher is using a lighter weight fabric.
     By the way, even when Trigger cloth or any of the heavier poplin fabrics are used, it's always nice to add a lightweight lining fabric (my choice is 80%-20% poly-cotton blend Symphony Broadcloth).  --It's just what I do. Everyone has a personal preference.

     Yes, these are pictures of the little Hummy Art Quilt (the backside part we politely aren't supposed to notice). I've just finished all of the leaves and flowers and am busy stitching eyeballs on hummingbirds. I'll post more pictures soon ...and then I'm going to go in search of fabric to finish the edges, sashes and bindings and other quilty things.

Sunday, January 23, 2011

A New Dimensional Lazy Daisy Stitch and a Brazilian Outline Stitch Leaf

The lazy daisy stitch is a favorite needlework stitch, whether worked in rayon, cotton or any fiber. Here's how to do a dimensional lazy daisy stitch that you can use in your Brazilian dimensional embroidery.
I'm still working on the little Hummy Art Quilt and using Iris #209 for the petals of this flower (I have teeny little pressed glass flower beads from Beadcats that I'll use in the center).
     For sword-shaped leaves with parallel veins such as the iris, gladdy or this flower, I like to use the Brazilian Outline stitch (floss held below the line of stitching with Z-twist rayon floss) and work lengthwise along the leaf. For leaves made with this stitch, my favorite weights are Frost or Lola because of their tighter twist which makes a prominent vein.
     By the way -- an idea just popped in, so I thought I should write it down -- you might want to try stitching a regular oval or heart-shaped leaf with Iris and the alternating satin stitch (leaf stitch), and then threading up some Lola and adding center and side leaf veins with straight or B.E. outline stitch. This little extra touch will add dimension to simple leaves, and a darker outline stitch along the bottom of the leaf will make it stand out even more.

OK.  Now it's back to writing about the dimensional lazy daisy stitch. If you look the petals, you'll see that we have a reverse lazy daisy. The first stitch is tiny, in the center of the petal, with a slightly longer tacking stitch.
Work 3, 4 or 5 additional lazy daisy stitches, always bringing the needle out at the tip of the petal, but slipping it through the tacking stitch and going back down and out at the tip again. Each next stitch is worked one thread higher on the petal.
       The stitches pile up around the center and straight stitches can be added at the sides for extra width. 

I'm still stitching, but I might add a little straight stitch in the center of each petal, like a flower ray (a flower guide for those little hummingbirds, directing them right to the center of the flower).

The hummingbirds are almost ready to fly into place. I think I'll use metallic threads and beady little size 14° seed beads, hex cut. I usually attach eye beads on birdies and other creatures with white thread. The white flash is an artist's technique for adding "life" to eyes. 

Tuesday, January 18, 2011

Handy Dandy Laying Tool for Satin Stitch

Really handy!  It's my thumb!
These leaves are satin stitch. The tendrils are B.E. Outline Stitch (floss held below the line of stitching when you are using Z-twist rayon threads for Brazilian dimensional embroidery) to give a smooth appearance to the vines.

Satin stitch, working with these twisted threads, always seems to look prettier when the twist is the same for each stitch. A "true" laying tool is ideal (I use my thumb and forefinger) and you can always improvise with whatever is at hand (pun intended). 
     Whenever I stitch, I use the stab method since I work on a hoop or frame, my left hand poking the needle into the fabric, and my dominant right hand pushing the needle up from below. Then I use my left hand to lift the floss once or twice, just before settling it into place.
     Another way to accomplish the identical twist for each stitch is to twirl the needle to "unwind" the floss slightly. 
    
To work a doodle cloth sample of the satin stitch, draw an oval shape and use Lola (because the twist is more pronounced). First, make all the stitches across the shape without letting go of the needle -- around and around and around -- you'll see the floss gets "stringy" after a few stitches.
     Now make a second sample and twirl the needle to untwist the floss or lift the floss before settling the stitch into place. You'll see that this is much more beautiful and gives a real "satiny" appearance to your satin stitch.

Here's another little thing that most people probably already know about:
See that tiny backstitch in the middle of the leaf?  I'll do that sometimes when I start a shape.  Mostly, it hides the knot and you won't have a floss tail shadow. But it also helps to adjust the tension slightly on the first stitch so all stitches evenly match.

Monday, January 17, 2011

The Balance of Nature

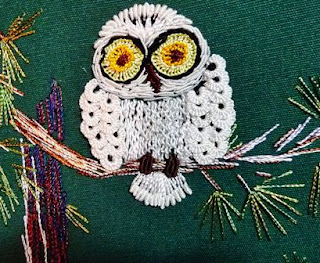
While the subject is OWLS, I thought it would be fun to share one of my Brazilian dimensional embroidery designs with you. 
     This is "The Balance of Nature"
I called it The Balance of Nature, but it reminds me of the poem, "There Was An Old Lady Who Swallowed A Fly". 
    Inside the owl's tummy are a cat, a bird, a mouse, some lovely Brazilian dimensional embroidery flowers, and the Ridged Blanket Stitch fern that I'll tutorialize soon. 
     Of course, Mom Nature balances out when you realize that the B.E. owl is inside the tummy of the bigger kitty with its picket sign. I bought the wooden plaque at the craft store and drew the kitty with the help of some ovals and triangles and lines on a MS Word file, and then I painted the kitty with acrylic paints.
     I kind of lost myself in the whimsy of the design, so I should know how lost that "surprised" little owl feels.  
     The post just below this one is what I recently wrote about transferring patterns with Sharpie pens -- not a good idea!

Spooky Ole Owl

Fierce, isn't he? (also tilted...) Well, I stitched him a long, long time ago. If I remember correctly, this is a pattern from the book, Brazilian Embroidery Instructions by Barbara Demke Johnson.
     I was stitching him onto dark green Trigger cloth and needed to see the lines better, so I went to JoAnn's and bought some lightweight Solvy by Sulky. What NOT to do: trace the pattern with a Sharpie pen.  I did. 
     See what happened:
Except for his face and feet, I used white floss - BouclĂ© and Nova. The Sharpie ink rubbed off onto the white floss and he has an eerie green glow in his tummy parts as though he has ingested an ecologically-sensitive, environmentally-compromised, irradiated munchie. (I like adjectives...)
      Because of this "experimental" stitching a few years ago, I have since used pens that won't smear when I make a mark on the Solvy transfer film. I like metal-tip pens like Uni-Ball and Roller-Ball that are available anywhere. I think a Micron Pigma pen would also work.   However ...
I like to save my Micron Pigma pens (I prefer light brown) for signing and dating my embroidery. I'll usually use the pen to write one time and then go over the letters a second time. If you hold the Micron Pigma pen right next to the fabric (not pushing too hard), the ink will wick from the pen to the fabric and the tip will last longer.

There's an interesting discussion about various products at the Yahoo group hosted by Sherry Johnson. It's a great way to learn a lot more about Brazilian embroidery and has easy signup.  Visit the BDEIG_Online_Chapter  by double-clicking this link.

By the way, I have saved this Spooky Ole Owl in my "Oops" Box.

Sunday, January 16, 2011

Brazilian Embroidery Stitches: Detached Buttonhole

When I write about Brazilian dimensional embroidery stitches, I try to never tell anyone a stitch HAS to be done a particular way. We can do whatever we want - there are no rules in this very creative needleart. I just write down what works for me. If it works for you, have fun!
    
Detached buttonhole is a stitch that comes to us from needle lace and all of the early B.E. books show the loops worked from a "bar" or straight stitch. They also show loops added with the needle pointed "down" or toward yourself.
     That never really worked for me, and I began to ignore this very versatile stitch.  --until I re-adjusted my thinking.
Now, I start all of my detached buttonhole stitch rows with a cast-on stitch first.
      I almost always work with the needle pointing up -- or away -- from myself. I found that I can use my left hand to hold the floss and by tugging it slightly, it opens up the loops below and lets me see where to poke the needle.
     As much as possible I try to progress in a clockwise direction, or left to right, with my Z-twist rayon floss (if you look at needle lace/detached buttonhole diagrams in our early B.E. books, you'll see they are drawn for S-twist threads). Looping or wrapping Z-twist -- it all has to do with whether the floss "unwinds and flattens" or keeps its shape. If you decide to do dimensional stitches with Perle or any S-twist fiber, you would reverse these suggestions.

Here's another thing that works for me:

That first row you see in dark burgundy is a cast-on. I made 9 loops for this particular petal.
     I begin adding my detached buttonhole loops by bringing the needle from back-to-front through the first loop. Then I immediately turn my needle around and go back through that same loop, place the floss behind the needle and finish the stitch. Like this:
I think I pierced the floss, please don't notice.
     Because I am a person who always wants to know "the reason why", I'll add my discovery that working counterclockwise someteimes makes the loops "fall down behind", so I usually try to make my last row of detached buttonhole stitches clockwise. As much as possible. It's all in the planning.

By the way, I also DON'T cast on TOO snuggly to the needle. I always think cast-on stitches are so pretty that you lose the "look" if they are tight. When I cast onto my milliners needle, I like to leave the approximate thickness of my fingernail to widen the loops slightly. In other words (since we are supposed to cast on with our left hand while holding the needle with our right), the slight extra width of the loop makes all the difference. Of course, one could always use a larger needle -- like the lovely new #15 milliners needles that are available. Here is a picture of "Maria's Rose" made with #1 and #15 needles that I tried when they first came out a couple of years ago. 
     By the way, the #15 milliners needle is WONDERFUL for stitching with
Bouclé.


Bullions are another story. Unlike cast-on stitches, you have to snug them down for the nicest finish.

On this rainy Sunday afternoon here in Oregon, I've decided it's a good day to stitch and write and snap pictures. Cuthbert thinks it's a good day to ponder upon where birdies go when it rains:

Thursday, January 13, 2011

The Selector of the Floss

Brazilian Dimensional Embroidery's resident floss-warmer. Yes, this is Cuthbert, my 6 1/2 year old Norwegian Forest Cat. Our other kitty, Emmy 'The Woman of Mystery', is ageless (meaning we got her from Rescue) and is sleeping in the Chicken-of-the-Sea Tuna box behind Cuthbert, most likely with one eye open.

Cuthbert sometimes sorts my floss, takes up the entire stitching area, and basks in the warmth of my stitching light. Today he likes green. I am very good at hiding my needles from him, but that's another story...
I like my floss stored in the plastic floss holders that EdMar makes. I have Glory colors in one batch of holders, Lola in another, Bouclé and Nova together by colors in a third set of holders. All are sorted by numbers and colors.
     And I have Iris, Frost and CirĂ© sorted into an additional set of floss holders, all 3 colors next to each other. You can see that I've color-coded the floss weights (the newer floss has tabs that are already color coded). This is the only way I will remember to use my Frost and CirĂ©.
     If you increase the size of the picture on your computer screen, you'll see a thread looped around one of the greens. That's because I might put 2-3 different dye lots into one slot and won't end up with leaves or petals that are two different shades of the same color. 

Wednesday, January 12, 2011

This Ought to be a Dahlia

Well, maybe it is!
I'll post a better picture after I add the hummingbirds. I made these 8-petal flowers with double cast-on stitches and double cast-on drizzle stitches (6 sets of loops for each petal) using Frost #127 (Orchid) and #218 (Light Fuchsia). Also included were my trusty darner, needle threader and a few extra straight pins. You'll see why in a minute.
Each flower has 8 double cast-on petals, alternating dark and light. After they were all on, I decided the flower looked too "spotty" so I pulled out the darner and added a light-colored drizzle in front of each dark petal. Oh! It's so nice to be able to do what you want when you are doing Brazilian embroidery -- it is part of the creative adventure, making choices, changing one's mind, just having fun in general!
   You can't cast-on too snugly when you use a darner, but I find they are easier to rethread.
     See that straight pin on one of the finished stitches? Here's another example:
I slip the pin into the outer loops so I won't have to deal with kinks and knots while pulling the needle-with-floss through the center of the stitch. It is also helpful to have a previous drizzle "pinned" so I don't tug the floss too hard while I'm making the next stitch. This can distort the length of the stitch.

You'll find complete instructions for making double cast-on stitches at the BDEIG website. The diagram shows one thread in use, but I like to use two strands of floss. Knot one end of each and begin casting on; this makes fewer kinks while you are trying to complete the stitch.

After I finished the flowers, I went in search of my next-favorite thing -- my beads. I would have preferred smaller beads for the flower center (these are pressed glass flower beads from Beadcats), but I liked the color which had a slightly blue tint to blend well with the floss. I tacked each in place with a 3mm Swarovski bicone crystal. If you look closely at the top picture, you'll see where the nylon beading thread shows.  I took care of that nicely with my trusty fabric marker pen. (I'm not taking any chances with Sharpie Pens because they might just decide to bleed when I launder my finished piece).

Well, the little hummy art quilt is humming right along, and writing these blog entries is wonderful motivation to keep me working on it until it's finished!

Tuesday, January 11, 2011

Madelon

In the interests of finishing sentences (or blog posts), I realized that I forgot to share the finished design, "Madelon", with you. I wrote about using the Ridged Blanket (or in this case, Buttonhole) Stitch and remember that I forgot to show you the finished design. By the way, the flower petals are stitched with the Raised Buttonhole Stitch (stitches verrrrry, verrrrry close together). 
     Instructions for the entire design are in the BDEIG Education Projects Book  but I thought you might like to see a picture here, too.

I'll also share the Ridged Blanket Stitch soon! I stitched a sample and think you'll like adding it as fill to your embroidery.

Here's the story about why the design is named "Madelon", and while I have everyone gathered around, I'll write about how I finished this piece.
I also sign all of my finished, original embroideries this way (if it is someone else's design, I'll add their name before my signature).
Here's how I finished the piece:
Most of us stretch our pieces over foam core board, pin the sides and/or lace the back (the proper way is to use archival materials and lace the back). After that was done, I glued a second piece of foam core board to the back. 
     Then, ignoring all the rules of "Proper-Ness", I found a piece of trim/braid and pinned it into the sides of the top and bottom foam core boards that were now stuck together for eternity (or till the glue gets crumbly and the pieces fall apart, whichever comes first...). Usually when I'm pinning trims on as a frame, I'll put a size 11° seed bead on the pin first.
     And, as shown previously, I attach a label to the back.

Monday, January 10, 2011

Hummy, Humming Right Along

I saw this quote somewhere,changed a couple of words, and then it just seemed to "fit" with our creative Brazilian embroidery needle art:

Brazilian embroidery is like playing the piano,
First you must learn to play by the rules,
then you must forget the rules and play from your heart

--Because once we learn the basic stitches, we can do whatever we want with them, all the while telling ourselves and nodding our heads vigorously in agreement with our profound thoughts, that THIS is art and an artist never has to color inside the lines.

Speaking of coloring...
     The Little Hummy Art Quilt that I'm playing with has lots of leaves (I think the original pattern was for appliquĂ© so there are a LOT of teardrops and oval shapes). I wanted to distinguish the leaves from the flowers so I got out my Derwent watercolor pencils.
See? The petals and the leaves all blend together. I needed to remember where the flowers were, so I colored everything around the flower centers in 2 flower colors (I think I'll use a double cast-on to make these petals -- changing my mind at any time is optional.)

I wanted dark leaves and light leaves for contrast. VoilĂ ! Colors were the answer, as I colored in the pattern sheet.
       By the way -- interrupting myself here -- I tried to choose different stitches for each window pane's leaves -- buttonhole or blanket stitch, alternating satin stitch, satin stitch across entire leaf, fly stitch, etc...   Just for variety.  And because I could.

You can tell that I'm working on a textured background and sometimes the Marvy wash-out pen lines don't show as clearly as I would like.  So .... I went in search of my Marvy Permanent Brush Markers (discovered at Michaels with my 40% coupon).
There they are!  Nice juicy neon colors.
..and I colored directly on the fabric. Yes, I stayed inside the lines -- this time. Just a dab of color here and there distinguished the leaves from the flower petals (see the pattern?). 
     And then I stitched.  And I've decided that if I don't totally fill in an area with floss, the color I added will blend with the leaf or flower petal.

By the way, you know this is a blog about Brazilian embroidery. Mostly.  I'm using EdMar rayon floss for everything, although I do padding with 4 strands of cotton embroidery thread, and sparkly beads and other fibers always seem to find their way into my work. The floss is so pretty and the extra sparkles just add to its beauty. 

I have more pictures. I've been stitching all week while my blog was loafing, so I'll add more tomorrow or the next day.
     I hope you're enjoying these notes. Whenever I figure out how to comment about your comments, I'll add a comment myself.  I'll also add more links - something for you to click while you take a break from your own stitching.

With A Little Help From My Friends ... Cuthbert and the Tekkies at Blogger

I had a little help from the Tekkies at Blogger and am now able to post again to my Brazilian embroidery blog. Cuthbert, shown above, mostly likes to watch the cursor move around and wonders why he doesn't get more Garfield cartoons instead of all those words....
        ...it was a week full of frustration, relaxed only by the opportunity to stitch the little hummy art quilt and write notes, but I'm SO happy now that everything works. 

Sunday, January 9, 2011

Stitching Instead of Blogging

When I'm not blogging, I'm stitching on the little hummy art quilt. I am snapping pictures and writing notes as I stitch. I hope to have my home computer in a more cooperative frame o' mind soon and I can then upload some stitching ideas/pictures.

At the moment, I'm getting a LOT of stitching done!

Wednesday, January 5, 2011

Blog Has Little Tummyache; Blogger Has Big Headache

In a spate of wild exhuberance, my able assistant (my Hubby, aka The Computer Literate One) enthusiastically added various virus protections and other interesting and probably-experimental things to the computer.
     I'm sure The Boys at the BlogStore didn't mind the virus protection, but something upset them.  So I am posting from our local library's computer. And I'm stitching at home until our home computer cooperates.

My first assignment, should I choose to accept it, is to go in search of my NavBar, which fell off - lost among the bits and bytes floating around in cyberspace.
     When all is once again right with the world, I'll start adding things to my blog. This is lots of fun. I'm writing notes, snapping pictures...

Saturday, January 1, 2011

My Little Hummy Art Quilt

I'm starting another "Work In Progress," and I think I will be inspired enough to actually finish it! I'm calling it my "Hummy Art Quilt", cleverly named because it has hummingbirds and flowers. 

First of all, something we should probably always remember -- this is an adaptation of a copyrighted pattern, but I'm making it for my own personal use. I'm acutely aware of this because I make and sell my own designs and books and wouldn't want anyone else reproducing my patterns for resale. 

It's part of the reason I won't post the entire pattern, but I'll take pictures as I work and share some of the things I've learned about B.E. stitches and techniques that I'll be using.

To give proper credit, I bought the book of quilt patterns at an estate sale several years ago. Patterns were made by a quilter named Patricia Cox. She still designs and has a website. When I looked at the pattern over the years, I realized that -- doubled in size -- the flowers were a perfect size for our Brazilian embroidery flowers.

So I went shoppping for fabric!
The Michael Miller fabric is "Fairy Frost" and I'm stitching on the lighter green. The darker green will divide the flower/birdie vignettes and to add dimension I (not being a "true" quilter) decided to finish the frames in the Attic Window quilt style -- my version.
The frames between each "window pane" are made with the darker color. I used my bias tape maker (a sewing tool) to get evenly-folded fabric dividers, tucked strips of Steam-A-Seam or Wonder Under (one of those sticky-back things that comes on rolls) and ironed the "frames" in place.
See?
       Then I blind-stitched them in place so they wouldn't shift as I am stitching.  I left the folds along the outside edges opened flat so I could add border strips (sashing, I think) along the edges when I'm finished with my Brazilian embroidery.
Like this:
These pictures aren't actual "true" color because I'm using indoor light for my photos. I'll work on mastering that next. I found (so far) that Iris #050 is a really lovely match with the fabric, and I have several dye lots of that color (shaded avocado green).

Well ... next I traced the enlarged pattern with flowers and hummies onto the fabric. 
     I decided there wasn't quite enough contrast between the icy light green and the willow leaf-colored darker green, so that's why I'm doing the Attic Windows thing ... with my sewing machine and a handy-dandy zigzag stitch using darker green rayon sewing thread.  I think I like it so far ...
Now I'm ready to start my Brazilian embroidery. I backed my fabric with poly/cotton blend Symphony Broadcloth (100% cotton would probably shrink) -- the fancy fabric has already been pre-laundered, whew!
     And I mounted my lined fabric on wooden stretcher bars (the 1" x 1" kind), attaching the fabric with a household stapler. (Although most people would use brass tacks, I use whatever is handy!)
      By the way, when my embroidery is all finished, this project will (still on the stretcher bars) go into either the sink or the bathtubby to soak out my blue wash-out Marvy pen marks.

I have more pictures, but will save them for next time!

It's Only a Machine, Mom ...

That's what my son always told me.   "It's just a machine, Mom. You're smarter than the machine."
     Well, this computer and this computer user still have "issues" now and then. I'm working on this blog and having enough adventures that I could probably write a book.
     But I think I will stick to stitching. Poking a needle in and out of fabric does wonders for achieving a relaxed state of mind.

So, please be patient while I try to figure out how to remove duplicate posts and get back to whatever it is I am supposed to be doing. I don't think I will play around with the blog backgrounds in the future until I really understand what I'm doing.