Showing posts with label Crazy Quilt. Show all posts

Monday, April 8, 2013

Fabric Postcards, Litty Bitty Art Quilts, Brazilian Dimensional Embroidery

Our Chinese Pear Tree -- the one that had only 3-4 Pear/Apples last year.
And now, I have decided to entertain you. But first, a story. When I was a little girl in Nebraska, my dad took pictures all the time, every thing possible. I actually have step-by-step slides of the construction of Gavins Point Dam on the Missouri River because that's where we went every Sunday after mass. And I have pictures of the mountains in Montana's Glacier National Park that my dad shot -- from every angle, stopping the car every few miles while we were on summer vacation.

And when we ever had company, my dad pulled out the slide projector and the company and my mother, brother, sister and I all sat in our little farmhouse kitchen on kitchen chairs and watched my dad's slide shows on the refrigerator door ("The best screen in the house," he always said).

And we didn't dare to leave. It wasn't like you had a "delete" key on a blog back in The Olden Days. It would have been impolite to go and play with our toys when we had company.  So, now, when I entertain you with my embroidery, my flowers and my cats, you actually do have the option of hitting your "delete" key. But until you do, here are some pictures of some fun I've been having.

Fabric Postcards.
Fabric Postcards are like little pieces of art, little crazy quilts, tiny art quilts, and a lovely way to go through one's stash and find all the things you forgot you had.

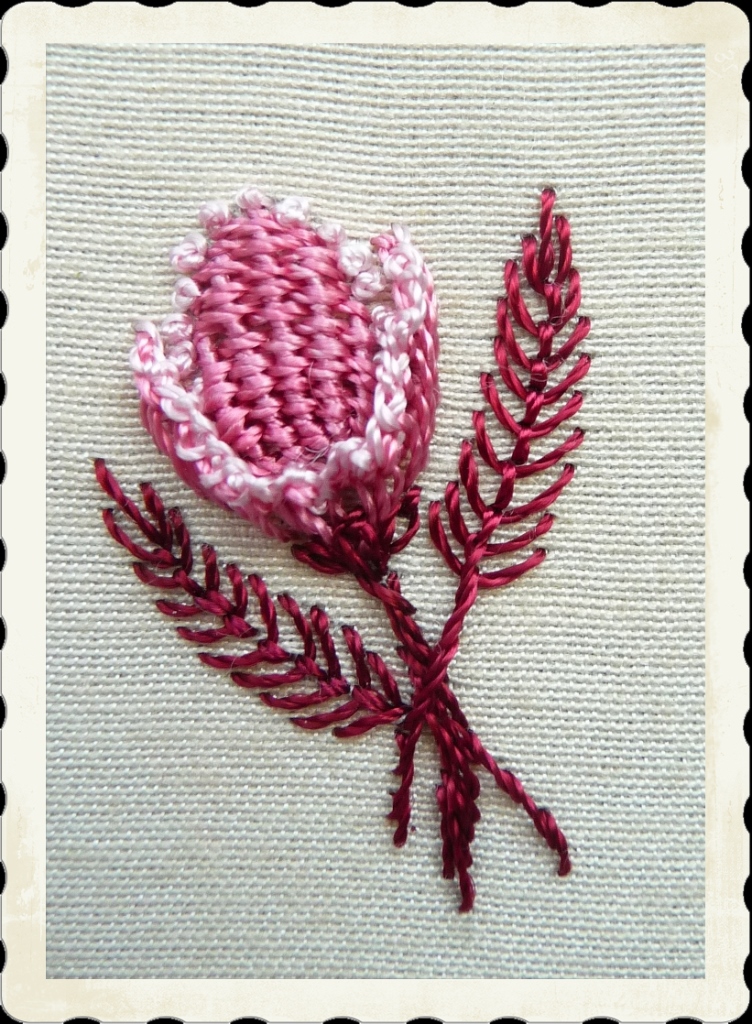
Remember my Rosey Posey from a previous blog post? Here's a picture. I taught this flower recently to stitchers from our BDEIG-WOW Chapter Class. By the way, if you would like to learn more about B.E. in your area, click on that BDEIG link above. We have chapters everywhere and they are usually stitching something interesting, often something new. The best thing about stitching chapters is that everyone shares a like interest.

I teach my individual flowers on small pieces of fabric which can be later assembled into a quilt, a crazy quilt, a tote, wearable item, fabric journal other cover -- anything you can think of. I had a sample of the Rosey Posey left (I'll bet you thought I'd never get to the good stuff!):
I thought it might be fun to make fabric postcards, which are really only tiny crazy quilts (or whatever you want them to be), so I did a little online research about fabric postcards. The Internet is a wonderful source of visual inspiration for anything you want to do, and a lot of blogs are filled with step-by-step written or photo tutorials. Here's one you might want to flag (click the blue link). Most blogs also give you the option of following them by email. You can also Google Janet Wickell at about.com for several pages of excellent quilted fabric postcard tutorials.  Here's another. So I decided to give it a try, too!
By the way, you can purchase the printed postcard backing fabric, or just make your own with a bit of muslin and a Micron Pigma Pen, or even set them up to 'fabric print' on your ink jet printer with just some freezer paper and fabric.  Yes, I've heard that the post office even takes them -- probably admiring them at each stop along the way!

Here's a better picture:
By the way, when I took this finished postcard to show my needlework-impaired hubby, he admired the butterfly. --The PLASTIC butterfly! Aaargh! Not my beautiful, original, awesome, amazing, wonderful, unique Brazilian embroidered Rosey Posey.  The plastic BUTTERFLY!! I think he also didn't understand the concept of "fabric scraps" [his words] so I gave him a speedy tute. 
          But he DID say complimentary things, so he will have a nice dinner this evening.

Here are more detail photos:
These are just a few beads from my bead soup and I attached them with gold seed beads to accent the gold threads in the fabric.
The little frog is a plastic button and I added some straight stitch grass with Iris floss. The purple silk cord just above was fastened with zig zag stitch on my sewing machine (I constructed a lot of this on my sewing machine, although I see often see fabric postcards edged with blanket stitch by hand.) If you scroll back up, you'll see that above this satin cord, I used two colors of rick rack and tacked the lighter color with a size 11/o cut bead (do I like sparkle or what?).

This is my newest Millefiori Brazilian dimensional embroidery floral design, which I have named "Heirloom Tulip", and I'll be teaching it this month at our local B.E. Chapter meeting:
This little tulip features needle weaving, blanket stitched side petals edged with a one-loop running cast-on stitch (looks like a knot, but it's not), and long-tailed fly stitch leaves. 
       Well, since I was in a fabric postcard frame of mind, I decided to have fun with this design, too:
Since I was "crazy quilting" two cards at the same time, I tried to make each look different. I'm not sure if it worked, but I sure had fun! Here's a better picture:
The flower is edged with some pretty dark red ribbon that had gold threads, and I tacked the corner with gold beads. I used the one-loop running cast-on stitch to edge the little flower fairy picture, and I changed to 5-loop 'blanket stitch' cast-ons for the other side.

I found that tulip fabric in my 'collection' - it was a drapery fabric sample, I think, but I liked the idea of two different kinds of tulip on one postcard. Here's a closer shot:
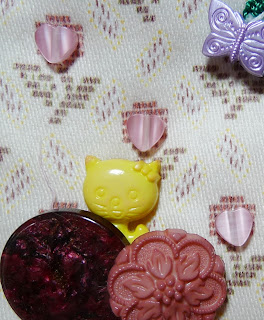
I stitched those tiny heart-shaped beads where the tulip flower is. The little purple butterfly is a plastic button, as is the little yellow kitten (I used the splash of yellow because I also had yellow with the flower fairy.), and the buttons are just odd buttons that were sitting in my button box winking and grinning at me, saying "Take me!  Take me!"
This is the little flower fairy, rescued from some fabric yardage, and embellished with Iris pink lazy daisy stitches, a loop of size 14/o pale yellow beads for the wings, some opaque size 11/o yellow beads for the flower center, and blue size 14/o beads for her eyes.
The fabric in the upper corner is embellished with beads. I found the fringe beads left over from another project, so divided them up (different lengths) and attached them through the holes in the buttons.

This was just the best time ever, and I hope these notes have inspired you to also try other things with your embroidered samples.

By the way, don't forget to pull out your Micron Pigma pen and sign and date your project. These are, after all, tiny works of art!

Rosalie


Friday, March 22, 2013

A NEW Brazilian Dimensional Embroidery Stitch Technique ... Braided Lace

Well, maybe not that new. But new to some, so I'll make a little tute here.

These LadyFlowers are "Becky, Bertha and Bubbles".
Becky, Bertha and Bubbles are all stitched with the same technique - a drizzle I have named "Braided Lace".  I have the instructions for these little LadyFlowers and almost 80 others in my book, My LadyFlowers by Rosalie Wakefield. Here's a picture:
I know, I know... *sigh*.  Sounds familiar.  I advertise and then I advertise some more. That's partly the reason for this blog, but the bigger reason is that I like to talk about Brazilian dimensional embroidery and am always willing to teach/share the things I've discovered. While I'm advertising, you can read more about the book, My LadyFlowers, on my website, here

All of the LadyFlower designs/patterns in the book will fit those little 2.5" frames, and are traceable patterns. However, you can tell from looking at the picture above that all you need are a dot for the drizzle and a spray of lazy daisy leaves and some beady or French knot curves and you'll have a design ready for your favorite wearable item or a crazy quilt, or a fabric postcard for a friend -- anywhere you can poke a needle!

I know you are more interested in learning about the Braided Lace Drizzle, so I'll tell you how to do it. I'll show you, too, with pictures as I write, since many of us are visual learners.  (And you can always drop me a note if you have questions).

You're all familiar with the basic drizzle, right? Thread your needle, come up through the fabric, unthread your needle, and start applying thread. Finish by re-threading the needle and going back down through the fabric and out. If you'd like to see a picture, please visit our BDEIG website. We have a "getting started" page that contains all of the basic stitches with diagrams and directions.  Here.  (Look around while you're here - there are freebie designs and lots of other good information, including all of the new Seminar 2013 classes, plus you can join the guild and learn even more!!!)

Back to work.
Braided Lace
You need:
      Two darners
      Two strands Lola (100% rayon Z-twist floss, from EdMar Co.), or your favorite floss weight.
         Needle Threader
      Pincushion for Drizzles
 
Thread a darner with Lola. (Repeat for the second strand.) Knot each end of a Lola strand separately (or just center one strand of Lola so that the fabric bite is approximately 1/8").
 
Bring the threaded needles up through the fabric, unthread needles. Re-insert the 2 darners, point down, about 1/8" apart into the pincushion. Like this:

You'll double cast on 18 times (this is 36 cast-on loops total, 18 alternating, on each side). Work as follows:

      With your left hand, cast on over the right needle.
      With your right hand, cast on over the left needle. 
          (The floss will cross in front) Like this (I did this a couple of times using different floss colors ...):
After you have cast on 18 sets of loops (or 36 times, total), your Braided Lace Drizzle will look like this:
See that pretty braided center vein? By the way (if you are "arranging" colors, the loops on the left side of the drizzle will be your flower "petals"). The right-size loops are 'gathered' into a tight center -- you'll see what I mean in a minute.
 
OK. After those loops are all on your needles, you will thread ONE needle:
     Thread the left-side floss into the right needle.
     Thread the right-side floss into the right needle.  Like this:
or this:
Now ...and very carefully so nothing pulls out, push that threaded right-side needle a little deeper into your pincushion:
...and always holding your floss loops against the needle (so nothing loosens or gets all wonky), carefully pull out that left-side (unthreaded) needle.  Now you have only one needle, the right-side threaded needle. See?
(I went and neatened up my fingernails as soon as I got finished here ...)
 
OK.  Finish the drizzle by pushing the right-side needle down through the fabric a little deeper into the pincushion. Remember to slip a pin or needle into the outer two floss loops so they don't twist and kink and knot for you (it's really hard to undo these with only one free hand...). Here's what I always do:
Oh, oops. Don't let these colors confuse you. I stitched this flower twice - you'll see in a minute. On the above picture, the red loops were cast onto the left-side needle. This is just a better picture, trying to show you about the pin through the two outer loops to prevent kinks and knots. On the earlier photo, the blue loops were on the left-side needle.  OK?  I guess I'd better show you:
As an interesting side note, the Braided Lace technique is a "reversible" stitch. I'll talk more about that in a minute. First, let's finish the drizzle.
 
          Pull the drizzle down snug to the fabric and the needle all the way through to the backside.
          Slip one of the strands of Lola out of the needle eye (you can use this long floss tail to knot off by hand later if you want).
 
With the one remaining threaded needle, come back up through the fabric at the base of the drizzle, or right next to where you started. Pull this threaded needle all the way through. With the tip of this threaded needle, guide the outer drizzle loop/edge/center braid of the drizzle to around in a circle to meet the beginning to the end and pull down snug. You'll have what looks like a circular flower with the blue loops forming the flower 'petals' (red loops in the flower pictured just below).
Finishing:
And done:
By the way, if you don't like your "joins", you can tuck them beneath another flower, or you can use any green, come up from the center and make 2-3 long bullions or cast-on stitches to give an impression of calyxes.
 
As a "technical" note, when you are using Z-twist floss and double cast-ing on, you'll notice the right-side loops "untwist" slightly, or flatten out (the reason why Z-twist bullions are wrapped clockwise).  [Perle Cotton is S-twist, by the way, and for those who do not have access to Z-twist floss, just reverse the procedure.] 
          I pretty much speak in "Z-twist". When these right-side loops 'flatten out', you'll see that they sort of tuck into each other and make a nice, smooth center for your flower.
That's it:  Braided Lace!
     
Braided Lace looks different on one side than the other. When I cast on with the blue loops on the left needle, these will make 'petals'. If I cast red loops over the left needle, I'll have red 'petals'. As I mentioned earlier, this stitch is reversible and you can flip the drizzle so the 'petals' will tuck under, or you can position the drizzle so that the 'petals' pop up.
Pretty both ways! See:
At the top of this post, you'll see that Bertha, Becky and Bubbles are kicking up their skirts and enjoying themselves. 
 
If you prefer the more demure LadyFlower "Garnet", let those left-side loops rest against the fabric, or even tuck them under with your needle. The picture below introduces you to the LadyFlowers, "Amber, Opal and Garnet":
I have lots of more advanced techniques in my book, My LadyFlowers, if you have already learned the basic Brazilian embroidery stitches and are feeling adventurous.
 
Always remember, too, that if you are trying to follow my instructions and something different comes out of your needle, just give it a name and continue - you have created a new design! 
 
Be sure to drop me a note, either in the comments below or by email, if you have any questions at all. I really LOVE Brazilian dimensional embroidery. Can you tell?
Rosalie
 

Wednesday, April 25, 2012

Edelweiss - A Free Brazilian Dimensional Embroidery Design for You

Each month during the coming year, the Brazilian Dimensional Embroidery International Guild, Inc. (BDEIG) is featuring a free design (posted for one month only and then gone forever). Up now is my "Edelweiss" design. You'll find a pdf file to download here.

I wrote about this design here on this blog a few weeks ago. You can read about how I finished the embroidery with the picture tutorial here. I stitched the design on medium blue poplin, but since it's such a simple traceable pattern, you could transfer it to any wearable item or onto fancy fabric or the fabric of your choice for a crazy quilt motif.

I hope you enjoy the design, and while you are visiting the BDEIG website, be sure to stick around a while and look at all of the other interesting pages.

Thursday, March 22, 2012

Do I Doodle? 'Deed, I Do . . .

This idea for doodling stitches on our doodle cloths for Brazilian dimensional embroidery is entirely TOO good to not share!
Yesterday morning I was at JoAnn stores (one of them). They always have upholstery fabric samples. Some are current and some are discontinued and in a bin or separate table, clearanced to go. They are 18" x 18" and are marked down to $2.00 each (and my 40% coupon worked on one of them), and all edges are serged. Besides being useful for doodle cloths, the fabric samples are also perfect for pillows.

I picked up the two prints because they were pretty. I thought about cutting them apart for crazy quilting. Then I saw the solids, slightly heavier. There are 10 diamond patterns vertically and horizontally. I'm going to start in the middle and stitch a flower. Then I will add more.  I'll post pictures as I'm working. The fabric is heavy enough that I don't need a hoop.

I just wanted to share this great idea with all of you.  By the way, I photographed the fabric pieces on my cutting mat (for a nice background). I just turned it over to avoid having grid marks on the photo.
Rosalie

Saturday, February 25, 2012

FREE-A New Brazilian Dimensional Embroidery Design for You

Our Brazilian Dimensional Embroidery International Guild (BDEIG, Inc) is 20 terrific years old in 2012. To help us celebrate the start of our next 20+ years, we invite stitchers to enjoy free B.E. designs - One-A-Month. These will be posted at the BDEIG website here, a new design posted each month, for one month only, and then replaced by a brand new design.

This is "Brazilian Bouquet", designed by Loretta Holzberger.
If you would like to see more of Loretta's beautiful designs, visit her website. In addition to Brazilian embroidery, Loretta specializes in needle lace and has also developed several beautiful stumpwork designs. She has also written several books. In addition to her needle lace and stumpwork books, she has developed some very creative work with silk flowers and Ganutell, a unique wire and floss method of making dimensional flowers.

Be sure to download the pdf file for this design; you are welcome to share it, but please don't charge for the copies you make. These designs are wonderful teaching projects for chapters or for your own projects.

Look for the next design from Debbie Kelley of DK Designs, and in May, I'll send in a design I have just developed for the Edelweiss flower.

Happy Birthday to us!
     ...and don't forget to become a BDEIG member if you haven't done so yet. You'll find a membership application here.

I have more to write in a day or two or three. I've been working on my design instructions for the new 2012 BE designs. And I've been putting together a lot of my stitch samples into a little crazy quilt. 

There were a few hundred left over, so I'm going to do some-exciting-thing else with them.
Rosalie

Saturday, January 28, 2012

The 22-Stitch* (*Give-or-Take A Stitch) Hummer - Brazilian Embroidery

Someone wrote me a note asking about the 22-Stitch Hummer, what it is and what it does.
This is my 22-Stitch* (*Give-or-Take A Stitch) Hummer -- a Brazilian dimensional embroidery design (although it's not very dimensional -- it's all lazy daisy stitches and a few straight stitches) and I have the instructions and a pattern in my book, Take A Stitch by Rosalie Wakefield. It's also posted on my website, but I don't have a shopping cart finished yet, so you can contact me by email if you'd like a copy.

Well, this is a pretty good picture.  Ole' 22 is only an inch tall. Here he is stitched with metallic threads (I usually choose the durable Sulky metallic threads, but anything will work - it's only 22 stitches, give or take.) I've also stitched this birdie with Glory. In the picture above, his tummy and bib are Glory rayon floss and his beak is gold rayon Glory floss. His sparkly little eyeball is a size 14/o seed bead. 
            To save you buying the book (although I wouldn't argue), you can see that I made a fly stitch for his body outline which I then tacked with a lazy daisy stitch. I then added a couple of lazy daisy stitches on each side for more tailfeathers.  The upper wings are tapered because of 1) offset [a-b] points through the fabric for those 3 lazy daisy stitches, or 2) 4 lazy daisy stitches with extra-long tacking stitches. The top of his head is one stitch, couched in a curve, and his beak is 2 straight stitches, the upper stitch overlapping the lower stitch.

In my book, Take A Stitch, there is a traceable pattern for this little 22-stitch hummer, and another pattern for several different hummers (different coloring). I stitched one in metallic thread and one in Glory rayon floss. (yes, DMC would work -- one strand). I stitched this design one time with silk ribbon flowers and another time using a Brazilian dimensional flower I developed called "Canada's Rose". Here's a picture:
This little hummer is a perfect addition to any crazy quilt design, or any floral embroidery, or edging a collar or just anywhere that you would like him to roost.
Rosalie 

Friday, January 27, 2012

Where Have I Been??

Goodness! How time flies when you are having fun.  Where have I been for so long?  I know, I know…

I've been stitching new Brazilian dimensional embroidery designs that I'll be teaching at our BDEIG Seminar this summer. I'll share some pictures here. I haven't forgotten my finishing (framing) tip - pictures still in my camera, and I have lots of other goodies to share.  I just seem to have gotten quite busy.


Here is the first of my new Millefiori Brazilian dimensional embroidery designs. These will soon be posted at my website for you to purchase and stitch. If you’re coming to our Brazilian Dimensional Embroidery Guild Seminar this June in Portland, Oregon, I invite you to sign up for this class, too.


This is Millefiori design #995 - Rose Garden
All of the roses are new cultivars from my drawing board; the frames are a simple stitch with a unique treatment, and the twining vines are easy and elegant. And every rose is different, each with an original dimensional stitch technique.


I have lots more to share and will add pictures in the next few days. Sorry I've been away for so long. (I've been working on a crazy quilt, trying to de-stash my fabric stash. ...and my bead stash, and my lace stash, and my button stash, and my trim stash.  Yes, I've been saving a long time to pile all of this "stuff" onto one piece of fabric).


I've been linking to these posts on my Facebook page and Twitter (since I have the little icons anyway), and want to thank those of you who write notes there.  You can also comment here if you'd like.


By the way, the "Rose Garden" design will be ready to purchase and stitch as soon as I have the instructions done, fabric printed, photos made.
Rosalie

Monday, June 27, 2011

Meadow Rue - A Mini-Tut for Brazilian Dimensional Embroidery

This is the Meadow Rue (Thalictrum) from my garden. I made a little mini-tutorial for this simple flower and you can use it for your crazy quilts or stitched on wearable items. You can find it here; if you have any trouble opening the pdf, please let me know.
Rosalie

Monday, April 25, 2011

Kiko Flowers from Sharon Boggon at Pintangle

Many of our Brazilian embroidery stitchers are also crazy quilters. I just saw this lovely flower shared by Sharon Boggon on her Pintangle blog
Be sure to click the link above for all the directions you'll need to stitch this pretty flower on your B.E. designs, your crazy quilts, or on your wearable items. These are just buttonhole stitches plus bullions, but the arrangement makes a really pretty flower petal -- and interesting stitch combinations are something for all of us to dream up when we are working on our embroidery.

I don't have a chance to follow Sharon Boggon's Pintangle blog and her In A Minute Ago website as often as I would like, but definitely recommend all of our Brazilian dimensional embroidery stitchers spend some time there.

Sharon also suggests that we might want to follow some of the links in the comments posted at the end of her blog for even more ideas. Thanks, Sharon, for your wonderful contributions to the world of embroidery. I've added Sharon's blog to interesting places to visit, right over there on the left side of this page.

Saturday, April 16, 2011

Brazilian Birdies and an Interesting Dimensional Embroidery Stitch Technique

Brazilian Birdies (bet you didn't know there was such a thing!) . . .

You can add these little Brazilian Blue Birdies to any of your embroidery projects or to your crazy quilts or wherever there aren't any cats.
     See how easy they are to make:
Just draw a small circle for the head, a nice plump oval horizontally for the body and stitch with Iris or Glory.  I satin stitched horizontally for the head, vertically for the body and added 2-3 angled straight stitches for the tail feathers.
     If you are feeling really adventurous, you can add a fly-stitch or Glory bullion for a beak and a little size 14/o seed bead for the eye.
     From the detail, you can see that I stitched the birdhouse very simply with Brazilian outline stitch (Z-twist floss held below the line of stitching), and more satin stitches.
     By the way, since Z-twist floss tends to wind itself tighter and tighter as you go around and around (through the fabric), it's always helpful to "unwind" or "twirl" the needle every now and then. Some stitchers will even drop the needle and let the floss untwist naturally. Whatever works...
     If you notice the roofline, it doesn't show a lot, but I try to angle the stitches slightly. They fill the area in nicely and don't give a look of heavy padding to the area.

If you go back to the first picture, you'll see some of the flowers from my book, An Artist's Garden. This is part of the cover design, "Come Into My Flowers":
More information about the book is posted on my in-progress website --uh, oh, Blatant Advertising straight ahead, http://www.millefiori-be.com/.

     The flowers encircling the birdhouse are my lilac with a really neat cast-on technique that I published in our BDEIG Newsletter, The B.E. Wrap-Up, last year. I'll probably add it again here at some point. Also shown is the foxglove stitched with cast-on stitches and a double fly stitch (making the tack first and then slipping a fly stitch through, two times).

But the one I want to share with you now is Star-Fill (originally named 5-Point Star-Filling Stitch and re-named by my stitching friend, Gayl). It's stitched just like those stars we learned how to make in grade school. Here's a graphic:
The star is drawn two times with your needle to fill all the lines, as follows:
Bring needle up at lower left (Point #1).
▪ Needle Path: Numerical Order, #1-10. On completion, each leg of the star will have two parallel straight lines.

▪ To finish, bring floss up next to center. Working on fabric surface, slip needle beneath two star points; pull snug.
▪ Continue to whipstitch 2-3 times around, catching central star lines into a group at center.
▪ Star Center: make a colonial or French knot, or secure a bead, crystal or pearl at center with a tiny backstitch.

See?  Easy as pie!


Monday, March 28, 2011

Hummy Art Quilt ... Almost Finished!

The little hummy art quilt that I've been working on is just about finished!
     I have a friend named Mary who is A True Quilter and after I finished all of the Brazilian dimensional embroidery on the flowers and hummingbirds, I raided my fabric stash and pulled colors. Mary made really excellent suggestions to this not-so-creative quilter (my perception of quilting is that you cut fabric up into tiny pieces and then sew it all back together).
   Mary suggested that I complete the sewing machine zigzag edges all around (since she didn't think it was a "true" attic windows pattern anyway), and then fold a 1" wide strip (the pink fabric) right next to the embroidery as though I was matting a picture.
    From my stash, we found a nice dark green but when I got back home I ended up using different pinks and greens than first chosen. It was interesting that as soon as I pulled the final fabrics, I just KNEW they were the perfect choice. The only down side was that I had to change my mind about another trip to the fabric store, and use what I had.
Here's a better picture -- the binding pinned in place and ready to blind stitch hem. As soon as I have it all finished, I'll post another picture.

     A blog is a good exercise in self discipline. I had to actually finish something I started and the hummers didn't end up hibernating in my UFO (UnFinished Object) collection. I am seriously thinking about pulling out a crazy quilt top that I started ages ago, cut off a flower stitched with really AWFUL color choices, and start embellishing!

Monday, March 21, 2011

Things This Blog Can Do... And A B.E. Design for You

I've been checking out all the good things Blogspot/Blogger can do. I found the little icon that lets everyone subscribe by email.  See? There it is over there on the left side. Just sign in with your email. Feedburner will open up a little window and you'll be asked to type some really atrocious spelling (to keep auto spammers out) and then you'll get a confirmation note in your email, followed by lots of messages  ... from ME!!  Easy as pie.

I'd like to find a way to make my pages wider to get all of my words to fit. The way I see it, I have only two choices:
          1. Select a different template
or
          2. Say more in fewer words.

I'm thinking ...

While I'm thinking, here's some Brazilian embroidery to entertain you.
I made these flowers with a version of a Brazilian dimensional embroidery stitch technique I developed a while back and have it and about a hundred others published in one of my books, My LadyFlowers.
      I call it "Stretch". If you look at it closely, you'll see that it is a double cast-on drizzle (I used 2 darners and 2 entire floss strands).
      After you load the needle with as many loops as you can, turn your fabric over and knot both floss tails together as close to the ends as you can.
      Then str-e-e-e-e-t-t-t-t-t-c-c-c-c-h it out as far as you can (usually about 4-5"). Next, thread another needle with regular sewing thread and start winding "Stretch" around the center (where you started the drizzle), tacking the loops, on one side only, on the fabric. 
      It's really fun when you use two colors, usually the darker color next to the fabric to give that impression of depth (and dimension). And, of course, variegated floss is wonderful. I used Lola, but any floss weight will work just fine.
      You can add a bead or two before you start wrapping.
      Also, you'll notice that some of the double cast-on drizzles look different than the others. One is made with regular looping, and the other two are made with up-down looping (aka, "up-down cast on", alternate stitch, needle tatting ...everyone has a favorite name...).

I always think these little floral designs would be perfect motifs for crazy quilts -- and down the road a bit, I'll start posting pictures of those two CQ quilt tops that I pieced some time ago. (I have definitely found that stitching alongside of blogging is a VERY good way to actually get a project finished!)
 
Here's a picture of the book, My LadyFlowers by Yours Truly, Rosalie Wakefield:
Oh, yes ...for sure, that's a commercial - blatant advertising, I calls it. --because I sell my books and designs, too.
     Actually, my books are up at Amazon, or you can order them directly from me. 
     Or if you wait patiently, I will probably eventually get almost all of this onto this lovely little blog that is so much fun to write.  And, as always, whenever anyone has a question about any of these stitches, just drop me a note. As you can see, I love to chat!
          (Well, so much for writing a post in FEWER words....  I'll keep trying, though!)

Have fun!  Don't forget to sign up for these blog messages email delivered via Feedburner in case you don't always remember to tune in. Thanks!