Showing posts with label B.E. Books. Show all posts

Saturday, June 13, 2015

Let's Get This Brazilian Embroidery Show On the Road

Didja miss me?? 
     I think my life is starting to settle down and I can get back to what I enjoy most -- more Brazilian Dimensional Embroidery.

I'm busy re-sizing photos because almost all of my gigs are used up on this computer and hubby says that I really have enough (he's probably right, but it means I need to re-size.  Hmmm, after I get finished with photos, I might start with myself ...the re-sizing, that is.  ho. ho. ho.)
These Brazilian embroidery designs are from the book My LadyFlowers (by myself, Rosalie Wakefield). As a side note (or blatant commercial), I have the book here on my website, www.Millefiori-BE.com, also at Amazon.com.

This photo is one of the "Pearls". It is named "Bo and Sno and 7 Little Dwarf Stars".  Yes, Little Bo Peep, Snow White with 7 little Star-Fills added to brighten their sky. The border is a popular edging technique I call "Scalloped Lace", although it's basically just a series of running cast-on stitches.

OK, now I know the details are the most interesting part our B.E. stitching. The focal flower, named Snow White, is inspired by osteospermums in my garden (although they don't last nearly as long there, as they do on fabric. With floss.) and is stitched with a technique I've named the Shadow Drizzle.

I added the String of Knots to make Little Bo Peep, peeking out from behind Sno, and stitched leaves with the Reverse Fly Stitch and the Backwards Leaf, and then I added vines with Automatic Couching.

You can see little sparklies - beads, sometimes metallic threads - in these designs because other fibers, beads, buttons and whatever we find in our stash (like crazy quilters) is such a natural companion to the lush rayon floss we use.
My Millefiori design instructions are all written so that rayon can be used for the embroidery, but as needle artists, each of us can change anything we like. Substitutions are fun and make these designs truly our own work.

Oh, yes, for sure ... I capitalized the names of all of these stitches. My LadyFlowers was written during one of my "experimental" stages ...playing with my floss to see what would happen, and then giving it a name. So this is really an advanced book for the adventurous stitcher who can also become "The Boss of Their Floss". I hadn't seen many of these techniques/stitches anywhere else, so I gave them each their own personal name. This is a picture of the other "Pearls":
Well, I'm back into my computer to do more re-sizing and sharing -- there are 80 "new" - at the time - floral designs in My LadyFlowers.
I'm also sharing these photos on Facebook, where there is a group named Brazilian Dimensional Embroidery, and everyone is sharing all of their beautiful work. If you aren't already on the group, FB or email me your addy and I'll send you an invite. It's a really friendly group, and everyone helps everyone else. --another nice place to B.E.
Rosalie
P.S. Website will soon be updated -- I have a couple of new designs to share with you.

Sunday, August 25, 2013

Did You Miss Me?

I sure missed all of you -- writing here is one of the joys of my days.

--and I owe those who come to visit regularly an explanation. First of all, a big bad virus came and tried to eat my computer.

Lucky for me, hubby knew just what to do ...he took it to the computer guru.
Of course, that was over a month ago. Everything is now fixed and humming along at high-speed.  But you know how life goes ... if it isn't one thing, it's another thing.

Hubby had a stroke last month - moderate, but it affected his right arm and leg which he is moving along (also at high-speed) trying to re-train. He will do it, too, I have no doubt. We get to hold hands a lot while I help that wayward, stubborn arm do its thing. You won't hear me complaining -- him either. He's been in rehab and it is an entire month from the start to now. But he's home and I can tell that is the best medicine for him -- he said "he was afraid he wouldn't ever see this place again" ... Yes, it almost made me cry, too. I'm helping him and will get more help as soon as I poop out. We had the absolute BEST team helping him at Portland Providence's PARC rehab unit -- what a wonderful, patient staff they all are. But I have him back now, and that's the best part. We are enjoying each day together and facing this challenge with a sense of humor and support for each other (I always think he needs it more).

OK, that happy eyeball face above...  Well, that's one of my newest Millefiori Brazilian dimensional embroidery designs. I was in rehab with Rich each day, learning what I needed to know and stitched while I listened. This is the result:
"Not Just Spots!!"   
      If you ever look nose to nose at a ladybug, you'll see how beautiful they really are.  Do you remember the "Rosey Posey" I earlier described here? These spots are stitched with yet another version of this easy flower, improved (in my opinion) from two previous methods of stitching the flower. This Rosey Posey is stitched with a particularly pretty dyelot of EdMar's rayon floss #327. I will probably have this design available for retail sale as a pdf file, but might also have a fabric print with photo and instructions. Since you would be stitching the same flower over plus six, stitchers might prefer a traceable design. I'll let you know down the road a bit.
 
Well, as long as you are reading here (hopefully), here's an interesting idea that most probably know about. Keep long straight stitches from sagging; make a teeny little backstitch beneath one end of the stitch.  See:
That's it for the ladybugs at the moment.  And that is a ladybug bead:
 As promised the last time I wrote here, I described the little BDEIG quilt I made and promised to share patterns and sources so you can stitch your own Original B.E. flowers.  I named it "The Olden Days - Early B.E. Flowers".  I'll share those very soon. Remember:
One other thing ...
 
With all of the other things going on this summer, I haven't updated my website except to post information here and here about my newest book, My Book of Stitches.
 
   Thank you to so many who have tracked me down through my email address or phone. I'm shipping these orders as soon as I receive them, double wrapped and shipped in a padded priority mailer. I hope you'll get your own copy soon.
Rosalie


Monday, June 17, 2013

A Brand New Book About Brazilian Dimensional Embroidery

This is my NEW book - My Book of Stitches.  It is written by me, Rosalie Wakefield, and is hot off the press! This book has almost 300 pages and is loaded with the ideas I get when I thread my needle. I'm hopeful that it will inspire other stitchers and add a few ideas for those who would like to design for Brazilian dimensional embroidery.

I've licensed My Book of Stitches with a Creative Commons Attribution-Share Alike 3.0 License, which I've linked for further information. This means that others can use any of these ideas and stitches, produce even better ideas if they like, and can sell whatever they develop from these stitches, and all they need to do is attribute (give credit) to the source - My Book of Stitches by Rosalie Wakefield. It's my way of sharing the things I've learned from other Brazilian embroidery instructors.

The book is coil bound, almost 300 pages, and a lot of ideas I've used in my designs, also many ideas from my books, and a few new ideas that popped into my head while I was writing the book. Books will be sent on order in a padded priority mailer; prices shown on my website, www.Millefiori-BE.com. You can email me or leave a note in the comments if you have questions.

I've been gone for a week and now I'm going to go out into my garden and see how many flowers will be there after I pull the weeds that are trying to run the show.

Rosalie

Friday, March 22, 2013

A NEW Brazilian Dimensional Embroidery Stitch Technique ... Braided Lace

Well, maybe not that new. But new to some, so I'll make a little tute here.

These LadyFlowers are "Becky, Bertha and Bubbles".
Becky, Bertha and Bubbles are all stitched with the same technique - a drizzle I have named "Braided Lace".  I have the instructions for these little LadyFlowers and almost 80 others in my book, My LadyFlowers by Rosalie Wakefield. Here's a picture:
I know, I know... *sigh*.  Sounds familiar.  I advertise and then I advertise some more. That's partly the reason for this blog, but the bigger reason is that I like to talk about Brazilian dimensional embroidery and am always willing to teach/share the things I've discovered. While I'm advertising, you can read more about the book, My LadyFlowers, on my website, here

All of the LadyFlower designs/patterns in the book will fit those little 2.5" frames, and are traceable patterns. However, you can tell from looking at the picture above that all you need are a dot for the drizzle and a spray of lazy daisy leaves and some beady or French knot curves and you'll have a design ready for your favorite wearable item or a crazy quilt, or a fabric postcard for a friend -- anywhere you can poke a needle!

I know you are more interested in learning about the Braided Lace Drizzle, so I'll tell you how to do it. I'll show you, too, with pictures as I write, since many of us are visual learners.  (And you can always drop me a note if you have questions).

You're all familiar with the basic drizzle, right? Thread your needle, come up through the fabric, unthread your needle, and start applying thread. Finish by re-threading the needle and going back down through the fabric and out. If you'd like to see a picture, please visit our BDEIG website. We have a "getting started" page that contains all of the basic stitches with diagrams and directions.  Here.  (Look around while you're here - there are freebie designs and lots of other good information, including all of the new Seminar 2013 classes, plus you can join the guild and learn even more!!!)

Back to work.
Braided Lace
You need:
      Two darners
      Two strands Lola (100% rayon Z-twist floss, from EdMar Co.), or your favorite floss weight.
         Needle Threader
      Pincushion for Drizzles
 
Thread a darner with Lola. (Repeat for the second strand.) Knot each end of a Lola strand separately (or just center one strand of Lola so that the fabric bite is approximately 1/8").
 
Bring the threaded needles up through the fabric, unthread needles. Re-insert the 2 darners, point down, about 1/8" apart into the pincushion. Like this:

You'll double cast on 18 times (this is 36 cast-on loops total, 18 alternating, on each side). Work as follows:

      With your left hand, cast on over the right needle.
      With your right hand, cast on over the left needle. 
          (The floss will cross in front) Like this (I did this a couple of times using different floss colors ...):
After you have cast on 18 sets of loops (or 36 times, total), your Braided Lace Drizzle will look like this:
See that pretty braided center vein? By the way (if you are "arranging" colors, the loops on the left side of the drizzle will be your flower "petals"). The right-size loops are 'gathered' into a tight center -- you'll see what I mean in a minute.
 
OK. After those loops are all on your needles, you will thread ONE needle:
     Thread the left-side floss into the right needle.
     Thread the right-side floss into the right needle.  Like this:
or this:
Now ...and very carefully so nothing pulls out, push that threaded right-side needle a little deeper into your pincushion:
...and always holding your floss loops against the needle (so nothing loosens or gets all wonky), carefully pull out that left-side (unthreaded) needle.  Now you have only one needle, the right-side threaded needle. See?
(I went and neatened up my fingernails as soon as I got finished here ...)
 
OK.  Finish the drizzle by pushing the right-side needle down through the fabric a little deeper into the pincushion. Remember to slip a pin or needle into the outer two floss loops so they don't twist and kink and knot for you (it's really hard to undo these with only one free hand...). Here's what I always do:
Oh, oops. Don't let these colors confuse you. I stitched this flower twice - you'll see in a minute. On the above picture, the red loops were cast onto the left-side needle. This is just a better picture, trying to show you about the pin through the two outer loops to prevent kinks and knots. On the earlier photo, the blue loops were on the left-side needle.  OK?  I guess I'd better show you:
As an interesting side note, the Braided Lace technique is a "reversible" stitch. I'll talk more about that in a minute. First, let's finish the drizzle.
 
          Pull the drizzle down snug to the fabric and the needle all the way through to the backside.
          Slip one of the strands of Lola out of the needle eye (you can use this long floss tail to knot off by hand later if you want).
 
With the one remaining threaded needle, come back up through the fabric at the base of the drizzle, or right next to where you started. Pull this threaded needle all the way through. With the tip of this threaded needle, guide the outer drizzle loop/edge/center braid of the drizzle to around in a circle to meet the beginning to the end and pull down snug. You'll have what looks like a circular flower with the blue loops forming the flower 'petals' (red loops in the flower pictured just below).
Finishing:
And done:
By the way, if you don't like your "joins", you can tuck them beneath another flower, or you can use any green, come up from the center and make 2-3 long bullions or cast-on stitches to give an impression of calyxes.
 
As a "technical" note, when you are using Z-twist floss and double cast-ing on, you'll notice the right-side loops "untwist" slightly, or flatten out (the reason why Z-twist bullions are wrapped clockwise).  [Perle Cotton is S-twist, by the way, and for those who do not have access to Z-twist floss, just reverse the procedure.] 
          I pretty much speak in "Z-twist". When these right-side loops 'flatten out', you'll see that they sort of tuck into each other and make a nice, smooth center for your flower.
That's it:  Braided Lace!
     
Braided Lace looks different on one side than the other. When I cast on with the blue loops on the left needle, these will make 'petals'. If I cast red loops over the left needle, I'll have red 'petals'. As I mentioned earlier, this stitch is reversible and you can flip the drizzle so the 'petals' will tuck under, or you can position the drizzle so that the 'petals' pop up.
Pretty both ways! See:
At the top of this post, you'll see that Bertha, Becky and Bubbles are kicking up their skirts and enjoying themselves. 
 
If you prefer the more demure LadyFlower "Garnet", let those left-side loops rest against the fabric, or even tuck them under with your needle. The picture below introduces you to the LadyFlowers, "Amber, Opal and Garnet":
I have lots of more advanced techniques in my book, My LadyFlowers, if you have already learned the basic Brazilian embroidery stitches and are feeling adventurous.
 
Always remember, too, that if you are trying to follow my instructions and something different comes out of your needle, just give it a name and continue - you have created a new design! 
 
Be sure to drop me a note, either in the comments below or by email, if you have any questions at all. I really LOVE Brazilian dimensional embroidery. Can you tell?
Rosalie
 

Saturday, March 16, 2013

Brazilian Dimensional Embroidery and The Balance of Nature

I have SO much stuff in my camera, but have been busy, or I'd be writing more bloggy things. At the moment, I discovered this little hooty owl among my Millefiori Brazilian dimensional embroidery designs. Many of you have probably already met this guy?  "WHooo?"
Friendly, isn't he? Not. Of course, it could be a good case of indigestion.

“The Balance of Nature” (Millefiori design #959 - available for stitching if you are feeling "sociable") is about the food chain as it relates to Brazilian embroidery and was inspired by the children’s rhyme, “There Was An Old Woman Who Swallowed A Fly…” 

The magnificent owl, a bird of the night and a bird of prey, is associated with wisdom. Our owl is wise enough to capture some interesting creatures and flowers in Brazilian embroidery along with his lunch and its lunch and its lunch, etc.

Innards include another kitty cat, a bird and a mouse that already has an “x” on its eye, plus sunflowers, monarda, asclepias and zinnia. The owl’s perch is a realistic log resting on a bed of ferns.
 
Framing the owl  is a nicely plump and well-fed kitty cat which can be embroidered or a pattern used for transfer to a wooden plaque (included with the fabric print and instructions). I bought my wooden plaque at JoAnn Stores and painted it with acrylic enamel paint (I found a really pretty copper color). I think I used my black Sharpie pen to do some of the outlining. Then I used my MS Word program and printed the title onto paper, glued it to balsa wood and found a nice fat needle to poke into the side of the design. See?
The "tummy" part of this design - the owl and its dinner 'fixins'" are printed on fabric. I used some interesting stitches, some fairly simple.
 
The little sunflowers are my favorite, though, and I've used them elsewhere. They start with a drizzle (double) with a long bullion that fits around the outside of the drizzle, and next I worked a row of detached buttonhole stitches through the drizzle loops and around the bullion (for support).
 
You'll also see that I added my Ridged Blanket Stitch fern to this design. I've written about it previously on this blog.
 I have instructions for the sunflower (I give it a different name depending on where I use it...) in my book My LadyFlowers by Rosalie Wakefield. Here's a better picture:
Sorry about the blur. Maybe I will re-shoot some of these pictures.
 
Anyway, since it's springtime (almost), the idea of birds comes to mind. (I'm keeping my cats away from owls, though!) As you can see, Cuthbert and Emmy could care less.
Rosalie

Friday, January 25, 2013

My "American Beauty Rose" in Brazilian Dimensional Embroidery

This is the American Beauty Rose: Brazilian dimensional embroidery stitched with 100% rayon Z-twist floss from EdMar Co. It's my original Millefiori design #965.

I'm sharing it today because it's a variation of the traditional bullion rose that has been around forever -- the same Bossa Nova Rose that I stitched the other day. (By the way, that flower might have looked nicer on its bed of leaves if I'd added another round of bullions and made it a bit larger!)

Here is a close-up photo of my American Beauty Rose:
You can see that, where the traditional bullion rose's bullion stitches start OUTSIDE the previous bullions, for this rose, I started each bullion INSIDE the previous one and put a bit more space between.

Well, of course, it needed "background". So, for each petal (the flat "petals" on the fabric), I worked a batch of long-and-short buttonhole stitches over bullion padding at the edges. This is the Raised Buttonhole Stitch I've written about previously where the loops of the buttonhole stitches are raised slightly to rest on top of the underlying bullion.  Here's a diagram:
 

And here's a picture, sort of . . .
If you hold the embroidery at eye level, you'll see the petals are slightly above the fabric. I use this technique quite often, so if you have any of my books (me = Rosalie Wakefield), shown here on my website, you'll be able to read about this handy-dandy dimensional technique in more detail. 

By the way, that pretty little purple flower is something I named a "Punctuation Plant" after a combination bullion/cast-on stitch called "The Comma." Here's another picture:
So, just remember, all of these original B.E. flowers, such as the bullion or Bossa Nova rose, can be played with, moved around, experimented with, until you see what you can discover that's a bit different. It's called playing with your floss, and in Brazilian dimensional embroidery it's known as having fun -- and that's exactly what we do!
Rosalie


Sunday, October 21, 2012

Brazilian Embroidery - Stitch Techniques That Work for Me

I have decided to start with my finished flower/motif. Today I'm going to write about some Brazilian dimensional embroidery stitch techniques that work for me. Each stitcher has their own best way of working with the floss and stitches and different teachers will have different ways of showing others. My suggestion is to learn from all and then do what works best for you.
Most stitchers who are familiar with my Millefiori designs know that I like to make really long bullions, cast-on and other dimensional stitches (For sure, there is a reason why Brazilian embroidery is also called "dimensional"!). I also work with a hoop or frame (1" wooden stretcher bars) so my fabric doesn't "bend" like it will for those who do not use a hoop.

For this design (one of my new projects for BDEIG Seminar 2013), I've also backed the embroidery with Thermolam-type batting (Don't use cotton; it will shrink unless you pre-wash it!) because it will be suitable for an art quilt or cushion/pillow. I usually use a backing fabric to keep floss tails from shadowing through.

So you can see from the picture above that I'm getting ready to make a long bullion. I bring my needle up from the fabric, leaving just the eye of the needle anchored, and I can begin wrapping or cast-ing on (easily).
Sometimes my bullions are fat back there at the start of the wraps. When that happens, just slip the needle under the bullion's "tummy" and tickle by bringing the needle in one direction, toward you, one or two times (on the picture above) .  This will even out your wraps.
      By the way, if you somehow make your wraps so tight that they are gasping for breath -- way too narrow on one end -- just take your thumb and pointy finger and roll the bullion wraps back and forth a few times to loosen them.
After a few bullions, you'll notice that the floss from the needle will twist after lots of wraps.
To get rid of those twisties -- and save yourself ALL kinds of grief, and time, working with the floss -- simply turn your work over and pull ALL of the floss through that eye of the needle that was anchored in the fabric, and then back it out again to a 3-4" floss tail. You'll find it's very easy now to settle your bullion in place.
     The bullion may also be too fat. This is a good time to work with it. I usually lift it (right side of fabric again), pull the core thread, lift it again, pull again, and settle it in place when the bullion diameter is even all along its length. Easy as pie. Give it a try!
Sometimes you'll have trouble pulling the threaded needle through the bullion. If you've moistened the end of your floss, it doesn't like to cooperate. If you have raveled floss (see that picture above), you can also have problems. Simply take your scissors and snip off those raveled ends and continue on your merry way.
Well, now! Doesn't that just look like a plate of cooked spaghetti? Dimensional stitches (anything more than a faction of an inch above the fabric) can position themselves this way and that. Especially on wearable items, after laundering, you might find your finished flower looks like it's REALLY been through the wash.
     You'll have happy cooperation by any circular flowers you make with dimensional stitches if you try something that I thought up ages ago (and have written and illustrated in my books, first Take A Stitch by Rosalie Wakefield, and almost everywhere else). It's a technique I call "Wrap 'n Gather".


Bring your threaded needle up from the fabric near the center of the flower. Weave the floss around the center 2-3 times.
Pull snug, gathering those dimensional stitches and getting them to stand at attention. Then just go down and out. Best (and easiest) thing ever!!

OK. I've still got stuff to share (maybe if I posted more often, I could keep these messages short).
Now I'm going to talk about cast-on stitches for a while. When we make Lola bullions, we like to have them snugged down to the diameter of 2-3 strands of Lola floss. It's a little different with cast-on stitches. I think (personally) the beauty of these stitches is to have the loops showing, not pulled tight to the needle.
      Off the subject for just a sentence or two -- some stitchers cast-on with two hands. I first learned to cast-on with my left hand only. There actually is a front and back to cast-on stitches (same as for bullions; and the floss unwinds for the two-handed cast-on -- or the second part of the alternating cast-on - tatting stitch when you are using Z-twist floss).

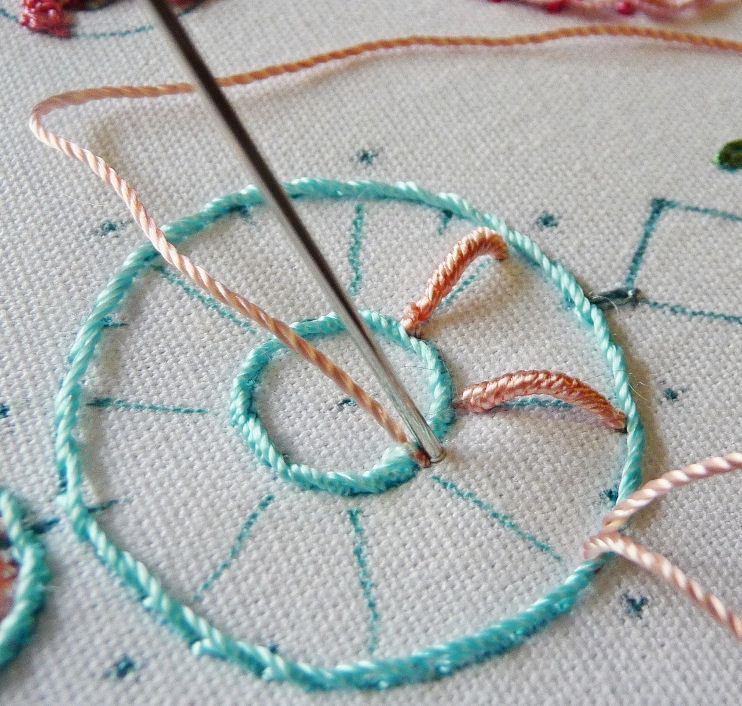
To continue with the discussion about the picture above -- I'm planning to make one cast-on on each side of the bullion so that the bullion will look like a flower petal's center vein.  The a-b-c-d Needle Path will be in a straight line to make the petal stand up, and the b-c points will be a couple of threads away from the a-d points. That's why you see the needle coming up between the blue and coral floss in that photo. I'm going to lay this cast-on stitch AWAY from the bullion center vein:
To do that, I place the floss behind the needle. Again, I'll hold those loops in place on the needle before going down and out at Point "D". I'm also being sure that I've pulled all floss through the needle eye and then backed it out. This way I'll have nicely untwisted floss and no kinks at the "d" end when I settle the stitch in place.
 See how nicely it works!
I wrote about this earlier, but see how I can space the "width" of my cast-on stitch by coming up between the blue and coral stitches. Point "c" will be just to the right of those coral "wrap 'n gather" stitches.
Sometimes we are almost finished with our flower and suddenly find a bullion or cast-on we've just made that is all wonky. Well, you can UNDO a cast-on or bullion very easily like this:
Go back to Point "C" in your Needle Path. This is the last place where the floss came UP from the fabric. Slip the eye of your needle into that spot and jiggle it a bit to loosen the floss.
To UN-DO a bullion or cast-on stitch,
pull the floss OUT
from the last place where the needle came UP.

I made it bold because it's one of the best tips ever!
I learned it from Virginia Chapman of Floss Flower Plus (see below).

Now I'd like to share a tip about knotting off that I  also learned from Virginia Chapman of Floss Flowers Plus. (Her book, Floss Flowers Book 1 should be in every B.E. stitcher's library, in my opinion.) Virginia is a master of technique and is always willing to help if anyone has questions.

Here's a picture:

To finish -- a note about color. These aren't my favorite colors, but with 200 colors of EdMar's rayon floss to choose from - solid, shaded, variegated and over-dyed, we have lots of choices. For this design I tried colors I don't ordinarily use. I'm still deciding if I like them, but most colors go together anyway.  I have decided to call it "Being Adventurous"!

As I wrote earlier, every B.E. instructor and many stitchers have their own best ways of working with the floss and stitches of Brazilian dimensional embroidery. We can all learn something from each of the rest of us, and then do what we want anyway. It's called Being Creative.
Rosalie