Showing posts with label Fabric Postcard. Show all posts

Monday, April 8, 2013

Fabric Postcards, Litty Bitty Art Quilts, Brazilian Dimensional Embroidery

Our Chinese Pear Tree -- the one that had only 3-4 Pear/Apples last year.
And now, I have decided to entertain you. But first, a story. When I was a little girl in Nebraska, my dad took pictures all the time, every thing possible. I actually have step-by-step slides of the construction of Gavins Point Dam on the Missouri River because that's where we went every Sunday after mass. And I have pictures of the mountains in Montana's Glacier National Park that my dad shot -- from every angle, stopping the car every few miles while we were on summer vacation.

And when we ever had company, my dad pulled out the slide projector and the company and my mother, brother, sister and I all sat in our little farmhouse kitchen on kitchen chairs and watched my dad's slide shows on the refrigerator door ("The best screen in the house," he always said).

And we didn't dare to leave. It wasn't like you had a "delete" key on a blog back in The Olden Days. It would have been impolite to go and play with our toys when we had company.  So, now, when I entertain you with my embroidery, my flowers and my cats, you actually do have the option of hitting your "delete" key. But until you do, here are some pictures of some fun I've been having.

Fabric Postcards.
Fabric Postcards are like little pieces of art, little crazy quilts, tiny art quilts, and a lovely way to go through one's stash and find all the things you forgot you had.

Remember my Rosey Posey from a previous blog post? Here's a picture. I taught this flower recently to stitchers from our BDEIG-WOW Chapter Class. By the way, if you would like to learn more about B.E. in your area, click on that BDEIG link above. We have chapters everywhere and they are usually stitching something interesting, often something new. The best thing about stitching chapters is that everyone shares a like interest.

I teach my individual flowers on small pieces of fabric which can be later assembled into a quilt, a crazy quilt, a tote, wearable item, fabric journal other cover -- anything you can think of. I had a sample of the Rosey Posey left (I'll bet you thought I'd never get to the good stuff!):
I thought it might be fun to make fabric postcards, which are really only tiny crazy quilts (or whatever you want them to be), so I did a little online research about fabric postcards. The Internet is a wonderful source of visual inspiration for anything you want to do, and a lot of blogs are filled with step-by-step written or photo tutorials. Here's one you might want to flag (click the blue link). Most blogs also give you the option of following them by email. You can also Google Janet Wickell at about.com for several pages of excellent quilted fabric postcard tutorials.  Here's another. So I decided to give it a try, too!
By the way, you can purchase the printed postcard backing fabric, or just make your own with a bit of muslin and a Micron Pigma Pen, or even set them up to 'fabric print' on your ink jet printer with just some freezer paper and fabric.  Yes, I've heard that the post office even takes them -- probably admiring them at each stop along the way!

Here's a better picture:
By the way, when I took this finished postcard to show my needlework-impaired hubby, he admired the butterfly. --The PLASTIC butterfly! Aaargh! Not my beautiful, original, awesome, amazing, wonderful, unique Brazilian embroidered Rosey Posey.  The plastic BUTTERFLY!! I think he also didn't understand the concept of "fabric scraps" [his words] so I gave him a speedy tute. 
          But he DID say complimentary things, so he will have a nice dinner this evening.

Here are more detail photos:
These are just a few beads from my bead soup and I attached them with gold seed beads to accent the gold threads in the fabric.
The little frog is a plastic button and I added some straight stitch grass with Iris floss. The purple silk cord just above was fastened with zig zag stitch on my sewing machine (I constructed a lot of this on my sewing machine, although I see often see fabric postcards edged with blanket stitch by hand.) If you scroll back up, you'll see that above this satin cord, I used two colors of rick rack and tacked the lighter color with a size 11/o cut bead (do I like sparkle or what?).

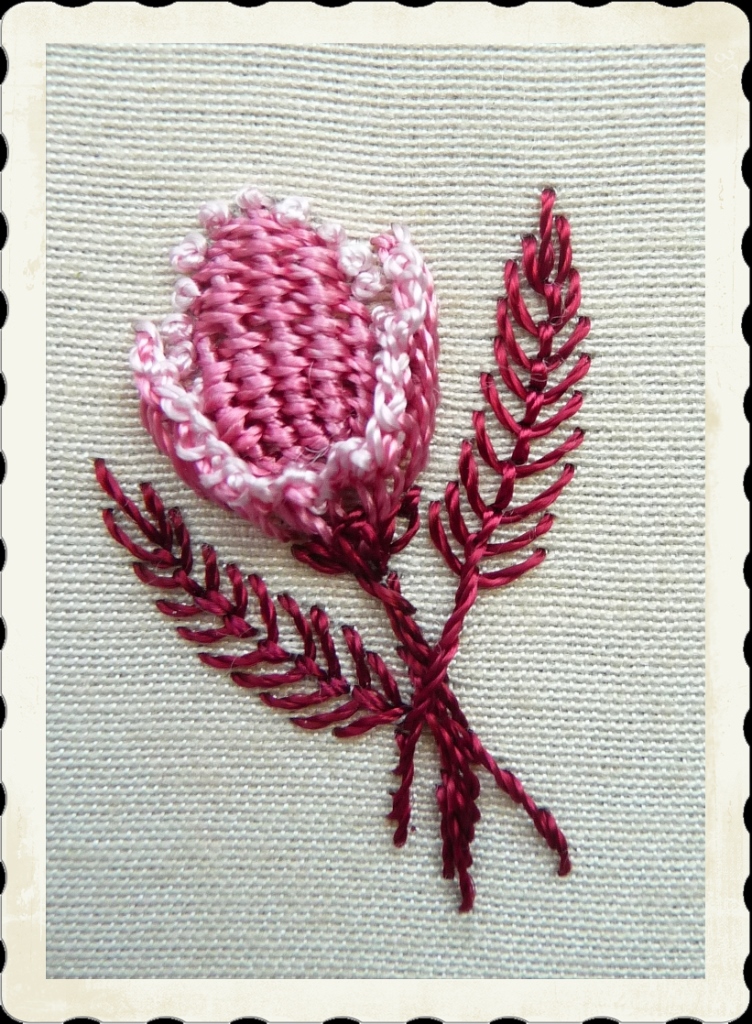
This is my newest Millefiori Brazilian dimensional embroidery floral design, which I have named "Heirloom Tulip", and I'll be teaching it this month at our local B.E. Chapter meeting:
This little tulip features needle weaving, blanket stitched side petals edged with a one-loop running cast-on stitch (looks like a knot, but it's not), and long-tailed fly stitch leaves. 
       Well, since I was in a fabric postcard frame of mind, I decided to have fun with this design, too:
Since I was "crazy quilting" two cards at the same time, I tried to make each look different. I'm not sure if it worked, but I sure had fun! Here's a better picture:
The flower is edged with some pretty dark red ribbon that had gold threads, and I tacked the corner with gold beads. I used the one-loop running cast-on stitch to edge the little flower fairy picture, and I changed to 5-loop 'blanket stitch' cast-ons for the other side.

I found that tulip fabric in my 'collection' - it was a drapery fabric sample, I think, but I liked the idea of two different kinds of tulip on one postcard. Here's a closer shot:
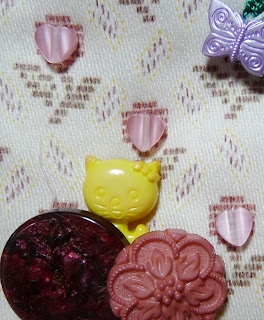
I stitched those tiny heart-shaped beads where the tulip flower is. The little purple butterfly is a plastic button, as is the little yellow kitten (I used the splash of yellow because I also had yellow with the flower fairy.), and the buttons are just odd buttons that were sitting in my button box winking and grinning at me, saying "Take me!  Take me!"
This is the little flower fairy, rescued from some fabric yardage, and embellished with Iris pink lazy daisy stitches, a loop of size 14/o pale yellow beads for the wings, some opaque size 11/o yellow beads for the flower center, and blue size 14/o beads for her eyes.
The fabric in the upper corner is embellished with beads. I found the fringe beads left over from another project, so divided them up (different lengths) and attached them through the holes in the buttons.

This was just the best time ever, and I hope these notes have inspired you to also try other things with your embroidered samples.

By the way, don't forget to pull out your Micron Pigma pen and sign and date your project. These are, after all, tiny works of art!

Rosalie


Monday, December 3, 2012

Christmas Tree - Stitch This Brazilian Dimensional Embroidery Design

OK, the concept of hanging a Christmas tree ornament on a Christmas tree seems redundant, but I had this idea . . .
You can stitch this speedy little design faster than you can go into the forest with your trusty axe and hew down your own tree. Any thread will do: rayon floss for Brazilian dimensional embroidery (I used Boucle), Candlelight, Rainbow Gallery, silk ribbon or any other fiber. You can make an ornament, greeting card, fabric postcard or even stitch this Millefiori design on your holiday vest or sweater. 

This tree is made with a row of lazy daisy stitches, each slightly longer than the one before, and is finished with a row of backstitches for a center trunk and to hold the lazy daisy stitches in place.

I call it "Li'l Christmas Tree" and would like you to share it with your stitching friends. Just let them know where you found it. If you like, drop me a note to let me know what you think. I even have a pattern here for a Christmas Tree, Lot.
There are lots of pictures, so let's get started.

You'll need a ruler and a pencil (so few lines, there's nothing to wash out). And some fabric, some thread and some beads.
Step 1.  Make a vertical line, 1 1/2" long
Step 2.  Make a horizontal line, 1" wide, about 1/4" up from the bottom.
Step 3.  Lightly draw dotted lines from the tip of the tree to the Step 2 line.
 The first tree shown at left in the top photo is made with Boucle. I used #214, which is a dark forest green.
You can use a darner or the #18 chenille needle (the large one that comes in the pack of silk ribbon embroidery needles), or you can use the #15 milliners needle, which is my favorite for working with Boucle.
Now we're ready to stitch:
Start at the tip of the tree and make a horizontal lazy daisy stitch, just under 1/4" long. Continue to the lower horizontal 1" line, making the lowest lazy daisy stitch 1" long.  That's it! You're done with this part.
Next, I doubled a strand of Glory #214 into my #5 milliners needle. Starting at the base of the tree, I worked a row of backstitch from bottom to tip.
I had enough left over to add a little star bead at the top.
Then I stitched some #11 seed beads here and there along the tree. Here's the finished Li'l Christmas Tree made with Boucle:
I used bullions and a cast-on stitch to make the little tree stand. For one of the other trees, I used satin stitch.

Remember that I mentioned you need only one row of lazy daisy stitches if you are working with Boucle? Even though I didn't do it for this "prototype", I'd make one stitch in one direction, the next in the opposite direction. Like this:
In the photo above where I'm showing the back-stitched center tree trunk, I used green Candlelight fiber. You'll see that the lazy daisy stitches go each way, one east to west, the next west to east.

I stitched this tree on red fabric using white Candlelight:
The base of the tree is made with a row of stem stitch and I added a detached buttonhole stitch in each. I made one row of detached buttonhole stitches "up", and a second row "down".  The star at the top is a stitch I developed which I call "Star-Fill". I think I posted it earlier, but to save you searching, here it is again:
 
I used Gold thread (DMC on spools, from the craft section at JoAnn stores - but any will work). Star-Fill is like the five-point stars we drew in grade school.  Just follow the numbers of the Needle Path through the fabric (oops, some of the numbers are missing!) Start at the lower left. With your needle, you'll follow the star path two times to get all of the lines on the fabric. To finish, just whipstitch 2-3 times around the center and add a bead or a French knot to end.

Here's a picture of a collage card I made with the white-Candlelight-on-red-fabric embroidery:
When I do this kind of "adventurous stitching", I wander around the house looking through crazy quilt trims, fabric bits, ribbons, beads, for upcycling ideas.
Since we are into the holiday season, you can often find earrings that you can un-do and stick to your design with either glue (my favorite is Fabric-Tac, also from JoAnn's) or needle and thread.
I added these charms to the Li'l Christmas Tree I stitched with green candlelight, and I used purple seed beads to "garland" the tree:
Oh. Before I forget, here's an idea for finishing your ornament. I cut two circles from 1/4" foam core board (if I do this again, I'm going to look for wooden shapes at Michaels Craft Store). Cutting foam core board into even circles with a razor blade is a real challenge!  But I wrapped the fabric around, pinned it into place. Then I glued the second piece on (you'd want to tuck a hanging ribbon between the layers first), and pinned the trim around the edge.
You can see how easy these are to make, and you are limited only by your imagination - and your time.

Speaking of time... If you had SO much fun stitching your Li'l Christmas Tree, how would you like to make a Christmas Tree LOT?  Here's a pattern. Just remember the larger trees use that 1-1/2" center line. You can make the other trees smaller. And if you check your buttons, beads or old holiday earrings, you might find some little critters or Christmas presents to tuck in at the base of the trees. 
Have fun! Happy Holidays to all.
Rosalie
 

Monday, February 7, 2011

A Valentine for You - Crayons and Pansies and Brazilian Dimensional Embroidery

Pansies, a traditional favorite with Brazilian dimensional embroidery artists, take on a brand new look with this vintage Millefiori Valentine's Day design (meaning I designed and stitched it a long, long time ago -- enough to make me a "vintage stitcher").
I'm pretty sure I still have the Millefiori pattern and instructions available for this design, but I'll tell you what I did and you can try it yourself if you like.
       First, I found a pretty picture of some pansies - it might have been from a greeting card. Then I went in search of my fabric crayons. And I needed tracing paper.
I colored the pansies onto the tracing paper, using a light touch for pastel areas. (When you iron fabric crayon tracings onto fabric, they will always transfer "brighter". Keep in mind that they will also give a "reverse" image.) Next, I ironed the colored pattern onto a simple pansy design that was already screen printed onto my cream poplin fabric.

As you can see from the embroidery, these simple pansies are stitched with cast-on stitches plus an added row of detached buttonhole stitches in each cast-on loop. Pansies always have a yellow center and you can add a bead (a pretty little yellow heart-shaped bead would be nice!) or a French or colonial knot.

     This is also a nice way to "dress up" your Brazilian embroidery designs!

If you'd like to make one for your own personal use, you have my permission to copy/paste that image above onto paper and transfer it to fabric.

I think this design would also make a really pretty little fabric postcard. Incidentally, fabric postcards make excellent substitute doodle cloths for our experimental stitches -- and floss tails. This is my floss tail collection:

It started out as a jar of animal crackers.  I re-purposed or up-purposed it (I'm not sure what the difference is. It's recycled.) 
       OK, you can stop laughing now!  I've been stitching for a LONG time ...and you can see that I don't throw things away very often, so I have a LOT of floss. I thought about using the floss tails sandwiched between two layers of water soluble Solvy and machine stitching over to make "fabric" -- might even do that one of these days.  In the meantime, I have found other uses for my rayon floss leftovers. This little project started out as a tomato pincushion...
The hat is "freeform" Brazilian embroidery. I drew a line around the middle of the pincushion and started attaching floss tails, just made a square knot to anchor them. The little plastic sunglasses are leftovers from somewhere or other. The tomato is upended (stem side down) and rests on a crystal goblet.

     Can you tell that I have a lot of fun playing with my floss?

Friday, December 10, 2010

Ornaments

Basic B.E. stitches may be found in most Brazilian embroidery books in print, or you can visit the BDEIG Website for step-by-step instructions, diagrams and photos.

To practice some of these stitches and make a small framed oval ornament or a fabric postcard, just draw a circle slightly smaller than 1" for each ornament. Make bullions or cast-on stitches with more wraps or loops than the length of the fabric bite. This will cause the stitch to curve slightly. Add sparkle with metallic threads, beads, or stitch some silk ribbon flowers on your ornament.


You can add evergreens by drawing curved lines and overlaying them with straight stitches. Start with a heavier floss like Nova first. Add straight stitches with Lola next, and then add a layer of Glory straight stitches. Or you can substitute this last layer with a metallic thread. (I like to use Sulky sewing threads because they are durable, but there are lots of choices.)

If you would like more ideas for Christmas ornaments (and approximately 93 other B.E. stitching projects), take a look at the Education Projects Book available from the Guild's Boutique page on the website. It is a wonderful idea for a Christmas (or other) gift for a stitching friend. Here's a picture of just the cover, with no clue to the wondrous treats inside:


You can order your copy by clicking on the link above. I'm including the pattern and tutorial for the ornaments here since it is my own copyrighted design.

Here's the mini-tut:

Lola or Ciré: Outline stitch all ornaments. At base of ornaments add 3 or 4, 4-wrap Brazilian lazy daisy (LZ DZ) stitches. Stitch the ornament cord with outline stitch and Lola, Ciré or metallic thread.


Top Ornament:
-- Place beads at dots.
-- Add 4 colonial or French knots around, at the 2, 4, 8 and 10pm positions.
-- Accent with fly stitch, LZ DZ and/or bugle beads.


Center Ornament:
(Note: I like to use two strands of floss when I make double cast-on stitches. Thread both strands into a needle and knot one end of each floss strand separately. You’ll have two loose floss tails at the other end, and this will prevent the kinking and twisting that the floss sometimes likes to do.)


-- All stitches are placed vertically. From center top to center bottom, place a twisted double cast-on stitch. Cast one loop on with your left hand and then one loop with your right hand. Do this 12 times. (12 pair of cast-on loops)

--Twist the stitch as follows: Before going down and out, slip needle beneath the double cast-on 2-3 times and tug. The stitch will twist. Finish the double cast-on by passing needle down through fabric, and out.
-- Starting at left side and, working from left to center, make:
             15-wrap bullion – 18-loop cast-on – 24-wrap bullion
-- Repeat these 3 stitches on right side of twisted double cast-on, reversing stitch counts.


Bottom Ornament:
-- Place a 20-wrap bullion horizontally across the center of the ornament. Above and below, make two rows of running cast-on stitches (not anchored, but continuous). Cast on 8 loops for each stitch. There are 3 cast-on stitches next to the center and 2 cast-on stitches above and below.
-- Optional: add beads at center of each cast-on stitch.


This is just a sample of the goodies in the BDEIG Education Projects book. And, you know, there's absolutely nothing wrong with making a Christmas (or other) gift to yourself!


Seasons Greetings!

By the way, if you have questions about any of the stitches or techniques I write about, leave a note in the comments section and I'll write more.