Sunday, November 18, 2012

Exhaustion Has Set In

Not me.  The cat ... the cat.

Cuthbert is exhausted. . .
after watching me stitch Brazilian dimensional embroidery seminar class proposals for the past month or so. 

And yes, I DO have a lifetime supply of 2" tape for easy cat-hair removal.

While I'm on the subject of Brazilian embroidery, I did discover an interesting bit of information. I threaded up a strand of EdMar's Frost-weight rayon thread into my #3 milliners needle.  We all do that, right?  The smallest needle we can find ...
    Actually, that was not such a good choice. My floss kept fraying and kinking and being generally disagreeable.  So I switched to the #1 milliners needle (the one we usually use for Lola). It made my job soooooo easy. That's a picture of a hosta that I stitched, all in Brazilian outline stitch (floss below the needle when using Z-twist threads for that nice even, rounded line). 

I also find that when I have overlapping petals, you can separate them with the shadow line of darker floss, or you can leave the thickness of a needle's worth of space between leaves. These leaves are fairly small, so I opted for the shaded line.
Cuthbert asks, "What's next?" (Oh, yes, he talks to me...)

   I told him I have my new Millefiori designs all stitched and my next project is to update my website. I'll also start sharing my design pictures here as soon as they are all edited and pretty. --and I'll let you know as soon as I have them all ready for you to stitch.
Rosalie


Monday, October 29, 2012

Eeeeek!!! I Have Mice . . .

....and WHERE are those cats when you need them??
It figures.

Here's the mouse:
It's a little blurred because it's so tiny (and I got too close with my camera, eeeek). This little mouse is approximately 1/8" high and about 1/4" long. I stitched the body of the little guy with 2 strands of Glory -- and whenever you stitch with two strands of floss, it's really important to "lay" your threads so they will be perfectly parallel. The color I used is Glory #147, a very pale wedgewood blue. I'm not into gray mice. I could have stitched the mouse in pink or baby blue, but this color works well.

So if you want to tuck a little mouse into your embroidery, just draw a little teardrop shape and flatten it out on the bottom. There's a little red pile of floss over there on the right; we'll talk about that in a minute.

Double your Glory floss in a #5 milliners needle and fill his little body with horizontal satin stitches.  (If I wanted a mouse with a bigger bun, I might have added extra vertical stitches or a bullion at the parking end.)

Next, thread up Glory #206 (black). Make a 2-wrap French knot for his nose and a 1-wrap French knot for his little eyeball. You could substitute a size 14/o seed bead if you like your mice to have sparkly eyes.

The tail of the mouse is stitched with very tiny Brazilian outline stitches -- floss held below the line of stitching when using Z-twist floss for that smooth, even line, and remember -- the smaller the stitch the neater the line.

OK. Mouse is done.
       The little red (Glory #009 - shaded tangerine) shape will be a ladybug. Stitch her in the same manner as you did the mouse, but make a 2 or 3-wrap French knot for the nose and for her spots add very tiny (over one strand of floss) seed stitches - itty bitty stitches.
Here they are, both finished. I hope - if you like garden vermin (--oops, er... I meant critters.  CRITTERS.) in your embroidery, pop them in little hidey places. They add interest to your work and people will enjoy them for long enough that they will soon ask, "What IS that?" and when you say, "Brazilian dimensional embroidery," they will be super-excited for you to teach them how to do it.

Here's the finished mouse and ladybug, not quite the same scale, but the mouse is a VERY little mouse. (And remember, they do NOT have to be gray)
I STILL can't get Cuthbert to pay attention. Some mouser HE is....
This cat has NO guilt.

      Well, I'll bet you would like to see another Brazilian dimensional embroidery design. This is a design called "Meowsers" and will be taught by Mary-E. Crichton and Gayl Ratigan at our 2013 BDEIG Seminar next June. This is a great class, especially for anyone who wants to learn the basics of Brazilian embroidery -- including lots of tips and hints and a separate little booklet written by Gayl Ratigan that you won't find anywhere else; it's filled with helpful B.E. information. Be sure to check the BDEIG website often; seminar classes will be featured in the February, 2013 issue of our newsletter, The B.E. Wrap-Up.
I hope you are enjoying these designs and the information is helpful. Write any time if you have questions. Thanks for reading!
Rosalie
 

The Rare Mirrored Finch

Just before I got my camera, this birdie feeder was covered with little finches. One of them ended up eating at the foot of the table.
Others parked up and down along the thistle feeder. The thistle seeds that fall to the ground are a special treat for the little doves that stop by every now and then.
Rosalie


Sunday, October 21, 2012

Brazilian Embroidery - Stitch Techniques That Work for Me

I have decided to start with my finished flower/motif. Today I'm going to write about some Brazilian dimensional embroidery stitch techniques that work for me. Each stitcher has their own best way of working with the floss and stitches and different teachers will have different ways of showing others. My suggestion is to learn from all and then do what works best for you.
Most stitchers who are familiar with my Millefiori designs know that I like to make really long bullions, cast-on and other dimensional stitches (For sure, there is a reason why Brazilian embroidery is also called "dimensional"!). I also work with a hoop or frame (1" wooden stretcher bars) so my fabric doesn't "bend" like it will for those who do not use a hoop.

For this design (one of my new projects for BDEIG Seminar 2013), I've also backed the embroidery with Thermolam-type batting (Don't use cotton; it will shrink unless you pre-wash it!) because it will be suitable for an art quilt or cushion/pillow. I usually use a backing fabric to keep floss tails from shadowing through.

So you can see from the picture above that I'm getting ready to make a long bullion. I bring my needle up from the fabric, leaving just the eye of the needle anchored, and I can begin wrapping or cast-ing on (easily).
Sometimes my bullions are fat back there at the start of the wraps. When that happens, just slip the needle under the bullion's "tummy" and tickle by bringing the needle in one direction, toward you, one or two times (on the picture above) .  This will even out your wraps.
      By the way, if you somehow make your wraps so tight that they are gasping for breath -- way too narrow on one end -- just take your thumb and pointy finger and roll the bullion wraps back and forth a few times to loosen them.
After a few bullions, you'll notice that the floss from the needle will twist after lots of wraps.
To get rid of those twisties -- and save yourself ALL kinds of grief, and time, working with the floss -- simply turn your work over and pull ALL of the floss through that eye of the needle that was anchored in the fabric, and then back it out again to a 3-4" floss tail. You'll find it's very easy now to settle your bullion in place.
     The bullion may also be too fat. This is a good time to work with it. I usually lift it (right side of fabric again), pull the core thread, lift it again, pull again, and settle it in place when the bullion diameter is even all along its length. Easy as pie. Give it a try!
Sometimes you'll have trouble pulling the threaded needle through the bullion. If you've moistened the end of your floss, it doesn't like to cooperate. If you have raveled floss (see that picture above), you can also have problems. Simply take your scissors and snip off those raveled ends and continue on your merry way.
Well, now! Doesn't that just look like a plate of cooked spaghetti? Dimensional stitches (anything more than a faction of an inch above the fabric) can position themselves this way and that. Especially on wearable items, after laundering, you might find your finished flower looks like it's REALLY been through the wash.
     You'll have happy cooperation by any circular flowers you make with dimensional stitches if you try something that I thought up ages ago (and have written and illustrated in my books, first Take A Stitch by Rosalie Wakefield, and almost everywhere else). It's a technique I call "Wrap 'n Gather".


Bring your threaded needle up from the fabric near the center of the flower. Weave the floss around the center 2-3 times.
Pull snug, gathering those dimensional stitches and getting them to stand at attention. Then just go down and out. Best (and easiest) thing ever!!

OK. I've still got stuff to share (maybe if I posted more often, I could keep these messages short).
Now I'm going to talk about cast-on stitches for a while. When we make Lola bullions, we like to have them snugged down to the diameter of 2-3 strands of Lola floss. It's a little different with cast-on stitches. I think (personally) the beauty of these stitches is to have the loops showing, not pulled tight to the needle.
      Off the subject for just a sentence or two -- some stitchers cast-on with two hands. I first learned to cast-on with my left hand only. There actually is a front and back to cast-on stitches (same as for bullions; and the floss unwinds for the two-handed cast-on -- or the second part of the alternating cast-on - tatting stitch when you are using Z-twist floss).

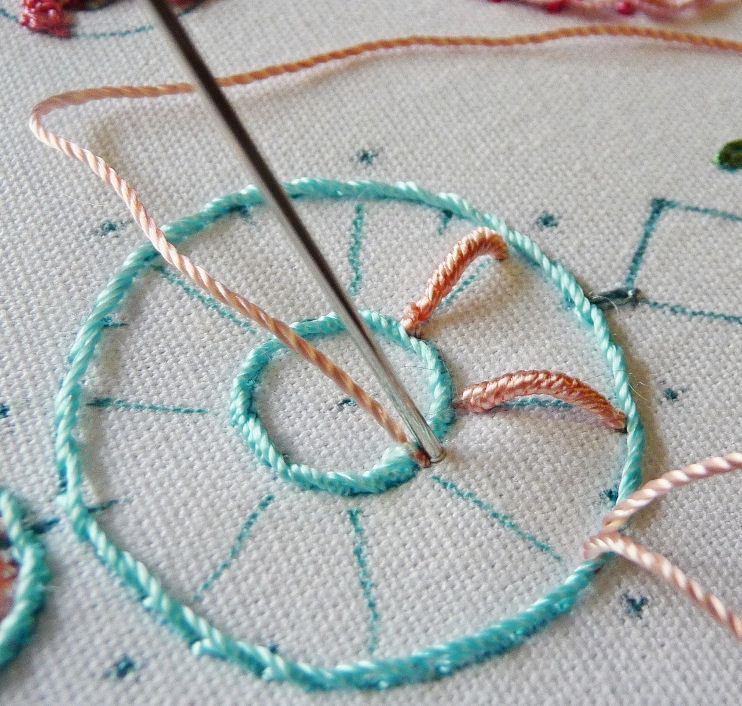
To continue with the discussion about the picture above -- I'm planning to make one cast-on on each side of the bullion so that the bullion will look like a flower petal's center vein.  The a-b-c-d Needle Path will be in a straight line to make the petal stand up, and the b-c points will be a couple of threads away from the a-d points. That's why you see the needle coming up between the blue and coral floss in that photo. I'm going to lay this cast-on stitch AWAY from the bullion center vein:
To do that, I place the floss behind the needle. Again, I'll hold those loops in place on the needle before going down and out at Point "D". I'm also being sure that I've pulled all floss through the needle eye and then backed it out. This way I'll have nicely untwisted floss and no kinks at the "d" end when I settle the stitch in place.
 See how nicely it works!
I wrote about this earlier, but see how I can space the "width" of my cast-on stitch by coming up between the blue and coral stitches. Point "c" will be just to the right of those coral "wrap 'n gather" stitches.
Sometimes we are almost finished with our flower and suddenly find a bullion or cast-on we've just made that is all wonky. Well, you can UNDO a cast-on or bullion very easily like this:
Go back to Point "C" in your Needle Path. This is the last place where the floss came UP from the fabric. Slip the eye of your needle into that spot and jiggle it a bit to loosen the floss.
To UN-DO a bullion or cast-on stitch,
pull the floss OUT
from the last place where the needle came UP.

I made it bold because it's one of the best tips ever!
I learned it from Virginia Chapman of Floss Flower Plus (see below).

Now I'd like to share a tip about knotting off that I  also learned from Virginia Chapman of Floss Flowers Plus. (Her book, Floss Flowers Book 1 should be in every B.E. stitcher's library, in my opinion.) Virginia is a master of technique and is always willing to help if anyone has questions.

Here's a picture:

To finish -- a note about color. These aren't my favorite colors, but with 200 colors of EdMar's rayon floss to choose from - solid, shaded, variegated and over-dyed, we have lots of choices. For this design I tried colors I don't ordinarily use. I'm still deciding if I like them, but most colors go together anyway.  I have decided to call it "Being Adventurous"!

As I wrote earlier, every B.E. instructor and many stitchers have their own best ways of working with the floss and stitches of Brazilian dimensional embroidery. We can all learn something from each of the rest of us, and then do what we want anyway. It's called Being Creative.
Rosalie

Monday, October 1, 2012

Tropical Flower Garden

As many of you know, I sold out of my book "Tropical Flower Garden" this summer. I've had so many requests that I have decided to do a new printing. I'm hoping to have the book available before the end of the year. Thanks, everyone, for your support. I'll post a notice here as soon as it's ready.
Rosalie

Monday, September 24, 2012

New Stitch Technique for Brazilian Dimensional Embroidery. . .and the Cats

It took me most of the afternoon to work out this little stitch (yes, it's very tiny, and yes, I dreamed it last night), and it will be part of one of my BDEIG Seminar 2013 classes next June. I named it Staccato - and there's a reason (if you go to Wikipedia.org and look up the derivation of the name). I guess this is a teaser, because I won't say more until it's actually part of the final design. It is fun, though, and it's easy to do.

Meanwhile, here's another teaser:
Cuthbert.
       He has the "good" spot.  (and I need to buy a can of white spray paint and give that poor chair a makeover...)

Emmy, meanwhile,
has to nap on the cold, hard floor.

Does Cuthbert care?
Maybe. Maybe not.
Rosalie
 

Thursday, September 20, 2012

Teacup of Kitten - Brazilian Dimensional Embroidery for the BDEIG Scholarship Quilt Project

Each year the Brazilian Dimensional Embroidery International Guild, Inc., asks for stitcher volunteers to sign up and complete a quilt block for our Seminar Scholarship Fundraising Project. I wrote about it a couple of days ago, but you can read it again at this link. ALL of the money received from ticket sales goes towards scholarships at our June seminar in Portland, Oregon, and one scholarship will pay for ALL of the week's classes, or registration, or other seminar expenses.
 
For our 2013 seminar theme, "Tea, Thyme and Lavender", we each received fabric with a design area of 6"x6" and the outline of a teacup, along with a color sample of the fabric that would be used to complete the quilt. 
 
 
My teacup is finished. 
The flower on the teacup and the rosebud are both a made with one of my original Millefiori stitches. I named it "Archie" -- it's an accidental drizzle that arches. Latin: Archie R. A. Drizzle. Instructions are in my book Take A Stitch by Rosalie Wakefield. You'll see the book at my Millefiori-BE website. (or you will whenever I stop playing with this blog and finish posting to my website).
    Here's a picture of the book cover:
Those purple flowers in the lower right-hand corner are also made with "Archie". The flower is named "Olde English Rose". Here's a close-up of Archie:
Notice that I enjoy adding beads and sparkly threads to my embroidery. Dimensional embroidery is just that much fun! You can add whatever you want and you can be as creative as you wish.
 
Here's a close-up photo of my Archie Rosebud, just one "Archie" drizzle that zigzags its way back to the fabric and is held in place with a tacking bullion:
 
The picture above is the border and background fabric that one of our Colorado BDEIG chapters has chosen. Everyone - both BDEIG members and anyone else who enjoys beautiful art quilts will have a chance to win this beautiful quilt when it's completed. Visit our BDEIG website often to stay updated, but the final photos will be published in our February 2013 newsletter, The B.E. Wrap-Up.
Rosalie


Sunday, September 16, 2012

Wouldn't You Think . . .

. . . that for as long as I've been doing Brazilian dimensional embroidery, I would know to have enough floss to finish a project?

I must have forgotten. Using Cire 119 to stitch a cute little orange kitten for my BDEIG Scholarship Fundraising Quilt project square, I was just sure two strands would be enough.

No.

And I looked high and low, and the only other dye lot I had made the kitten look like a little raccoon when I added stitches (No, I didn't take a picture - I "deleted" the stitches).

So I regrouped.  In this town we have 3 needlework stores (lots of nice fibers) and a quilt store that carries rayon floss. I made a field trip. And found this pretty thread called "Fuzzy Stuff" and am now stitching a blue-gray (Right! I also didn't have any Cire 146 or 147) kitten.
You can read more about this quilt in yesterday's post. I'll send more pictures in a day or two ... now that the kitten and I are on the same wave length.
Rosalie
 

Friday, September 14, 2012

I Will Now Brazilian Embroider a Teacup

Here's my project.

Each year the Brazilian Dimensional Embroidery International Guild, Inc. (BDEIG) has a fundraising project for scholarships to our annual BDEIG Seminar. You can read more about it here. Our theme for the year 2013 is "Tea, Thyme and Lavender", so our Scholarship Quilt Committee is planning to make a wall hanging. Members sign up to stitch a block.

We can stitch flowers or anything else that we choose. So I went in search of pictures and templates, floss, beads and pen:
I will stitch a flower and the "anything else" will be a cat, tucked comfortably into the teacup. I've done this a time or two before:

This little kitten was inspired and adapted from a graphic I found on the Internet. I stitched the kitten and teacup as part of a gift for one of our guild's outgoing presidents. Several of us stitched our choice of designs. I knew she liked kitties, so that's why a kitten was my contribution.

One of our BDEIG Scholarship Fundraising Projects was the "Critters in a Jar" quilt and so I stitched a similar design with a kitten holding a label:
I like this kitten best and will probably use it. I'm not the best artist when it comes to drawing animals correctly, but if you think about it -- everything is just an oval or a circle or a triangle. When you look at it that way, you can draw almost anything! Cire is great for silky kitten fur and can even be brushed a bit.

Speaking of cats ...
     I wrote to our BDEIG Online Chapter the other day, asking about a remedy for those little finches that keep crashing into our window. You might have read about them here. Several people suggested window stick-ums, but I found another solution. It's temporary, and VERY moveable, but when it's in place the little finches scatter to the four winds:
Yes, it's Cuthbert.
    Not only is the view just like "Television for Cats", it also saves the finches a lot of headaches, concussions, whatever.

Oh, wait.  We were speaking of flowers, somewhere in here. I just happened to wander my Back 40 the other day and found some interesting things in bloom.
This is a hollyhock in my side yard with a bee visiting:
The hollyhocks are so tall that I just pointed my camera UP to get this picture:
The coneflowers are blooming. This year I remembered to tie them up.
And this is the seed pod:
But this is my favorite picture today. It's my polyantha rose named "The Fairy" and each batch of flowers is like an entire bouquet. It's been growing in my Oregon garden for over 30 years. 


Maybe I should go shopping for some NEW roses. But I think I will stitch my teacup first.
Rosalie