I have decided to start with my finished flower/motif. Today I'm going to write about some Brazilian dimensional embroidery stitch techniques that work for me. Each stitcher has their own best way of working with the floss and stitches and different teachers will have different ways of showing others. My suggestion is to learn from all and then do what works best for you.
Most stitchers who are familiar with my Millefiori designs know that I like to make really long bullions, cast-on and other dimensional stitches (For sure, there is a reason why Brazilian embroidery is also called "dimensional"!). I also work with a hoop or frame (1" wooden stretcher bars) so my fabric doesn't "bend" like it will for those who do not use a hoop.
For this design (one of my new projects for BDEIG Seminar 2013), I've also backed the embroidery with Thermolam-type batting (Don't use cotton; it will shrink unless you pre-wash it!) because it will be suitable for an art quilt or cushion/pillow. I usually use a backing fabric to keep floss tails from shadowing through.
So you can see from the picture above that I'm getting ready to make a long bullion. I bring my needle up from the fabric, leaving just the eye of the needle anchored, and I can begin wrapping or cast-ing on (easily).
Sometimes my bullions are fat back there at the start of the wraps. When that happens, just slip the needle under the bullion's "tummy" and tickle by bringing the needle in one direction, toward you, one or two times (on the picture above) . This will even out your wraps.
By the way, if you somehow make your wraps so tight that they are gasping for breath -- way too narrow on one end -- just take your thumb and pointy finger and roll the bullion wraps back and forth a few times to loosen them.
After a few bullions, you'll notice that the floss from the needle will twist after lots of wraps.
To get rid of those twisties -- and save yourself ALL kinds of grief, and time, working with the floss -- simply turn your work over and pull ALL of the floss through that eye of the needle that was anchored in the fabric, and then back it out again to a 3-4" floss tail. You'll find it's very easy now to settle your bullion in place.
The bullion may also be too fat. This is a good time to work with it. I usually lift it (right side of fabric again), pull the core thread, lift it again, pull again, and settle it in place when the bullion diameter is even all along its length. Easy as pie. Give it a try!
Sometimes you'll have trouble pulling the threaded needle through the bullion. If you've moistened the end of your floss, it doesn't like to cooperate. If you have raveled floss (see that picture above), you can also have problems. Simply take your scissors and snip off those raveled ends and continue on your merry way.
Well, now! Doesn't that just look like a plate of cooked spaghetti? Dimensional stitches (anything more than a faction of an inch above the fabric) can position themselves this way and that. Especially on wearable items, after laundering, you might find your finished flower looks like it's REALLY been through the wash.
You'll have happy cooperation by any circular flowers you make with dimensional stitches if you try something that I thought up ages ago (and have written and illustrated in my books, first Take A Stitch by Rosalie Wakefield, and almost everywhere else). It's a technique I call "Wrap 'n Gather".
Bring your threaded needle up from the fabric near the center of the flower. Weave the floss around the center 2-3 times.
Pull snug, gathering those dimensional stitches and getting them to stand at attention. Then just go down and out. Best (and easiest) thing ever!!
OK. I've still got stuff to share (maybe if I posted more often, I could keep these messages short).
Now I'm going to talk about cast-on stitches for a while. When we make Lola bullions, we like to have them snugged down to the diameter of 2-3 strands of Lola floss. It's a little different with cast-on stitches. I think (personally) the beauty of these stitches is to have the loops showing, not pulled tight to the needle.
Off the subject for just a sentence or two -- some stitchers cast-on with two hands. I first learned to cast-on with my left hand only. There actually is a front and back to cast-on stitches (same as for bullions; and the floss unwinds for the two-handed cast-on -- or the second part of the alternating cast-on - tatting stitch when you are using Z-twist floss).
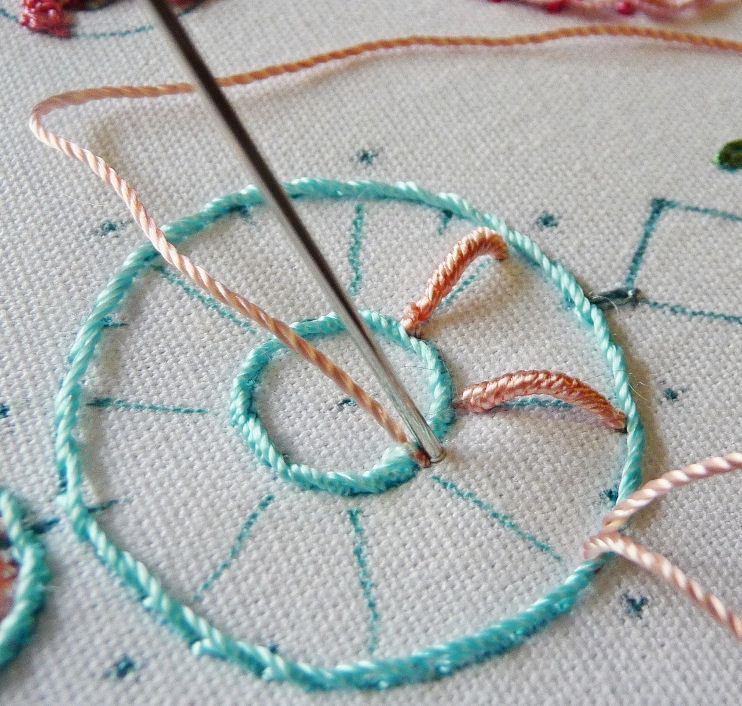
To continue with the discussion about the picture above -- I'm planning to make one cast-on on each side of the bullion so that the bullion will look like a flower petal's center vein. The a-b-c-d Needle Path will be in a straight line to make the petal stand up, and the b-c points will be a couple of threads away from the a-d points. That's why you see the needle coming up between the blue and coral floss in that photo. I'm going to lay this cast-on stitch AWAY from the bullion center vein:
To do that, I place the floss behind the needle. Again, I'll hold those loops in place on the needle before going down and out at Point "D". I'm also being sure that I've pulled all floss through the needle eye and then backed it out. This way I'll have nicely untwisted floss and no kinks at the "d" end when I settle the stitch in place.
See how nicely it works!
I wrote about this earlier, but see how I can space the "width" of my cast-on stitch by coming up between the blue and coral stitches. Point "c" will be just to the right of those coral "wrap 'n gather" stitches.
Sometimes we are almost finished with our flower and suddenly find a bullion or cast-on we've just made that is all wonky. Well, you can UNDO a cast-on or bullion very easily like this:
Go back to Point "C" in your Needle Path. This is the last place where the floss came UP from the fabric. Slip the eye of your needle into that spot and jiggle it a bit to loosen the floss.
To UN-DO a bullion or cast-on stitch,
pull the floss OUT
from the last place where the needle came UP.
I made it bold because it's one of the best tips ever!
I learned it from Virginia Chapman of Floss Flower Plus (see below).
Now I'd like to share a tip about knotting off that I also learned from Virginia Chapman of Floss Flowers Plus. (Her book, Floss Flowers Book 1 should be in every B.E. stitcher's library, in my opinion.) Virginia is a master of technique and is always willing to help if anyone has questions.
Here's a picture:
To finish -- a note about color. These aren't my favorite colors, but with 200 colors of EdMar's rayon floss to choose from - solid, shaded, variegated and over-dyed, we have lots of choices. For this design I tried colors I don't ordinarily use. I'm still deciding if I like them, but most colors go together anyway. I have decided to call it "Being Adventurous"!
As I wrote earlier, every B.E. instructor and many stitchers have their own best ways of working with the floss and stitches of Brazilian dimensional embroidery. We can all learn something from each of the rest of us, and then do what we want anyway. It's called Being Creative.
Rosalie


Olá Xará, estou encantada com este seu tutorial, ainda mais porque é inspiração brasileira.
ReplyDeleteVeja a coincidência, estamos fazendo um caderno de bordados, como mostruário de pontos, e o atual, é sobre mandalas.
As suas dicas são valiosas para nós, obrigada.
Roseli Becker
Thank you, Roseli. I'd love to see more of your mandelas. The one you mention is part of a new Brazilian embroidery design called Wind Chimes and there are more included.
ReplyDeleteDet här broderiet älskar jag!Inte så länge sedan upptäckte jag på en brasiliansk sida och jag tycker det är beundransvärt det ser ut som relief broderi eller spets broderi om man kan kala så. du kan presentera den så bra , blomman är nästan som levande!
ReplyDeleteThanks so much. This will keep me working at Brazilian embroidery which was beginning to frustrate me too much.
ReplyDeleteBELLO TUTORIAL. ME GUSTA QUE COMPARTAN CON LAS MUJERES A NIVEL UNIVERSAL. DIOS LAS BENDIGA POR SU FRATERNIDAD Y COMPAÑERISMO.
ReplyDeleteexcelent
ReplyDeleteHi really its gud wants to know wat type of thread and material u used
ReplyDeletereally awesome
ReplyDeleteits too much helpful
thanks!
Amei!!!Parabéns pelo belissimo trabalho!!!
ReplyDeleteGracias que hermosa tecnica
ReplyDeleteСпасибо :)
ReplyDeleteDoes the embird program allow you to transfer the appliques to the program so that you can manuever the names? I am new to this and the only program I have to the monogram wizard plus.
ReplyDeleteGorgeous stitches and great precision! I have always loved the looks of hand embroidered details, but never had the patience to do it myself. Looking forward to seeing your garments with such a great embellishment.
ReplyDeleteGracias, no sabia como se ejecuta esta hermosa flor,sus explicaciones son muy claras y bien documentadas.
ReplyDeleteIt is absolutely beautiful
ReplyDeletevery good
ReplyDeleteMulțumesc frumos pentru expicația in imagini a acestei frumoase broderii in relief.
ReplyDeletepretty job
ReplyDelete