Brazilian dimensional embroidery - so elegant and so beautiful, and SO creative to stitch! Here are the remaining flowers from The Olden Days ... flowers with new little designs for you to stitch, that I used to create this pretty little art quilt.
By the way, I'm not "A True Quilter" and when I finished this project, I noticed that one of my corners didn't match. Using my own "Mistake Correction Device", I went in search of something to cover my error and found the pretty little lovebirds. I think it was originally a pin. Ripping out isn't really in my vocabulary, often with stitches, too. I just give them a name and tell myself, "I meant to do that."
First, we will back up a bit. Earlier today/yesterday, I posted several flowers with instructions and general directions. But I have more detail - picture tutorials. I'll add those here for those of us who aren't quite to the "turbo stitching" category yet.
You've already found my "Stitch Along" post for Flower #3, The Bossa Nova Rose here.
Flower #5 is the Geron/Lazy Daisy design:
If you follow my notes in the previous post, you'll have an idea of the knotted or wrapped lazy daisy stitch. You'll begin as for a regular lazy daisy, but you will wrap the needle (always clockwise around the needle with Z-twist rayon floss) 4-6 times.
To finish, and after snugging the bullion wraps down to the needle, slip the needle between the bullion and the fabric so the longer right-side thread will tuck beneath the bullion. Then go down and out at the end of those wraps.
You can see how nicely this finishes the lazy daisy. I haven't shown the Brazilian or 2-Step Lazy Daisy here, but it's another option.
Flower #7 is the Peach Blossom
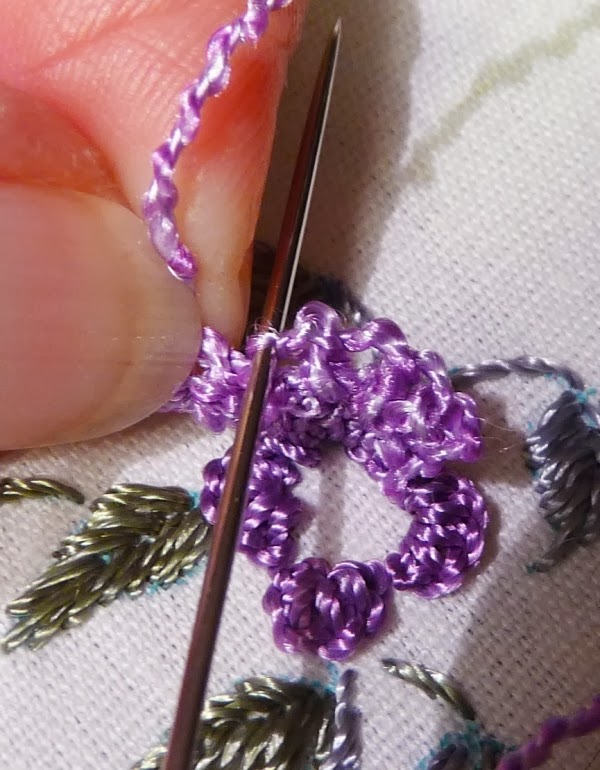
This picture tutorial may help when you work with detached buttonhole stitch. After placing a cast-on stitch on each of the four sides, begin detached buttonhole stitch for the petals, always working in a clockwise (left to right) direction.
Also, if I remembered correctly from the embroidery I did a year ago, I would have told you that I stitched this flower with the nubby Boucle floss (although any weight will work).
The pictures below show how I work Row #2 of the peach blossom petal. Above, I'm at the end of the first detached buttonhole stitch row. Next (below), I'll place the floss behind the needle and start to add a row of stitches counter-clockwise or from right to left, one loop in one loop unless I'm increasing. If I want to increase I'll just make two detached buttonhole stitches in a loop - either at an edge or in the center if you want your petal to be pointy. (To decrease, just skip a detached buttonhole stitch on the row below.)
Now I'm turning around and working clockwise for the next row:
On the picture below, I find it helpful to use my left hand to slightly pull the stitches apart so I can see where to place my needle.
By the way, this might be a good place to write about direction. Most of the original needle lace stiches (where this technique comes from) are made with the needle and petal pointing DOWN and you stitch toward your navel. I've always found it easier to do detached buttonhole with the needle pointing UP ("You'll put your eye out," my mother always said...) or AWAY from myself. It makes it easier for me to hold the petal open with my left hand.
Spelled differently, it would become a warship known as a "NAVAL Destroyer", but that's a whole other blog, not mine. This is the NAVEL I'm writing about:
Back to stitching, when you have finished, your petal will look like this. The more rows you make, the more dimensional your flower. Always try to stitch the last row in a clockwise direction to keep those stitches upright. They tend to fall down behind if you work the last row counter-clockwise.
To continue to the next petal (each worked separately gives more definition to the flower, but you can continue each row around if you like), weave the floss down alongside the petal and then start the adjoining petal back to front through the first loop and then turning around and going through that loop again. OK, I know these pictures don't look quite that way, but doing that will keep your petals separate.
Following the picture tute above might be easier. You can work the petals continuously from one petal to the next, or stitch each one separately. Remember that I begin these petals with a cast-on stitch. Remember to come up behind the first base cast-on stitch, through that first loop, and then immediately turn around and go back through that loop before continuing on to detach buttonhole the next cast-on loop. This gives your petal a nice edge. If you have any questions, please write in the comments below and I'll write even more.
Somebody once said that repetition is the sincerest form of flattery, or a way of being bored to death and ready to immediately stitch something else. You can choose.
Flower #8 is the Rolled Rose design:
Since I snapped pictures as I was stitching, I might as well share those here. If you like, you can just scroll down to the rest of the flowers and skip this part.
This is a detail photo of the Rolled Rose. I enjoy adding cast-on stitches to make the flower look more realistic, but the original flower is all bullions. Just remember to overlap, alternating stitches on each side of the 2 center bullions.
Thank you for your patience. I hope those pictures were helpful.
Here are the remaining flowers from The Olden Days for you to play with. The patterns are drawn to be 2.5" x 2.5":
#9 of 16: Creeping Flower
The Creeping Flower
Some of our early Brazilian embroidery instruction books call this The Creeping Flower, others the Jasmine. Just so I don't have to run after you, waving this blog in my hand because I forgot something, I'll direct you to this earlier post for details of stitching The Creeping Flower.
Greenery. Iris, shaded green
Begin at the tip of any leaf and satin stitch across, changing to Brazilian outline stitch (floss held below the line of stitching) for the stems. I stitched the stamens with the flower color, but if you like try this green for the stamens.
Flowers. Iris, Glory.
Iris. Make 12-wrap bullions just inside the curve on the design with a light color.
Glory. Stamens are the Cast-on Pistil Stitch. Always remember to come up where you want your knot to be when you make this stitch.
Continuing with Glory, make a 15-loop cast-on stitch on the curved design line. If your cast-on stitches give you an argument and the beginning and ending loops want to curl, just tack them down to show them you are the boss of them.
You can finish by tacking the center cast-on, too.
#10 of 16: Cast-on Daisy
The Cast-on Daisy. Yes, it looks like the Bullion Daisy (Pattern #6), and you can substitute stitches at any time or combine -- every other stitch a bullion, and then a cast-on. Let your imagination take you as far as you want (It's a great trip!). Here are some pictures I took when I first stitched the Cast-on Daisy for The Olden Days quilt.
Fine Growth. Glory or metallic thread. Fine growth and field flowers (tiny French knots in clumps along each branch) defined early B.E. designs and added a richness that is left behind as we all focus on stitching the flowers. But fine growth is beautiful. And easy. Make a stitch; tack a stitch; repeat. Sometimes you will tack the stitch twice to add curves. You can use as much or as little as you like, but you will definitely like the finished appearance of your embroidery.
Leaves. Green. To stitch realistic lobed leaves, try them with side-by-side lazy daisy stitches. You can make individual stitches, but for larger leaves (different design?), make a lazy daisy stitch plus a blanket stitch for each "lobe".
Cast-on Daisy. Lola. As for the bullion daisy, we work "North-South-East-West" stitches first and then fill between with one or two additional cast-on stitches. These are 12-loop cast-on stitches, but you can vary the number if you like.
The flower is finished with the "Wrap 'n Gather" technique which is so ideal for wearable items because it prevents needing to re-shape stitches after laundering. Here's a picture:
Side view:
I added the big fat juicy bead in the center after wrapping - this made it stand up a bit more.
Time to take a break and pet the cat. Emmy. She has decided to sleep on my mouse hand while I'm working here. That's OK, I don't mind the distraction.
...continuing:
#11 of 16: April Flower
The April Flower is one of the earliest Brazilian embroidery flowers that we see. It appears on the work of stitchers in Brazil where the rayon floss was first dyed, and many of our early books show this flower in their designs.
Greenery. Iris. Work the leaves with alternating satin stitch. Make the first stitch from the tip of the leaf deep into the center; this will help to taper subsequent stitches for a pretty leaf. Stem stitch the stems - or use outline stitch. Add 3, 15-wrap bullions beneath the flower petals to become the flower calyx.
Flower. Iris, 2 colors. Using the lighter color, satin stitch the flower centers. Notice the different angles for each.
With the darker color, begin the petals with a lazy daisy stitch and continue with closely-stitched buttonhole stitches, some stitches long, some short, to decrease bulk at the flower center. At any point on the flower, if you come to a deep petal cut, you can go down and out to keep the thread from curling over on itself, and come up again right next to this stitch to continue, or start with another lazy daisy stitch.
Stamens are couched straight stitches. I added size 11/o seed beads, but you can use the flower-center color and make a colonial or French knot if you like.
#12 of 16: Ruth's Tole Rose
Ruth's Tole Rose is a lovely padded rosebud from the creative mind of our own Ruth Griffith, one of the most prolific designers for the original JDR. She specialized in elegant pillow designs filled with a glorious variety of flowers. Ruth's Tole Rose and Ruth's Old French Rose are two favorites and often appear on her designs. When you use this flower in any of your embroidery, please credit Ruth. Thanks!
Greenery. Iris. Leaves are alternating satin stitch, some stitches long, some short for a realistic leaf. Satin stitch the stem at an angle.
Fine Growth. Glory. Couch stitches as before for this design's fine growth. Or try feather stitch for a different appearance. Try to always remember that if you have a flower with a stem and are adding fine growth with stems, that you will want those stems to appear on your work. There are several ways of couching - most of them appear in My Book of Stitches by Rosalie Wakefield, and you can try any of those methods if you like. I might, if I remember, write a post about the various forms of fine growth stitches that we can add to our work. (Remind me if you want...)
Field Flowers. Glory, Iris or seed beads. One-wrap French knots make very nice field flowers.
Ruth's Tole Rose. Iris. Pad the wide base of the flower with 2-3 bullions. Another way to pad your flowers is to use cotton embroidery floss, 3-4 strands. You can satin stitch in one direction and then slip the needle under these satin stitches and satin stitch across in the other direction. (This will give you THREE layers of padding, and a really FAT flower!)
Next, satin stitch at an angle to fill the flower bud. Try to 'lay' your threads, or to keep the Iris "unwound" every couple of stitches so it won't look stringy. If the twist matches on all of the stitches, your final look will be very satiny and lovely.
Finish the top of this flower with a 60-wrap bullion, starting at the tip of the bud and curling the bullion around into a question-mark shape. Tack as needed. If you feel adventurous, substitute a cast-on stitch.
At the base of Ruth's Tole Rose, make 5, 9-loop cast-on stitches. Just beneath this row of stitches, add 7, 9-loop cast-on stitches.
Four flowers to go. Oh. Wait. You were wondering what happened to Cuthbert?
That cat has NO appreciation of the finer things. See Mr. Curly Toes:
Here's another of the original B.E. flowers:
#13 of 16: Japanese Violet
Japanese Violet
When I first tried to make bullions, I could never figure out how the beginnings and endings of bullions were so beautiful and there were no kinks. I learned a couple of things.
First of all, there is a wonderful technique developed or discovered by Virginia Chapman of Floss Flowers Plus. It's called "The Sneaky Bite". I use a hoop when I stitch (fewer wrinkles), so when I am making extremely long bullions or cast-on stitches on a tiny fabric bite, this is what I do.
Bring the needle up from the fabric. [a]
Go back into the fabric. [b]
Come back up next to [a], between [a and b], but only the needle point and all of the needle except the eye, which remains on the back of the fabric.
Next, wrap, wrap, wrap (x 40). Pat your bullion wraps down close to the needle. Don't let go of the needle.
Now turn the fabric over where the eye appears. Pull ALL of the floss through the eye of the needle, and then back it out again until you have a 3-4" floss tail.
Turn the fabric back over to the right side. Working with both hands, 'tent' your bullion and pull the floss through, working the entire bullion wraps down to the diameter of about 2-3 floss strands.
Hold the wraps on the needle to settle the bullion in place. If it is still a bit fat, just lift it and re-settle it in in place. You will have a perfect bullion.
Holding those loops (especially) on the needle as you settle the stitch in place will keep them from spinning and kinking and making you do the work all over again.
Ref. Floss Flowers Books 1 and 2 by Virginia Chapman
Flower. Lola, two colors. You will see the design has one five-petal flower and a partial (three petals) flower. On each of the design lines make a 40-wrap bullion. With the second color, and working between each of the Round #1 petals, place a 35-wrap Lola bullion. Add a bead at the flower center, or substitute a French or colonial knot.
Greenery. Iris, green. I thought that bamboo would make interesting greenery for a Japanese violet, so I made separate 8-10 wrap bullions for each part of the stem. The bamboo leaves are a reverse lazy daisy. Bring your needle up some distance away from the stem and offsetting points [a-b] of the stitch, complete the lazy daisy stitch. This will make a realistic narrow bamboo leaf.
#14 of 16: Canada's Rose
This is one of my own original designs - the Canada's Rose, which I named to remember the great time we had with several other Brazilian embroidery designers at a Canadian seminar in 1994. One evening at seminar, Maria Freitas of EdMar brought out a huge pile of floss (she owns the store), and showed us how to make TASSELS. We used wooden candle cups from the craft store and glue/wrapped them with Nova. Then we stirred and mixed our many floss colors and weights until we had beautiful tassels.
On the way home I thought it would be fun to make a flower to fit on the top of the tassel, but without making several fabric bites to do it. So, on a little 1/8" pentagon, I made 5 LONG running cast-on stitches around. That was Row 1, 15-loop cast-on stitches. For Row 2, I slipped the needle through loop #2 and back through loop #1 and made 20-loop cast-on stitches. Continuing around, I had 5 longer loops. Then I added a third row, this one with 25-loop cast-on stitches for each. I ended up with a big flower on a tiny base, and have tried several variations on my Millefiori designs. I hope you will try this one and see what else you can do with the technique. Credit would be nice, too.
So now you know how to make the flower. You can finish with a bead at the flower center.
Greenery. Iris. each of the stitches is a 6 or 8-wrap bullion, angling each beneath the other and at an angle to give the impression of a stem.
#15 of 16: Cast-on Flower
The Cast-on Flower also appears in many of the first Brazilian embroidery books. It is a simple arrangement of cast-on stitches and you'll often see it on many of our designs.
Greenery. Iris, green over-dyed. These leaves are stitched with the buttonhole stitch. (With space between each stitch, it is called a blanket stitch). It's always good to place the floss behind the needle in a clockwise direction for each stitch. (Counter-clockwise will eventually 'unwind' the floss)
It is sometimes difficult to match the angle working from the leaf tip to the base, so you can start on the left side of the leaf, buttonhole stitch to the tip, and go down and out. Next, bring the needle up on the right side of the leaf and stitch by wrapping the needle counterclockwise and working from right to left to the tip of the leaf.
Try to overlap the stitches at the center. If you prefer, add a row of outline stitches for a center leaf vein.
Flower. Lola. Number the five dots on the design, #1-5; make a 24-loop cast-on stitch from #1-#3, the next stitch from #1 - #4, and continue around. The [a-b] points of the stitch are on the outside, and the [c-d] points are just inside to keep the petals in a straight line. Remember, when you come to the last petal, you will want to end it behind the first.
Use a contrasting color Lola and add 5, 3-wrap French knots at the flower center.
#16 of 16: Maria's Iris
Maria's Iris. When I first saw the iris created by Maria Freitas in her Brazilian Embroidery Book 2 (now combined into The Art of Dimensional Embroidery) I was just stunned by her creativity -- especially after so many 'round' flowers. I've done my own version here, but this is really Maria's Iris and if you use it, please give her credit, and see if you can find her original version which she has included in several of her EdMar designs.
Greenery. Iris, green. I used a shaded color floss and positioned the colors to catch the light. This is always a good idea in embroidery or painting. Decide which direction the light is coming from - upper left, upper right, wherever - and position lighter parts of the floss as highlights.
I stitched these parallel-veined leaves with Brazilian outline stitch (floss held below the line of stitching). Stitch the length of the leaf, cutting floss as needed to position your color.
The Iris. Lola, two colors. For each of the lower petals, make 15-loop cast-on stitches with the smooth side of the stitch at the center and the loops on the outside. At the top, the shorter petals are 10, 8, and 10-loop cast-on stitches.
With a second color, make 6-loop cast-on stitches from the flower center into the long petals. Add 3, 6-wrap bullions at the top of the iris.
What? All done? Are you still reading? I hope so. Emmy, however, has bit the dust. She's over there, and has fallen asleep in her Costco box...
Cuthbert, however, woke up and wants to play:
I hope you've enjoyed stitching these flowers from The Olden Days of Brazilian dimensional embroidery.
In my next post, I'm going to share something new ... an easy way to create a favorite B.E. flower, and I might just have you stitch along with me on one of my newest designs.
Rosalie
 So I woke them up:
 Naughty Cuthbert. Poor cute Emmy.
 Guess I'll finish cleaning house now.