Tuesday, December 6, 2016

Cloud Nine, Angels Wings and a Gingerbread House


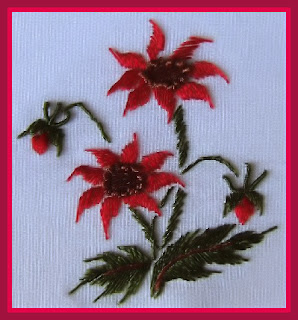
I love the winter holidays and am inspired to create Brazilian dimensional embroidery designs now and then. I'm sharing some of my Millefiori designs with you here. They are all posted on my www.Millefiori-BE.com website if you'd like to read more and/or order a copy.

This is one of my Millefiori holiday Brazilian dimensional embroidery designs.
It is #998 "Cloud Nine", another name for flowering dogwood (Cornus florida), one of the most beautiful native American flowering trees - the state tree of Missouri and Virginia and the state flower of North Carolina and Virginia.
      The border is stitched with my original Interlocking Stem Stitch (if you stitched "Ruth's Gazebo" you may have tried it already), and the flowers with their distinctive dogwood petals are notched with an interesting technique. I never shy away from beads and other sparklies, and you can see that I used matte size 8/o seeds for the little berries.

This design is #838 "Angels Wings" -- stitched with Glory in mostly satin and straight stitch (which is just 'single satin stitch').

The wings are colorful caladiums, and the instructions have several versions of 'angel hair styles' to chose from. These both make lovely ornaments or gifts for friends. I used braid around the frame edge to dress this design up a bit.
Here's the idea for framing these little ornaments:

Then I had an idea to stitch a gingerbread house in all dimensional embroidery. That was fun!  It's a small design and makes a lovely winter tablescape with ornaments and a little candy dish nearby. 
     This is Millefiori design #962 "Gingerbread House".

Charms and beads are fun to substitute. The Gingerbread House is framed with holiday greenery and decorated with only the most delicious candies of the season. As you stitch, you can dream on cotton candy clouds, munch on a minty candy roof or doorknob; you can garden with gumdrops and lollipops or treat yourself to a candy-pink cupcake in a chocolate bullion wrapper, or you can wander a candy almond path in search of old-fashioned Christmas ribbon candy.
(I think I gained 5 pounds just stitching this design).
 
              A marshmallow snowman with cinnamon-stick arms and chocolate chip eyes adds to the sweetness of this BE design. Stitches include criss-cross satin stitch, Brazilian outline stitch, raised buttonhole stitch, knotted buttonhole stitch, Star-Fill, the Barbed Bullion, and a Millefiori stitch named “Stretch.” It’s a real temptation to embellish this design with beads and other sparklies, but no beads are needed – the beautiful rayon floss does the job all by itself!
 
Another holiday design that I stitched long ago is Millefiori design #868 "Winterlight".
This small design was made for a greeting card.
 
By the way, I've found flowers in one of my books, "An Artist's Garden" that can easily be used to make small ornament-style designs, or gifts for friends or family.
 
Everything is posted at my website (www.Millefiori-BE.com) or you can send me a message (on this blog and also at the website) if you have questions. 
 
Thread your needles, and enjoy the holidays!!
Rosalie


Saturday, December 3, 2016

Whew! I Almost Lost You All ....

Just a speedy little note and then I'll be back soon. I almost lost my blog, couldn't post, ruined my whole day not having anyone to chat with. But the tekkies at Blogger helped me, and Google Search added their 2cents.  Now I'm back and will have freebie design for you and hopefully (if I don't click the wrong button again...) a new look.

Friday, August 19, 2016

Wear Your Heart On Your Sleeve

Brazilian dimensional embroidery: These are cuffs for your wrist with dimensional stitches and/or bead enhancements. The instructions are ready now - a pdf file offered on my website, www.Millefiori-BE.com.  Just look for Millefiori Design #954; as soon as payment is received, I'll fly (via email) the instructions to you. There are 21 pages and lots of photos and diagrams.  Here's a picture:
Here are some close-up photos of the designs. Colors I used are listed for both versions. The first is named "Sophisticates".

The center design shown is "Celebrations" and has been designed as a holiday cuff with beads added for sparkle. I'd like to thank my friend and fellow B.E. designer, Marsha Johnson/Harvey, for giving permission to use her large central flower for this design:
The third design included in the package is named "Essentials" and here I framed it into a small frame for a narrow wall.
To finish these small designs in odd-sized frames, I mounted the embroidery on 1/4" foam core board, edged the piece with 1/4" trim (attached with size 11/o seed beads pinned into the sides) and glued it to matte board. Here's a detail photo:
 
The instructions include traceable patterns for each, so the stitcher could also transfer the project to ultra suede, denim or other fabric, any wearable item, or even edge a collar or lapel, or decorate a crazy quilt or tote bag.
 
The pdf will be sent via email as soon as your PayPal payment comes through, and I'm only an email away if you have questions.
Rosalie


Wednesday, August 17, 2016

Retro Embroidery: Avocado Green, Harvest Gold, Burnt Orange

The time was late 1960's and early 1970's. Brazilian dimensional embroidery wasn't on my horizon for at least 15-20 more years, but I've been stitching since I was a wee smidgeon (a VERY long time ago) - first those dresser scarves and pillowcases our moms gave us, and later (I have no idea where she found them) the large pictures with deer or landscapes, all long/short stitch with 4 strands of Coats & Clark cotton embroidery thread. 

Fast-forward to the 60's, and colors trending to avocado green, harvest gold and burnt orange. --And a handy supply of McCall's Needlecraft, Woman's Day and Family Circle magazines. 
I pulled out my embroidery threads and started stitching. The design above (inspired by one I saw somewhere) started with lazy daisy stitches. I circled around and around until I ran out of one color, or got bored. Changed colors and continued to stitch.
 
Then I went to look for more. This was a tiny 2x2" picture (McCall's Needlework, I think) that I saw on an advertisement. I'll bet I can do that, I thought - and I threaded my needle again.
 There isn't any dimensional embroidery here, just basic embroidery stitches.
 
We lived in Omaha, Nebraska, at the time. One day when I was flipping through the Omaha World Herald, I saw an ad, just a line drawing in black and white. But I thought it was cute. So I stitched it. Here's a picture:
Everything is long/short or other basic embroidery stitches. The sheep is stitched with lazy daisy stitches worked around and around. I did have a lot of fun.
 
After we moved to Oregon and I discovered Brazilian embroidery in the late 80's, I had lots of fun playing with these newly-discovered dimensional techniques. And when I ran out of things to stitch, I suddenly realized that I could probably draw my own ideas. So I did.
 
So.  If I can do it, so can you! Just remember: our flowers are circles, ovals or triangles; our leaves are heart-shaped. Animals are mostly circles and ovals. Have fun! Easy as pie.
Rosalie
P.S. By the way, our kitchen appliances in Omaha were Harvest Gold.


Sunday, July 17, 2016

Desert Dewdrop with Dragonfly

 This is my interpretation of the Desert Dewdrop in Brazilian dimensional embroidery. It is very simply stitched with Boucle, and Swarovski crystals add sparkle at the flower centers.
 
And a dragonfly. Sparkly Kreinik fibers make wings that are almost transparent.
Traceable patterns and instructions for stitching these little designs may be found in my book, An Artist's Garden, available at my website: www.Millefiori-BE.com and at Amazon.
Rosalie
 

Thursday, July 7, 2016

Daffodils, Dahlias and a Dandelion

These are found in "An Artist's Garden", my book (Rosalie Wakefield) of small traceable designs suitable for any item ... a small frame, a greeting card, crazy quilt or any wearable item. The instructions are written for Brazilian dimensional embroidery (Z-twist rayon thread, very beautiful; looks like silk), but creatively experimenting with any thread (S-twist; known as dimensional embroidery) and adding beads, buttons, anything sparkly, is encouraged, especially since YOU are the artist.
As mentioned previously, I'm sharing these small designs in color if you'd like to save them in a file somewhere and use them as reference. 
 
Here is my interpretation of the daffodil:
It's simply stitched with the Brazilian outline stitch, reverse lazy daisy, straight stitch and cast-on stitch. Simple. Easy. Fun.
 
This is a dahlia:
Look easy? It is. The pattern and instructions are in the book.
 
And keeping in mind that one person's weed is another person's wildflower, here is a friendly little Dandelion:
Many of these designs are stitched with medium-weight floss (Iris) and light-weight floss (Glory).
 
The book's back cover has a design I call "Formal Garden". You can select flowers from the book or make up your own "theme" design such as "Flowers of the Month", or use this design as printed:
That pretty little pansy in the second row up there is one of my favorite flowers. I'll post it as soon as I get through the flowers lined up ahead. I hope you enjoy stitching these flowers. (It's MUCH more fun than weeding my garden, which is what I did today ... in the rain ... in Oregon ... in July ... when it almost never rains.)
Rosalie


Monday, June 27, 2016

Clematis, Clivia and Coral Bells: Brazilian Embroidery from An Artist's Garden

I'm continuing to share pictures from "An Artist's Garden", dimensional embroidery designs by me, Rosalie Wakefield. Many are already aware that our Brazilian embroidery is stitched with rayon floss (Z-twist floss), but any threads will work for dimensional embroidery (S-twist floss). I also often add beads or metallic threads for fun.

This is a picture of Clematis with an interesting lazy daisy weaving technique.
I've also used this flower on a couple of my Millefiori designs. This is #8011 "Snail Mail":
And this earlier design is #952 "Sunbonnet Sue's Sassy Sister"
 
I've added the color photos for a couple of other "An Artist's Garden" designs - first the Clivia:
And "Coral Bells":
If you enjoy these small, easy-stitch designs, you might have fun with Millefiori designs #828 "Flower Patch" and #829 "Veggie Patch" - these are pillow-size prints.....
 
You'll find them all, and many more, at my website www.Millefiori-BE.com.


Enjoy!
Rosalie

Thursday, June 23, 2016

Fairy Trees and Umbrellas

The Brazilian Dimensional Embroidery Guild, www.BDEIG.org, each year asks members to vote on a Flower of the Year and a Theme for the coming year. In 2017, the Flower is named "Fantasy Flower" (and it can be as Fastastic-sy as anyone wants). The Theme for the year is "Fairy Gardens".
 
I have the perfect book full of small traceable designs using mostly Glory and Iris - "An Artist's Garden", and here is a continuation of more little designs that I've been sharing in color. (Book available at my website: www.Millefiori-BE.com and also from Amazon) The first flower is the centaurea, commonly called perennial bachelors button or cornflower (perfect little parasols for a fairy...):
This second picture, chives, would make lots of pretty little trees for fairies to shade themselves beneath. 
While playing with my Millefiori dimensional embroidery through the years, I've made other designs that seem to come right out of a fairy garden.

This is Millefiori #926 "Garden Party". Here is a detail photo of the trellis and its climbing roses (made with the Continuous Drizzle, a stitch I worked out at the time).
I had so much fun that I pulled out my beads, ribbon and sparkly threads, plus all sorts of little odds and ends and stitched a beaded version (I used sheer fabrics for the background, layered over the screen-printed fabric). I set it into a shadow box, found a bit of broken mirror and some of my polished rocks and a little rubber duckie and created the pond on the 'floor' of the shadow box:
I have detail photos of this project if anyone would like to see them. That trellis is made with balsa wood (I think I could have found one already finished at the craft store...) and the fence is stitched with flat toothpicks that I painted white. (Yes, I have too much time on my hands...)
 
A few years later I designed Millefiori #969 "Wishes and Dreams":
This design has a couple of little flower fairies -- actually "22-Stitch (give-or-take-a-stitch) Flower Fairies" flitting around:
They are "related" to my famous "22-Stitch (give-or-take-a-stitch) Hummer"
Now I think I'll fly on out of here for the moment. More soon ...
Rosalie


Friday, June 10, 2016

Calla Lily, Carrots and Cat Tails. Oh -- and a Cauliflower

As promised forever ago, here are more of the little designs from my book, An Artist's Garden, by me (Rosalie Wakefield). I have it at my website, but it's also available from Amazon.com.
There is the calla lily.
And this is a crop of carrots stitched with "Carrot Feathers" greenery.
Next, in alphabetical order, is my design named "Cat, Tails".
Very simple stitching using double cast-on stitches for the cattails. (Uh, oh. Cuthbert doesn't think it looks a lot like his magnificent self.)
Who would have ever thought how easy it is to stitch a realistic cauliflower? Just think! Brazilian dimensional embroidery is not only beautiful, fun and exciting - it is also nutritious!
As I wrote earlier, if you are stitching the patterns in the book, you can save these pictures for reference. They are all in An Artist's Garden, and there is also a fabric print with all of the designs. I made mine into a little "I-Spy" art quilt.
Think what fun it will be to take your scissors (instead of pruning shears), needles, threads and fabric and sit in your garden and stitch!
Rosalie


Monday, June 6, 2016

The Donut Drizzle - A New Stitch Idea for Brazilian Dimensional Embroidery

This little floral design - my interpretation of Sea Lavender or Statice -  is stitched with Brazilian dimensional embroidery's rayon floss using blanket stitch for the leaves, The Comma (a combination cast-on and bullion that I developed ages ago), and something new -- the Donut Drizzle!
 
I have pictures.
I'm using Frost-weight floss, #220 periwinkle. Here's how.  Make a little "x" on your fabric. Bring the threaded needle up from fabric. Unthread the needle and place it, pointed end down, into a sturdy pincushion. Cast-on 9 loops, drizzle style, over the eye of the needle. Keep the loops nice and even along the needle. Now re-thread the needle (see above).
Slip a pin or needle into the upper drizzle loop (temporarily). Push the threaded needle (holding the cast-on loops) down through the fabric and out.
Next, bring the threaded needle up right next to where you began your drizzle. Bring the threaded needle all the way through and slip it into that upper loop where the pin is inserted. You can remove the pin now.

Holding the loops (so they won't twist), gather everything into a circle, nice and snug. You might need to do a bit of adjusting, but you'll end up with a pretty little circle (or donut) of cast-on loops.
 
This is the flower. It's just a drizzle, gathered into a circle. Isn't that fun?~~
 
To finish, the sea lavender needs a center, so I threaded up a strand of Cire #034 (shaded periwinkle) and made a colonial knot in the center. I like to use a colonial knot instead of a French knot just because it's more dimensional, but it also looks very orderly.  Like an orderly donut.
Cuthbert offers to hold his thumb (well, I guess it would be a finger since cats don't have thumbs) on the knots, but I gave him a nice pet, pet, and told him to go back to sleep. I think it was the thought of a REAL donut that got his attention:
 
Here's a picture of the finished Donut Drizzle with the Colonial Donut (er, I meant Knot) in the center. Give it a try - it's so easy and makes lovely little filler flowers. Yum.
I'm getting hungry . . . 
 Rosalie