Our Chinese Pear Tree -- the one that had only 3-4 Pear/Apples last year.
 And now, I have decided to entertain you. But first, a story. When I was a little girl in Nebraska, my dad took pictures all the time, every thing possible. I actually have step-by-step slides of the construction of Gavins Point Dam on the Missouri River because that's where we went every Sunday after mass. And I have pictures of the mountains in Montana's Glacier National Park that my dad shot -- from every angle, stopping the car every few miles while we were on summer vacation.
And when we ever had company, my dad pulled out the slide projector and the company and my mother, brother, sister and I all sat in our little farmhouse kitchen on kitchen chairs and watched my dad's slide shows on the refrigerator door ("The best screen in the house," he always said).
And we didn't dare to leave. It wasn't like you had a "delete" key on a blog back in The Olden Days. It would have been impolite to go and play with our toys when we had company. So, now, when I entertain you with my embroidery, my flowers and my cats, you actually do have the option of hitting your "delete" key. But until you do, here are some pictures of some fun I've been having.
Fabric Postcards.
Fabric Postcards are like little pieces of art, little crazy quilts, tiny art quilts, and a lovely way to go through one's stash and find all the things you forgot you had.
Remember my Rosey Posey from a previous blog post? Here's a picture. I taught this flower recently to stitchers from our BDEIG-WOW Chapter Class. By the way, if you would like to learn more about B.E. in your area, click on that BDEIG link above. We have chapters everywhere and they are usually stitching something interesting, often something new. The best thing about stitching chapters is that everyone shares a like interest.
I teach my individual flowers on small pieces of fabric which can be later assembled into a quilt, a crazy quilt, a tote, wearable item, fabric journal other cover -- anything you can think of. I had a sample of the Rosey Posey left (I'll bet you thought I'd never get to the good stuff!):
 I thought it might be fun to make fabric postcards, which are really only tiny crazy quilts (or whatever you want them to be), so I did a little online research about fabric postcards. The Internet is a wonderful source of visual inspiration for anything you want to do, and a lot of blogs are filled with step-by-step written or photo tutorials. Here's one you might want to flag (click the blue link). Most blogs also give you the option of following them by email. You can also Google Janet Wickell at about.com for several pages of excellent quilted fabric postcard tutorials. Here's another. So I decided to give it a try, too!
 By the way, you can purchase the printed postcard backing fabric, or just make your own with a bit of muslin and a Micron Pigma Pen, or even set them up to 'fabric print' on your ink jet printer with just some freezer paper and fabric. Yes, I've heard that the post office even takes them -- probably admiring them at each stop along the way!
Here's a better picture:
 By the way, when I took this finished postcard to show my needlework-impaired hubby, he admired the butterfly. --The PLASTIC butterfly! Aaargh! Not my beautiful, original, awesome, amazing, wonderful, unique Brazilian embroidered Rosey Posey. The plastic BUTTERFLY!! I think he also didn't understand the concept of "fabric scraps" [his words] so I gave him a speedy tute.
But he DID say complimentary things, so he will have a nice dinner this evening.
Here are more detail photos:
 These are just a few beads from my bead soup and I attached them with gold seed beads to accent the gold threads in the fabric.
 The little frog is a plastic button and I added some straight stitch grass with Iris floss. The purple silk cord just above was fastened with zig zag stitch on my sewing machine (I constructed a lot of this on my sewing machine, although I see often see fabric postcards edged with blanket stitch by hand.) If you scroll back up, you'll see that above this satin cord, I used two colors of rick rack and tacked the lighter color with a size 11/o cut bead (do I like sparkle or what?).
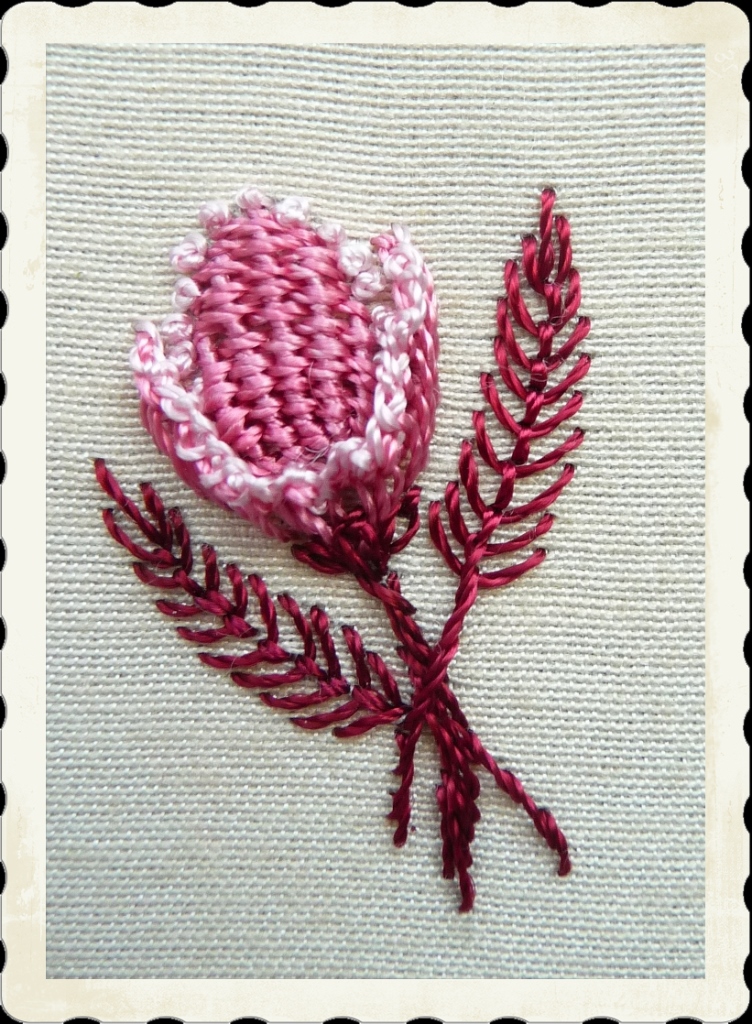
This is my newest Millefiori Brazilian dimensional embroidery floral design, which I have named "Heirloom Tulip", and I'll be teaching it this month at our local B.E. Chapter meeting:
 This little tulip features needle weaving, blanket stitched side petals edged with a one-loop running cast-on stitch (looks like a knot, but it's not), and long-tailed fly stitch leaves.
Well, since I was in a fabric postcard frame of mind, I decided to have fun with this design, too:
 Since I was "crazy quilting" two cards at the same time, I tried to make each look different. I'm not sure if it worked, but I sure had fun! Here's a better picture:
 The flower is edged with some pretty dark red ribbon that had gold threads, and I tacked the corner with gold beads. I used the one-loop running cast-on stitch to edge the little flower fairy picture, and I changed to 5-loop 'blanket stitch' cast-ons for the other side.
I found that tulip fabric in my 'collection' - it was a drapery fabric sample, I think, but I liked the idea of two different kinds of tulip on one postcard. Here's a closer shot:
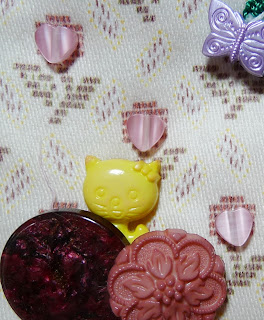 I stitched those tiny heart-shaped beads where the tulip flower is. The little purple butterfly is a plastic button, as is the little yellow kitten (I used the splash of yellow because I also had yellow with the flower fairy.), and the buttons are just odd buttons that were sitting in my button box winking and grinning at me, saying "Take me! Take me!"
 This is the little flower fairy, rescued from some fabric yardage, and embellished with Iris pink lazy daisy stitches, a loop of size 14/o pale yellow beads for the wings, some opaque size 11/o yellow beads for the flower center, and blue size 14/o beads for her eyes.
 The fabric in the upper corner is embellished with beads. I found the fringe beads left over from another project, so divided them up (different lengths) and attached them through the holes in the buttons.
This was just the best time ever, and I hope these notes have inspired you to also try other things with your embroidered samples.

By the way, don't forget to pull out your Micron Pigma pen and sign and date your project. These are, after all, tiny works of art!

And when we ever had company, my dad pulled out the slide projector and the company and my mother, brother, sister and I all sat in our little farmhouse kitchen on kitchen chairs and watched my dad's slide shows on the refrigerator door ("The best screen in the house," he always said).
And we didn't dare to leave. It wasn't like you had a "delete" key on a blog back in The Olden Days. It would have been impolite to go and play with our toys when we had company. So, now, when I entertain you with my embroidery, my flowers and my cats, you actually do have the option of hitting your "delete" key. But until you do, here are some pictures of some fun I've been having.
Fabric Postcards.
Fabric Postcards are like little pieces of art, little crazy quilts, tiny art quilts, and a lovely way to go through one's stash and find all the things you forgot you had.
Remember my Rosey Posey from a previous blog post? Here's a picture. I taught this flower recently to stitchers from our BDEIG-WOW Chapter Class. By the way, if you would like to learn more about B.E. in your area, click on that BDEIG link above. We have chapters everywhere and they are usually stitching something interesting, often something new. The best thing about stitching chapters is that everyone shares a like interest.
I teach my individual flowers on small pieces of fabric which can be later assembled into a quilt, a crazy quilt, a tote, wearable item, fabric journal other cover -- anything you can think of. I had a sample of the Rosey Posey left (I'll bet you thought I'd never get to the good stuff!):


Here's a better picture:
But he DID say complimentary things, so he will have a nice dinner this evening.
Here are more detail photos:


This is my newest Millefiori Brazilian dimensional embroidery floral design, which I have named "Heirloom Tulip", and I'll be teaching it this month at our local B.E. Chapter meeting:
Well, since I was in a fabric postcard frame of mind, I decided to have fun with this design, too:


I found that tulip fabric in my 'collection' - it was a drapery fabric sample, I think, but I liked the idea of two different kinds of tulip on one postcard. Here's a closer shot:


This was just the best time ever, and I hope these notes have inspired you to also try other things with your embroidered samples.

By the way, don't forget to pull out your Micron Pigma pen and sign and date your project. These are, after all, tiny works of art!
Rosalie


