It's amazing the things you can learn from other needlework enthusiasts. The Loop Knot Start is a technique the cross stitch (also needlepoint) stitchers use. I learned about it from a Facebook friend and shared her post with pictures at the Dimensional-Embroidery group over there. (Let me know if you'd like to join - they have really lively discussions, lots of pictures, questions/answers, but you need someone to invite you. Send an email and I'll be happy to do that.)
Here's a photo of the starting process, credit to:

To start, fold a strand of floss in half and thread both loose ends into a darner (remember with the wide darner eye, you'll want to cast on just a bit more loosely so you can pull the needle through):

Here's how you would make that traditional loop knot start:

This FB page (you'll have to scroll down) shows the stitcher making a group of bullions around the center. https://www.facebook.com/FatimaAttach/
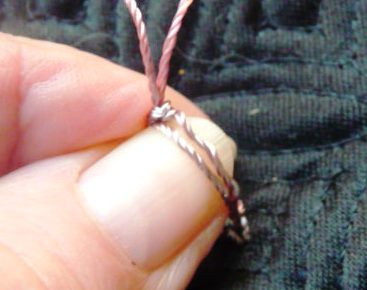
OK, back to pictures. Here I've double cast-on 12 sets of loops (12 on each side of the needle):

 If I need more "neatening", I'll just slip my fingers between and gently continue pulling the floss through.
 ...and I like to hold my stitch until everything is nice and even before I settle it all in place at the fabric:


Here's a photo of the starting process, credit to:
http://www.needlework-tips-and-techniques.com/embroidery-floss.html. Please visit the website for more details as well as other helpful information you can apply to your Brazilian embroidery.

I had an idea after I tried this and took pictures to share with you. I wondered if you could make a longer 'starting' stitch and instead of just making the loop knot, if you could do a little bit of casting on or double casting on and, guess what? It works!
What is actually a really long double cast-on seems to be a drizzle, but it's not free-standing. It just has that "Loop Knot" start.To start, fold a strand of floss in half and thread both loose ends into a darner (remember with the wide darner eye, you'll want to cast on just a bit more loosely so you can pull the needle through):

Above is the tiny stitch, the same as shown in the first picture. Now I'm going to double cast-on, 12 loops on each side of the needle. (By the way, one of the advantages of having the two loose floss tails is that it's easy to untangle the floss after lots of looping. I often use two separate strands of floss, each knotted separately, when I make double cast-on stitches.)Here's how you would make that traditional loop knot start:

When you pull the needle through that loop, you'll have a nice tight knot on top of the fabric. This might be a good technique to use for wearable items or fancy work where you don't want a fuzzy knot to show on the back of the fabric.
This FB page (you'll have to scroll down) shows the stitcher making a group of bullions around the center. https://www.facebook.com/FatimaAttach/
OK, back to pictures. Here I've double cast-on 12 sets of loops (12 on each side of the needle):

See that tangle of threads? With two loose ends, you can easily pull both through the eye of the needle and then back them out again for a short floss tail.


Remember that tiny fabric bite I started with? When it's tucked down on the fabric, it looks like a little bump on a log: (or a snowball, or a little bug - add eyeballs)

So then I wondered what would happen if I took a longer fabric bite. I made a 15-loop double cast-on.
To finish, I knotted the threads off on the back side with a square knot (Right over left, then left over right. Moisten knot. Pull snug.)
By the way, I made a discovery (others probably know this - it just never registered with me...). When you are double casting-on, to make a nice pointed tip for your petal, just switch floss sides. Cross the floss over in front of the needle and cast that right-hand floss tail with your left hand, the left-hand floss tail with your right hand). [I cast-on with my left hand only; others have other ways of doing this. I'm just writing what works for me.] Here are pictures:


By the way, the Facebook link above shows the stitcher making a beautiful bullion, several of them overlapping around the flower center. Since you are using doubled thread for this process, you could switch to a lighter-weight floss.
Just experiment and see what you come with. Remember, it's OK to play with your floss. Have fun!
Rosalie