Monday, August 31, 2015

My Minion

I saw this freebie crochet pattern somewhere on the Internet.  It was too good to pass by, so I stitched myself a minion for my phone. I used the cotton Sugar'n Cream cotton yarn from the craft store and a size 8 hook. Here's a picture:

Just before crocheting My Minion, I wanted to try the crocodile stitch, looked around the Internet for a pattern. I made it slightly larger and the straps slightly longer (it ended up looking like a market bag), and after all of my fun, I took this picture:
Crochet is as relaxing for me as beading - but Brazilian embroidery is as much fun, so that's what I'm working on now.
Rosalie
 

Wednesday, August 26, 2015

Canada's Rose

This is Canada's Rose:
I developed this flower (on a very tiny base/first round) back in 1994 when Virginia Chapman, Debbie Kelley and I were traveling back to Oregon from a Teachers' Technique B.E. Seminar in Vernon, British Columbia.  One of the things we did there was to learn an interesting way of making tassels (class taught by Maria Freitas of EdMar Co). During this really entertaining class Maria even cheerfully suggested that making tassels was a good way to use floss - she was definitely right!

To finish my tassel, I looked for a dimensional flower to add - or design. I stitched my first version of this flower and named it Canada's Rose.  Since that time, I've used it lots of places with lots of variations. You'll find it in my books, Take A Stitch and also in My LadyFlowers. It's also in my most recent book, A Book of Stitches.
It's basically three rounds with the first round of stitches through the fabric only --five running cast-on stitches for each round. I change the counts on a whim; this version has 15, 15 and 18, changing the color each time around. I added a 4mm Swarovski bicone crystal (the AB finish adds the extra sparkle; the color is named "Siam").

I hope some of you will try this and with different variations. I haven't ever done the outer row with green Boucle, but think it might just look like a calyx. Adding beads in the row (or instead of a row) is another idea that I just now had.

Brazilian embroidery is so creative and so much fun and there is no such thing as "can't", so each stitcher can discover something new.  Enjoy!


Before I go, we spoke earlier about tassels. After the inspiring class with Maria, I continued playing with tassels. At the time, Debbie Kelley and I presented a tassel class for our local B.E. chapter. Here are some pictures or the tassels I made:
Above is the tassel I made in Canada - we used wooden candle cups (from the craft store). And I used a LOT of floss. The prototype Canada's Rose fit on top of the tassel. Another view - purples, greens, blues, my fave.
My acrylic paints never go to waste. Below I just painted a candle cup and added some trim. (I had SO much Elmer's Glue on my fingers working with Nova on that tassel above).
Other fibers also make nice tassels -- and you can top a tassel with almost anything. This is a little wooden flowerpot (the rayon isn't hanging straight because this little item has been sleeping in a box on my closet shelf. I used silk flowers for the colorful parts of the tassel.
Some old rayon from my stash was used for the left and center tassels below. Somewhere I learned that if you dip them in food color (I think, or maybe it was ink, or maybe it was thinned-down paint -- can't remember, but Pinterest probably has that idea somewhere...), you can get interesting effects. The color wicks into the rayon nicely. It was probably food color or ink that I used.


That tassel on the right is made with six-strand cotton embroidery floss - lots of beads to embellish. Her head is made with detached buttonhole stitch and she has an embroidered face. (Sorry it's kind of small - but you'll get the idea)


About the same time I was on my tassel tour, I discovered Dorset Buttons - was that ever fun. Several years ago I did a related class that I called "Kaleidoscope" - also lots of fun. These are some of the little buttons I made:
Oh!  And I stitched a Canada's Rose with Nova in the center of one of the Kaleidoscope pieces, using the basic weaving techniques and starting with detached buttonhole stitch around a 2" ring. The leaves here are also detached buttonhole stitch.
Some of the petals are a little mashed, --or wilted?
 
 
While we are on the subject of adventure, here's a picture I took earlier today of my Emmy (the calico who is now 18 years old) and her big buddy Cuthbert (our Norwegian Forest Cat who just turned 12), who likes to give her smooches every time he saunters by - much to Emmy's chagrin; Emmy could care less.

We have SO much fun at our house . . .
Rosalie

Tuesday, August 11, 2015

Cuthbert Takes Selfies. I Take Flowers

Cuthbert is my Norwegian Forest Cat and just celebrated his 12th birthday. Having nothing better to do, Cuthbert decides to take some selfies. 
"I am Cuthbert," says he, as he takes charge of the camera.
 
"I am fluffing myself up and putting on my cuteness as I get ready to shoot some selfies."

"I prepare the camera for my selfie":
"First must remove unwanted thumbs -- not mine!"
"Now must find my best side. This:"
"Or this:"
"Maybe this.  Yes, this:"
"Wait!  I have more.  And I have the camera...."
"Here are my glorious whiskers"

"....and my majestic chin:"

"My awesome eyeball:"
"--And my spectacular nose."
"Aaah, words fail me; I have run out of adjectives, so will just share:"
"I hope you have enjoyed these photos. I will return the camera now."
Exhaustion sets in for Cuthbert. He feels the need of a nap:
And since I (Rosalie) now have the camera, I'm going to share some flowers from my August Oregon garden, taken just this afternoon. The foliage was so pretty, I decided to take these pictures. Here is a fern:

These next two photos are from a filipendula (Common Name: Queen of the Prairie - lovely pink fluffs of color outside my kitchen window in late spring):
 
And a ginkgo that struggles to survive beneath a ravenous wisteria:
 
My favorite time is to wander around our garden with my camera and come upon lovely surprises like this blue hibiscus that I planted several years ago (I almost forgot it was there!):
This hardy fuchsia has also been coming up for the past several years - I have it as a treat for our little hummingbirds - it's also just outside my kitchen window and just recently loaded itself up with flowers:
 

Here is a carnation I planted just this spring:

Also new is this little portulaca that I liked because of the colors:

This verbena is a favorite of the swallowtail butterflies that float through our yard:
And this zinnia is a reminder that autumn is not too far away:
Well, that was fun. I think I'll draw some pictures now, so I can write about Brazilian embroidery again. I hope you have enjoyed this show. Cuthbert does, too.
Rosalie


Thursday, July 30, 2015

Fly, Stitching Fly Stitch - A T.A.S.T. Challenge

Fly Stitch, you say?  Sure, I can do Fly Stitch.  Sounds like fun!  I even have flies ....
Seriously, though.
     Sharon Boggon of Pinangle.com periodically has embroidery challenges as part of her Take-A-Stitch Tuesdays -- a different stitch each week. In addition to her elegant crazy quilts, Sharon also has one of the best online stitch directories. There are several, but hers is one of my favorites.

Week #1 was the Fly Stitch.
"I can do this," I said to myself . . .
I found inspiration for a truly hairy fly on the Internet, Googling "coloring pages" images. Once I had my fly, I let my imagination take over. The fly's nemesis is a cute little fly-(stitch)-filled frog.
 
I did this ENTIRE design with fly stitch (except for two little loop stitches that I'll talk about later). As I stitched, I took pictures and wrote some notes, so this is basically a picture tutorial.
My first love is Brazilian embroidery; I really like working with this Z-twist rayon floss. I selected EdMar's Glory in Dark Emerald Green (#160) and added Avocado Green (#215) for the fly. Glory 215 seems to be a nice froggy color, so it was a good choice. The frog's tongue is stitched with Glory 204 (a nice bright fuchsia).
From the waist down, the fly is stitched with Dark Emerald Green using the Brazilian lazy daisy stitch. This is basically a fly stitch with a 6-wrap bullion tack. (I think of a lazy daisy stitch as a closed fly stitch. Could be.  It's possible...)
The idea for this "fill" technique comes from Maria Freitas of www.EdMar-Co.com (also manufacturers of the rayon floss we use). She used it for one of her bird designs several years ago. I think it makes a nice fly, too.
 
The Brazilian lazy daisy is also known as the Two-Step Lazy Daisy. Instead of just tacking the loop, you go into the fabric about 1/8" away (longer tack), come up inside the loop and wrap-wrap-wrap, 6 times). Finish the 'bullion' and go down and out through the fabric and on to the next stitch. Easy as pie!
 
Here are some step-by-steps:


Wasn't that fun? Here's a close-up picture. 
 
I added some separate fly stitches at the bottom of the fly because I always think they are kind of hairy. (Most of the ones I see close-up are flat, the victims of my fly swatter, so I can't really judge.)
For the fly's upper body, I added fly stitches from the outside to the center, adding a longer tacking stitch.  (After I laundered out the blue lines, there was some extra space, so I added more fly stitches with Avocado Green, as you'll see later.)
I only needed six feet for the fly (Spiders have eight feet). I needed to start fly stitching from the outer edges (toes) back to the body, so I carried the floss on the back side, slipping through one fabric thread now and then so it wouldn't show on top.
 I made the frog's antennae with a fly stitch. The tacking stitch was a 12-wrap bullion, right between the eyes.
      Speaking of eyes, I used 6mm fire polish beads for the fly eyes. For the frog, I found some cute little fiber optic beads.
 
Now it's on to the little frog. Its lily pad is stitched with Dark Emerald Green using a 'side fly' stitch. The frog is stitched entirely with fly stitches (you could say the frog was working up an appetite for lunch), although they are fairly similar to blanket stitch here. The frog's tummy is stitched with bright Fuchsia and overlapping fly stitches, with the tacking stitch at the bottom. Here are some pictures:
 I attached the frog's beady little eyes with straight stitches, although a fly stitch would have worked as well. For a 'smile', I made a 20-wrap Glory bullion from ear to ear (if frogs have ears), and tacked it in the center, the same as a fly stitch.

The frog's tongue is chain stitched continuously. I suppose one could stretch their imagination here and call it a "closed fly stitch".  By the way, that little bitty green fly already "velcro'd" to its tongue is just a couple of straight stitches (also known as parallel satin stitch), and the wings are little loop stitches that I've had in several of my books on Brazilian dimensional embroidery (tie a knot in the floss on top of the fabric and when you go down and out, the knot stops on the surface and leaves a little loop). 

I added the threaded needle to the fly so I could legitimately name this design: "Fly, Stitching Fly Stitch".
 
This is the finished frog:
 
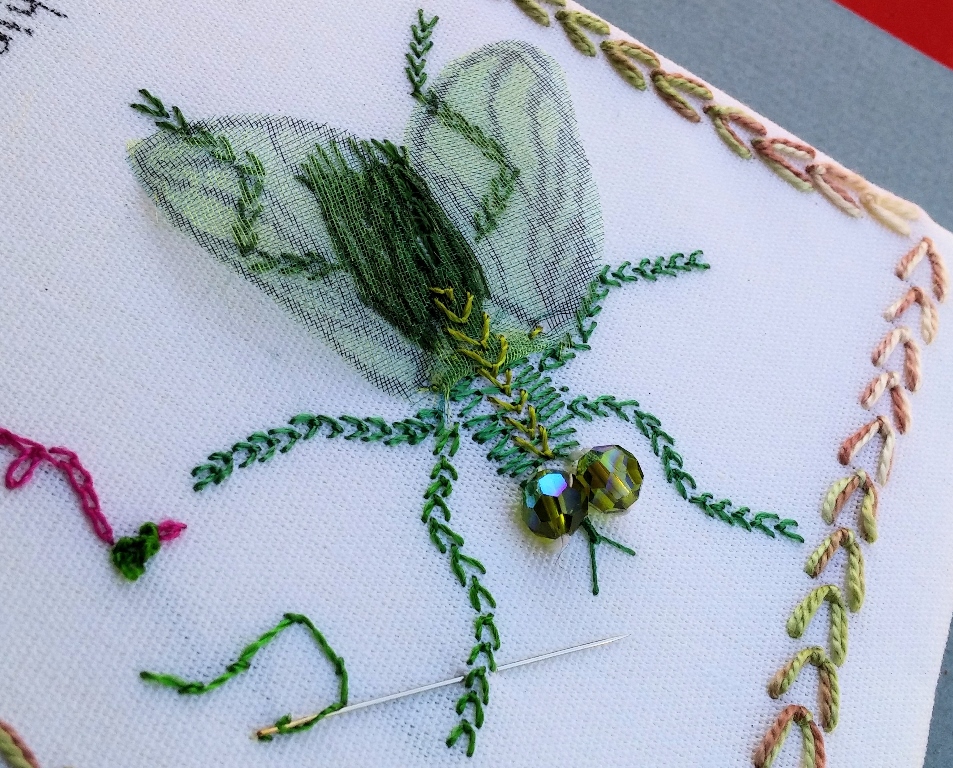
I decided to dress the fly with a cape. I had some sheer 2" green ribbon in my crazy quilt and ribbon embroidery stash, so I traced the fly's wing lines onto the ribbon with the Sharpie and Micron Pigma pens. I worried about the ribbon raveling, but it didn't.

The wing was stitched in place with the lighter avocado green Glory floss, and I continued a zipper line of fly stitches up its back to fill the open space. Here's a picture of the fly with its wings attached.
..and a couple more:


To finish my T.A.S.T. Fly Stitch challenge, I thought it would be fun to add a border of fly stitches. So I went back into my stash again, and found some colors.
I settled on the center color which is from Needle Necessities. It is overdyed Pearl #8, 100% cotton #866. I fly stitched the border with two strands of floss in my needle.

This was a LOT of fun to stitch. However, the fly stitch challenge happened in Week #1, and the group is getting ready to stitch Week #3 or #4.

I hope you enjoyed this little picture tutorial. Here is a picture of my Fly, Stitching Fly Stitch just before framing (no extra bugs).
As you can see from my last photo, these flies are quite at home on one of my house plants, and I am very glad they are only plastic!
Rosalie