Showing posts sorted by date for query rosey posey. Sort by relevance Show all posts

Sunday, August 25, 2013

Did You Miss Me?

I sure missed all of you -- writing here is one of the joys of my days.

--and I owe those who come to visit regularly an explanation. First of all, a big bad virus came and tried to eat my computer.

Lucky for me, hubby knew just what to do ...he took it to the computer guru.
Of course, that was over a month ago. Everything is now fixed and humming along at high-speed.  But you know how life goes ... if it isn't one thing, it's another thing.

Hubby had a stroke last month - moderate, but it affected his right arm and leg which he is moving along (also at high-speed) trying to re-train. He will do it, too, I have no doubt. We get to hold hands a lot while I help that wayward, stubborn arm do its thing. You won't hear me complaining -- him either. He's been in rehab and it is an entire month from the start to now. But he's home and I can tell that is the best medicine for him -- he said "he was afraid he wouldn't ever see this place again" ... Yes, it almost made me cry, too. I'm helping him and will get more help as soon as I poop out. We had the absolute BEST team helping him at Portland Providence's PARC rehab unit -- what a wonderful, patient staff they all are. But I have him back now, and that's the best part. We are enjoying each day together and facing this challenge with a sense of humor and support for each other (I always think he needs it more).

OK, that happy eyeball face above...  Well, that's one of my newest Millefiori Brazilian dimensional embroidery designs. I was in rehab with Rich each day, learning what I needed to know and stitched while I listened. This is the result:
"Not Just Spots!!"   
      If you ever look nose to nose at a ladybug, you'll see how beautiful they really are.  Do you remember the "Rosey Posey" I earlier described here? These spots are stitched with yet another version of this easy flower, improved (in my opinion) from two previous methods of stitching the flower. This Rosey Posey is stitched with a particularly pretty dyelot of EdMar's rayon floss #327. I will probably have this design available for retail sale as a pdf file, but might also have a fabric print with photo and instructions. Since you would be stitching the same flower over plus six, stitchers might prefer a traceable design. I'll let you know down the road a bit.
 
Well, as long as you are reading here (hopefully), here's an interesting idea that most probably know about. Keep long straight stitches from sagging; make a teeny little backstitch beneath one end of the stitch.  See:
That's it for the ladybugs at the moment.  And that is a ladybug bead:
 As promised the last time I wrote here, I described the little BDEIG quilt I made and promised to share patterns and sources so you can stitch your own Original B.E. flowers.  I named it "The Olden Days - Early B.E. Flowers".  I'll share those very soon. Remember:
One other thing ...
 
With all of the other things going on this summer, I haven't updated my website except to post information here and here about my newest book, My Book of Stitches.
 
   Thank you to so many who have tracked me down through my email address or phone. I'm shipping these orders as soon as I receive them, double wrapped and shipped in a padded priority mailer. I hope you'll get your own copy soon.
Rosalie


Monday, April 8, 2013

Fabric Postcards, Litty Bitty Art Quilts, Brazilian Dimensional Embroidery

Our Chinese Pear Tree -- the one that had only 3-4 Pear/Apples last year.
And now, I have decided to entertain you. But first, a story. When I was a little girl in Nebraska, my dad took pictures all the time, every thing possible. I actually have step-by-step slides of the construction of Gavins Point Dam on the Missouri River because that's where we went every Sunday after mass. And I have pictures of the mountains in Montana's Glacier National Park that my dad shot -- from every angle, stopping the car every few miles while we were on summer vacation.

And when we ever had company, my dad pulled out the slide projector and the company and my mother, brother, sister and I all sat in our little farmhouse kitchen on kitchen chairs and watched my dad's slide shows on the refrigerator door ("The best screen in the house," he always said).

And we didn't dare to leave. It wasn't like you had a "delete" key on a blog back in The Olden Days. It would have been impolite to go and play with our toys when we had company.  So, now, when I entertain you with my embroidery, my flowers and my cats, you actually do have the option of hitting your "delete" key. But until you do, here are some pictures of some fun I've been having.

Fabric Postcards.
Fabric Postcards are like little pieces of art, little crazy quilts, tiny art quilts, and a lovely way to go through one's stash and find all the things you forgot you had.

Remember my Rosey Posey from a previous blog post? Here's a picture. I taught this flower recently to stitchers from our BDEIG-WOW Chapter Class. By the way, if you would like to learn more about B.E. in your area, click on that BDEIG link above. We have chapters everywhere and they are usually stitching something interesting, often something new. The best thing about stitching chapters is that everyone shares a like interest.

I teach my individual flowers on small pieces of fabric which can be later assembled into a quilt, a crazy quilt, a tote, wearable item, fabric journal other cover -- anything you can think of. I had a sample of the Rosey Posey left (I'll bet you thought I'd never get to the good stuff!):
I thought it might be fun to make fabric postcards, which are really only tiny crazy quilts (or whatever you want them to be), so I did a little online research about fabric postcards. The Internet is a wonderful source of visual inspiration for anything you want to do, and a lot of blogs are filled with step-by-step written or photo tutorials. Here's one you might want to flag (click the blue link). Most blogs also give you the option of following them by email. You can also Google Janet Wickell at about.com for several pages of excellent quilted fabric postcard tutorials.  Here's another. So I decided to give it a try, too!
By the way, you can purchase the printed postcard backing fabric, or just make your own with a bit of muslin and a Micron Pigma Pen, or even set them up to 'fabric print' on your ink jet printer with just some freezer paper and fabric.  Yes, I've heard that the post office even takes them -- probably admiring them at each stop along the way!

Here's a better picture:
By the way, when I took this finished postcard to show my needlework-impaired hubby, he admired the butterfly. --The PLASTIC butterfly! Aaargh! Not my beautiful, original, awesome, amazing, wonderful, unique Brazilian embroidered Rosey Posey.  The plastic BUTTERFLY!! I think he also didn't understand the concept of "fabric scraps" [his words] so I gave him a speedy tute. 
          But he DID say complimentary things, so he will have a nice dinner this evening.

Here are more detail photos:
These are just a few beads from my bead soup and I attached them with gold seed beads to accent the gold threads in the fabric.
The little frog is a plastic button and I added some straight stitch grass with Iris floss. The purple silk cord just above was fastened with zig zag stitch on my sewing machine (I constructed a lot of this on my sewing machine, although I see often see fabric postcards edged with blanket stitch by hand.) If you scroll back up, you'll see that above this satin cord, I used two colors of rick rack and tacked the lighter color with a size 11/o cut bead (do I like sparkle or what?).

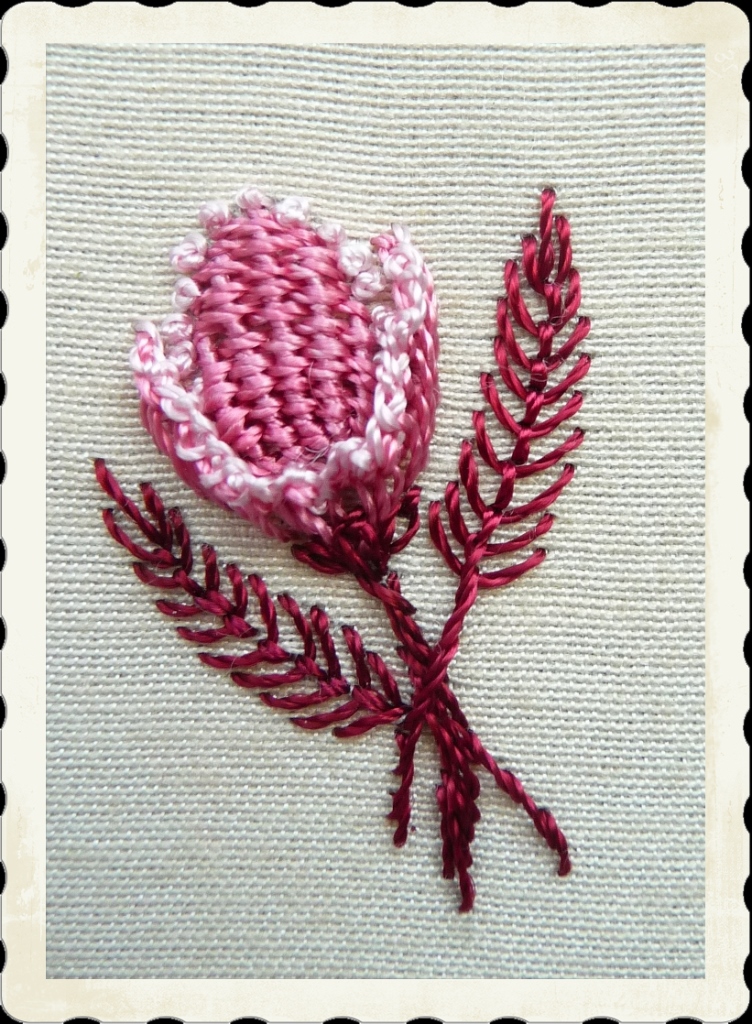
This is my newest Millefiori Brazilian dimensional embroidery floral design, which I have named "Heirloom Tulip", and I'll be teaching it this month at our local B.E. Chapter meeting:
This little tulip features needle weaving, blanket stitched side petals edged with a one-loop running cast-on stitch (looks like a knot, but it's not), and long-tailed fly stitch leaves. 
       Well, since I was in a fabric postcard frame of mind, I decided to have fun with this design, too:
Since I was "crazy quilting" two cards at the same time, I tried to make each look different. I'm not sure if it worked, but I sure had fun! Here's a better picture:
The flower is edged with some pretty dark red ribbon that had gold threads, and I tacked the corner with gold beads. I used the one-loop running cast-on stitch to edge the little flower fairy picture, and I changed to 5-loop 'blanket stitch' cast-ons for the other side.

I found that tulip fabric in my 'collection' - it was a drapery fabric sample, I think, but I liked the idea of two different kinds of tulip on one postcard. Here's a closer shot:
I stitched those tiny heart-shaped beads where the tulip flower is. The little purple butterfly is a plastic button, as is the little yellow kitten (I used the splash of yellow because I also had yellow with the flower fairy.), and the buttons are just odd buttons that were sitting in my button box winking and grinning at me, saying "Take me!  Take me!"
This is the little flower fairy, rescued from some fabric yardage, and embellished with Iris pink lazy daisy stitches, a loop of size 14/o pale yellow beads for the wings, some opaque size 11/o yellow beads for the flower center, and blue size 14/o beads for her eyes.
The fabric in the upper corner is embellished with beads. I found the fringe beads left over from another project, so divided them up (different lengths) and attached them through the holes in the buttons.

This was just the best time ever, and I hope these notes have inspired you to also try other things with your embroidered samples.

By the way, don't forget to pull out your Micron Pigma pen and sign and date your project. These are, after all, tiny works of art!

Rosalie


Tuesday, January 15, 2013

Rosey Posey - Stitch My New Brazilian Dimensional Embroidery Flower


This is my Rosey Posey.
I'm going to share my instructions for this original Millefiori flower in a photo tutorial so you can stitch it, too. This design is for your own personal use; if you'd like to share it with a class, please direct them here to my blog (click the link), and ask them to make their own "save" or copy as explained below.

Before I start, I'm not sure how much space Blogger will let me have for each post, so I might need to make this in two separate posts. We shall see. I'm also going to share a handy hint for those who print these blog pages out and don't really want to use up 50 sheets of perfectly good paper. 

Technical Assistance:
Here's what to do. Open a Word file on your computer. Select and Copy this blog entry and paste it into the Word file. Next, reset your Word page layout to "narrow margins" and "two columns" with just 1-2 points between. This entire entry will shift into 2 columns and many fewer pages. Squish the corners of the overly large pictures to fit the column.  Go to "Line and Paragraph Spacing" and (while the entire post is on the page/s) adjust everything to "single space" on the "Line Spacing" choice. I'm typing here in the Verdana font, but you can reset your font to 10 or 11-pt Arial if you like. If you didn't have an iPad or reader to transfer this tutorial to, you will have just a few pages that you can print and take with you.
Well, now -- on to the fun!
         I've stitched this flower with 2 colors Iris (EdMar's lovely Z-twist  embroidery floss), a pale shaded pink and a bright fuchsia pink.

You'll need:   Seed beads (you only need 7), size 10/o or 8/o - or even 6/o (the largest, if you are making a Rosey Posey with Nova)
                   You can substitute pearls or crystals if you like, 3mm or 4mm
                   You could even stitch a tiny button in the very center (a little blue birdie button like it is sitting on a nest??)
     Also:       Rayon floss in two colors, or you can try a fiber such as Candlelight or any of the Rainbow Gallery threads.
                   Your #1 milliners needle (the Lola needle)

Any floss weight will work for my Rosey Posey. Every stitch is a 12-loop cast-on.
When I used Iris, I selected size 10/o seed beads (the craft store version of size 11/o seed beads - I wanted a silver-lined bead for sparkle). Try size 8/o seed beads if you are using Lola.


You can stitch this flower on any wearable item or a tote bag or anything that doesn't move. All you need to draw is one little triangle with its sides just under 1/4" or 5mm.
Stitch a bead in the center of this triangle (or you can make a 3-wrap French knot). TIP: If you attach beads with a backstitch, they will lie on their sides.
(If any of the typing on these pictures doesn't show up, just double-click the image and you'll have a larger version.) The printed image on the right is from my first set of instructions for this flower. I gave it as a freebie in the goody bags for those who attended our BDEIG 2012 Seminar.

I have bead soup! See . . .
Leftover beads in a box, all sorts and sizes. Whenever I need just a few, I'll sort through and find what I need. If I collect them on a straight pin, I can pin the pin to my embroidery and the beads will stay put.

Here is a triangle I've drawn on my crazy quilt (made with Moda fabrics in soft blue, lavender, pink)
On each of the triangle sides, make a 12-loop cast-on stitch.
Keep the Needle Path (the path of the needle through the fabric) or (a  c-d  b) in a straight line with the c-d part of the stitch in the center to "widen" the petal.
From the What-Works-For-Me Department -- A TIP:
There is a definite right and wrong side to cast-on stitches made with Z-twist rayon floss. The following method keeps the loops nicely twisted. Hold the needle with your right hand; cast floss over the tip of the needle with your left hand. When all loops are on the needle, tuck the floss behind the needle; hold the stitches gently on the needle and pull through. Keep a gentle hold on the loops until the stitch is settled in place. This prevents twists and kinks in your stitch. Check the “Basic Stitches” page at the BDEIG website to learn another method of making cast-on stitches. –and then do whatever works for you (like making your own department!).
 
When the first 3 petals/triangle is finished, change colors (the change of color floss makes this flower easier to learn the first time). Add a 12-loop cast-on stitch across each point of the triangle. Add another bead just in front of each of these stitches.
The darker-color cast-ons are stitched at each point of the first triangle:

Three beads are stitched just behind each of these darker pink stitches:
Like this:
Next, close those triangles with 2, 12-loop cast-on stitches on each side. You now have 4 triangles, total, with a bead in the center of each. Easy as pie, right?? A picture or two will help:
 
See how nicely it works!
Here's a diagram to help (visual aids are always nice):
You have just completed diagram 1 above (the first four triangles). Now you will add three more triangles around. Two sides of the next triangles and a bead are shown in the center diagram above.
 
I have already explained that it works for me to cast-onto the needle, place floss behind, and settle it in place for a kinkless-cast-on stitch.
Back to our embroidery ....
     We now have the three triangles of the second round (around the center triangle) finished:
We're going to add three more triangles and three more beads to complete the main part of the Rosey Posey. The first two sides of each of these "Round 3" triangles will be placed back-to-back with those of Round 2. I found it helpful if I drew short lines for those first two sides. Refer to the center diagram above. A picture is even more helpful; a larger picture, even more so:
 
See those blue lines? Each will hold 12-loop cast-on stitches for Triangles #5, 6 and 7.
The photo above is self-explanatory. The photo below shows that you now have  one center triangle in a light color, and 6 triangles around -- a total of 7 triangles, each made with 3, 12-loop cast-on stitches.
Finish your Rosey Posey with a little doily. Two rows of running or continuous cast-on stitches around will snug the petals together and keep your flower standing upright. Here's a diagram of what we'll do:
Change to your lighter color (the flower-center color) - or use green if you'd like your Rosey Posey resting on a bed of leaves.
Check that diagram just above for A Clue to What We Will Do.  Bring your needle up in front (or above) any triangle point (#1), slip the needle beneath triangle point #2 (work clockwise) and back under triangle point #1. Cast on 12. 
      Without going down and out, slip your needle beneath triangle #3 and back under #2 and cast on 12 times again. Repeat around. You'll have 6 "slightly stretched out" cast-on stitches around,
 
Add a second round of 15-loop running cast-on stitches, this time working through the loops of the previous row.  Like this:
See?
And now, your Rosey Posey is finished! Wasn't that fun?
Here's a picture:
And here are a few more ideas. I stitched this Rosey Posey with Lola  (on black fabric:
For this Rosey Posey I used an overdyed color. I think I used Nova weight:
This picture was somewhere on the Internet and it was my inspiration for my Rosey Posey adapted to Brazilian dimensional embroidery:

I hope you will enjoy stitching this new Millefiori flower, the Rosey Posey, by me (Rosalie Wakefield), and will visit my website to see more of my B.E. designs.
 
As I mentioned earlier, this design is for your own personal use. You are welcome to share this design and link to my blog with your classes and friends, but please don't charge them. Remember, I'm not charging you for this freebie. I know that you all know and respect that this is a copyrighted design, but you are welcome to use it on anything you'd like to stitch for yourself.
 
Let me know if you have any questions. I'll answer any comments or you can email me here. Thank you for reading here, and have fun!
 Rosalie