Showing posts with label Tips and Hints. Show all posts

Sunday, April 28, 2013

Bugs? Sure. It's Brazilian Dimensional Bug Embroidery

Before I get too enthusiastic, I should let you know that there is blatant advertising ahead.
This is a picture of one of my Millefiori Brazilian dimensional embroidery designs, #915 "There's a Garden in My Dragonfly". The picture above is stitched entirely with 100% rayon floss from EdMar.
 
I took detail pictures of this design, but when I stitched it my enthusiasm overflowed and I stitched another version entirely as bead embroidery. More about that later.
 
Here's the commercial. This design #915 "There's a Garden in My Dragonfly" is available at my Millefiori website, printed on cream or white fabric. Send a note if you'd like to order one for yourself. You can use PayPal if you want, or you can email me for more information.
 
Commercial over.
 
Here are pictures of the fun that I had, plus some hints and tips you might be able to use in your other embroidery designs.
 
This is the bug behind:
Bullions, cast-on stitches, some herringbone, some knots...
 
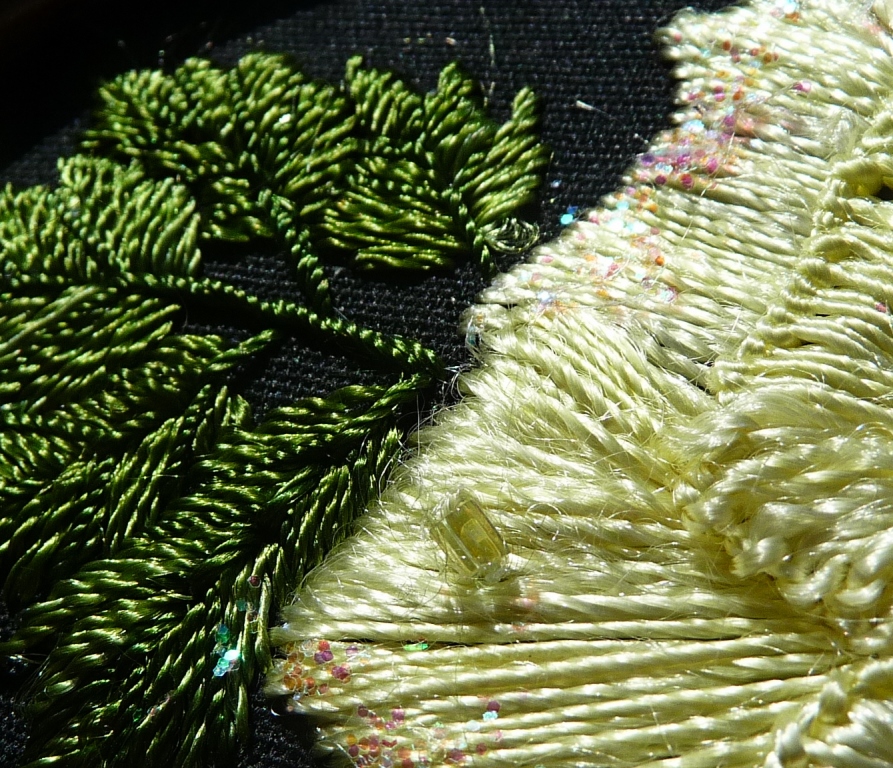
Here's a picture of the detail work on one of the wings:
By the way, it was while stitching this design I discovered Brazilian couching. I didn't want to make outline stitches to edge the wings (the dark color above) and I knew that regular couching stitches are sometimes quite long. With Brazilian couching, you make a stitch about 1/2 to 3/4" long and make a fabric bite (through the fabric) of only 2-3 threads (floss held below the needle for outline or Brazilian couching stitches). This type of couching can be used with any fiber or metallic thread for extra sparkle when you are finishing leaves, stems or . . .  dragonfly wings. If you double click the picture, it should fill your computer screen and you can even see any uneven stitches that I sometimes make...

Those corner designs (second picture above) are stitched with little "dragon-flowers". I'm adding a picture of the bead embroidered corner designs, too. (By the way, I get a lot of my little flower and leaf beads from Beadcats, but they are available at a lot of bead stores and companies including Fire Mountain and Shipwreck.  The B.E. version:
 The Bead Embroidery version:
Here is the bead embroidered version of #915 "There's a Garden in My Dragonfly":
I traced this design onto lightweight Solvy (by Sulky) and basted it to velveteen (velveteen is much easier to stitch than velvet with its nap). But any fancy fabric, even a brocade, could be used. The wings are a semi-sheer overlay of fancy fabric. You could also stitch the design using 3" wide floral sheer ribbon, stitched in place. (I edged the wings with a metallic thread, probably Candlelight) If you add sheer fabrics to the cream or white prints that I have available, you can produce a beautiful design, too.

OK, so THEN ... I raided my old collection of jewelry, looked at old earrings, buttons, shell, sparklies, etc.   ....and that body? It's a BRACELET. I think I actually WORE it back in The Olden Days when I was in high school.  Here's a picture:
More pictures:
Those are rhinestones and cabochons (I think the smaller blue one was part of a necklace). Probably the most collectible item on this embroidery is those little silver things between the two ovals. I think they might be old shoe clips (with rhinestones -- worn before my time, I'm sure ... probably from a garage sale bargain!) The blue/green/silver add-on is also a shoe clip:
...and I found some broken earrings:
...and part of an old plastic necklace (oops, I mean "lucite" - the NEW plastic):
I added some seed beads and little shell cabochons (attach non-hole things with Fabri-Tac or other clear-drying glue).
These two pictures are images of detail embroidery on the wing and head:
 
I hope you will pull out some of your unfinished, or untouched, or even unloved B.E. design purchases and think about things you can do to make them truly your own.
Rosalie

Thursday, April 4, 2013

What I Learned from Debbie Kelley

This Brazilian dimensional embroidery design is called "A Rose for My Mother" and has been designed by Debbie Kelley of DK Designs. Debbie is one of our very creative Brazilian embroidery designers, as you'll see when you visit her website. You can also click here.

I always learn (or think up) something new when I'm stitching anything. I decided to transfer Debbie's very popular rose to black trigger poplin and to stitch it with EdMar's Cire weight floss, #134, light yellow. Here are some of the things I discovered:
To avoid the dark background fabric from peeking through, and because Z-twist floss (or most other fibers) tend to twist (rayon can get tighter and tighter until it looks like string), I discovered that if I "unwind" the Cire before finishing the stitch (or even lifting it off the fabric a bit and then settling it back in place), I have a smoother satin stitch. Of course, laying threads is also important when using satin stitch.
 Study the petal above and you'll see that I had a sudden inspiration to add a morning "dewdrop" to my rose petal. Just one. It's a size 11/o seed bead.

These days little dewdrop-shaped beads are also available, and seed beads can be purchased in a variety of finishes, clear, inside color, iridescent -- lots of choices. It's always nice to have a bead or two around; you never know when you'll want to add that extra sparkle to your dimensional embroidery flowers.

Sometimes, though, we have an "oops" moment. I also had some 'clear sparkle paint' from the craft store that had little metallic sparklies in it. So I painted a bit onto the floss, here and there. It's possible that I'm one of those people who thinks if a little glitter is good, more will be better. Not so.
The parts that look red on that photo above are actually glitter that has morphed over the years. (We all learned the same thing about a product called Fray-Check).
The other thing that I thought up when I was stitching Debbie's rose is the Raised Buttonhole Stitch. Click that stitch for a tutorial if you want. I've used it on many of my Millefiori Brazilian dimensional embroidery since then, but it was when I stitched this embroidery that I discovered that you can tack a bullion along the edge of a flower petal and then buttonhole stitch over it, but not take the floss down tight to the fabric. Rather, let it rest on top of the bullion.  I was probably halfway through this piece, so it doesn't show as well as it does on my American Beauty Rose (pictured at the above link). It's a great way to place a dimensional petal on a flower.  Everyone already knows, I'm sure, that those petals fill in best with long and short stitches.

We all learn things as we are stitching and we are all free to be as creative as we want with Brazilian embroidery, so I hope everyone who tries any of these projects will also try other new things - and write them down!

I took my finished embroidery to my windowsill that is filled with light, and my photographer's helper helped me position the frame "Just so".  However, Emmy may have been trying to get it out of her way so she could have the sunshine entirely to herself.
With cats, you just never know.
Rosalie


Monday, March 25, 2013

Rayon FROST Floss Speaks. FROST says, "Work with me here, folks..."

Frost is a medium-weight 100% rayon floss made by EdMar-Co. for Brazilian dimensional embroidery. Frost is temperamental. Frost is wannabe Lola, but picky, picky, picky about being used. 

Don't give up on Frost, though, and give away all of your Frost to your Friends. You can do a lot with it (besides making tassels). It's all in the needle you choose, all in how you work with it.

Frost has a twist similar to Lola - try a rolled rose with Lola and next to it, make a rolled rose with Frost. You'll see they look the same; one is only smaller.

There are some interesting things one can try to make Frost your Floss Friend. First, if you are making bullions, try a larger (#1 milliners needle) instead of the #3 usually recommended. You can work your bullion down to the correct diameter as you finish the stitch.

Because of its twist, Frost (and Lola) produce realistic, rounded flower stems and are a perfect choice for leaves with parallel veins, such as lilies, tulips, iris and other flowers.
The upper curved line is a flower stem made with Frost using Brazilian outline stitch, in which the floss is held below the line of stitching (exactly the opposite of S-twist threads shown in needlework stitch books).

The lower stitching shows the floss held below, but I'm also stitching a lily leaf with side-by-side rows of outline stitch. See?
 Now I'm going to talk about Frost and its kinky habits. Bad Frost! Bad Frost!
See the arrow in the picture above, pointing to a nice collection of twisties, just while I'm making ONE little stitch! *sigh* (You can double click the picture if you want a REALLY good close-up...)

I've found out (oh, by the way, I do my outline and stem stitching with an embroidery or chenille needle with a larger eye. It just seems to work better.) that - with Lola and Frost, and especially if you are doing some satin stitch - you can 'unwind' the floss. The other thing you can do is to LIFT the stitch a little ways with your needle and then settle it back in place. Somehow this relaxes the twist and the threads look nicer.
 OK, I exaggerated a bit in the photo above, but when you try it, you'll see what I mean. Lifting or 'un-twisting' your floss (or dropping your needle) are a good idea when working with our lovely rayon.
Here I've lifted it a bit before settling it in place -- and you should try that while holding a camera and snapping pictures!

Here's the finished lily leaf and the stem, all stitched with Frost:
Oh!  --and those stamens up there?  Well I'll give you a twofers. 

That is my own discovery (and a much better pistil stitch) - that I have named "Cast-on Pistil Stitch".  For those who read here, you've gotten the entire tutorial when I first developed the stitch.  It's here and here, or you can go back to the September 2011 posts. 

Just always remember, when you make a Cast-on Pistil Stitch, you come up where you want the knot to be. See?
Then take your fabric bite (the length of the pistil stem). Come back up where you want the knot to be and cast on one or two times.
Place the floss behind the needle, and go down and out right there (you can't go down and out anywhere else!):
This is a better picture of the leaf and stem made with Frost. This is also from one of my newest Millefiori designs, which I named "South of the Border". (I should have given it a "Lily" name because it has several new Brazilian dimensional embroidery stitches and ideas for lilies. I stitched the original design with lots of hot salsa colors, and now I'm trying another version with more muted, gentle lily colors (or will try to). I'll keep snapping pictures and sharing them. Here's the original Millefiori design which will be available for you to stitch in a couple of months, South of the Border:
I hope these hints and tips for using Frost will encourage you to give it a try. After I finished my embroidery, I looked around for The Cats. Usually they are sleeping on top of my table under my bright light and tactlessly suggesting that I go somewhere else to stitch. Cuthbert, however, is safely hidden in a new box, out of sight of Emmy (in the background, caring less...)

Rosalie


Saturday, February 16, 2013

Delightful Little Dragonfly

I just had an idea that was too good to NOT share!
Here's why I got so excited (Right. Doesn't take much to excite me!) -- usually we stitch our butterfly bodies and dragonfly bodies with bullions or French knots, sometimes beads. 

If you double-click this photo for a closer look, you'll see that this is a dragonfly in flight -- he's attached at the front end only. Here's what I did.

Using my beading needle and nylon beading thread, I first attached the head, which is a size 11/o seed bead. Next, I threaded 6 slightly smaller size 14/o seed beads onto my needle. Instead of going through the fabric at this point, I threaded a 7th seed bead and went back through the first 6, size 14/o seed beads, and then through the fabric just behind the dragonfly's head, and knotted off.
          This makes the dragonfly hover in the air.


He needed wings, so I found my Sulky Holoshimmer thread (see below) and using the thread double in my needle I placed 2 lazy daisy stitches on each side of the body, just behind the dragonfly's "shoulders" (don't ask...).
That's a photo of my size 14/o seed beads and one of the Sliver threads made by Sulky, called "Holoshimmer" (hologram + shimmer), from JoAnn Stores. I like the Sulky threads because they are made for machine embroidery, so I know they are durable for hand embroidery. Visit the Sulky website if you'd like to read more about this thread. You can also use it to edge the loops of your cast-on stitches and add some sparkle to your flowers. 

If you want to tuck a little dragonfly in alongside your embroidered flowers, you can stitch it with anything you want, but I'm always looking for a reason to stitch with beads. This little dragonfly provided a really good reason!
Rosalie

Thursday, February 7, 2013

Optical Illusions in Brazilian Embroidery Leaves -- No Stems

This picture is from one of my Millefiori B.E. designs:
I posted it here to keep everyone interested and reading on to the "good part", hints and tips about stitching leaves and no stems. The design is #993 "Field of Flowers".  I originally designed it to use up all of my odd floss colors.

Fans of Brazilian dimensional embroidery were pretty much underwhelmed.

So I pulled out a piece of white fabric and all of the Iris #227 (Pale Sea Green) floss I could find in my stash, some pale green beads (because I'm almost never without a bead or two next to my embroidery), and stitched this busy, busy, flower-and-technique-filled design in monochromatic colors. See what happened:
I framed it as a small art quilt. I've also learned that it's a good idea to have your quilt fabric handy so that you can match fabric and floss colors. Here's a picture of the finished design, made into the little quilt:
I'm not really A True Quilter, but I know how to sew the fabric together (somewhat). These little quilts are a nice alternate framing idea for our Brazilian dimensional embroidery.

Well, now I'll talk about The Main Subject of this post ... optical illusion and Brazilian dimensional embroidery. 

Stems, leaves.  Lazy Daisy leaves and evergreen leaves. 

The idea is to decrease bulk and still have a graceful, elegant background for our dimensional flowers. When we receive a B.E. design on fabric, those blue lines will wash out. Often the entire stem and all leaves are drawn on the fabric. Of course, just because they are there, that doesn't mean we have to cover every line with floss!  Here's where the optical illusion comes in.

This is a finished branch covered with lazy daisy leaves. We often stem (or outline) stitch the branch first and then add the leaves, as shown below.
But we don't have to do that!  Look at the diagram below. No stem is stitched. I'll bet your eye was fooled!
    (It's called trompe l'oeil, literally meaning 'fool the eye', and is pronounced: TROM-loy.)  A note of caution -- it does NOT work when I step on my bathroom scale.  It's also easier to say "optical illusion".
Now, when I show you the diagram without the stem, you'll see what I mean. Your eye will tell you there is a stem; you will not have bulky embroidery, and it looks just fine. See?
Notice those lazy daisy stitches? They are slightly offset - one side just a bit longer than the other. This makes it easy to tuck all of those stiches along a stem line. Just be sure that the short end of the stitch is beneath the long side of the stitch (not shown here).  Here's a step-by-step diagram:
And here's a picture:
 
This "off-setting technique" also works with evergreen leaves, which are basically just straight stitches (although the idea of Glory bullions for each is rather interesting...). See:
(It will look a lot better when the flowers are added and the blue lines washed out, I promise...)

You can choose your own method of stitching -- the regular lazy daisy stitch (or detached chain, as named in stitch directories), the off-set lazy daisy stitch, and at the far right, the twisted lazy daisy stitch. Select the method you like best.

And if you are being more adventurous (I'm sure I've written about this before, but it's like repetition for emphasis to reinforce learning.), you can stitch your leaves with the Reverse Lazy Daisy Stitch. This stitch starts farther away from the center branch (which is stitched) and the tacking stitch becomes the leaf "stem".  See (bottom diagram):
Just always remember to be adventurous in your embroidery. Try new things, be creative, have fun! Here's another close-up photo from my "Field of Flowers" design:
And now I'm going to go back to stitching. I'll show you my new project soon. It's also quilt-related (sigh).....
Rosalie

Wednesday, January 23, 2013

The Bossa Nova Rose

This is the Bossa Nova Rose. It's one of the original Brazilian dimensional embroidery flowers -- a bullion rose.

I'm using EdMar's 100% rayon (Z-twist) floss. The leaves are stitched with Iris 215 (avocado green) and the buttonhole stitch leaf [corrected from earlier post in which I wrote alternating satin stitch leaf].
I edged the leaves with Glory 049 (light to pale avocado). These and the leaf veins are completed with the Brazilian outline stitch (floss held below the line of stitching for a smooth line that happens when you use Z-twist). 

Sometimes I have a helper close by, sleeping under my nice warm light:
Why!  Look!  It's Cuthbert. He watches for a while, gets bored, takes a nap, repeats. I have discovered the value of keeping a roll of scotch tape close by when the cats are near.
(Scotch tape shown above.)

This is the center of the Bossa Nova Rose. I started with a tiny square (about 1/8" or 2mm) drawn on the fabric with my wash-out Marvy Pen with the fine-point tip. I've stitched a size 8/o bead in the center, and I'm making my bullions with Lola 157 (burgundy) and 163 (antique rose). I use a #3 milliners needle to make these Lola bullions because I find they are much easier to work down to the proper bullion diameter.
You'll find instructions for stitching the Bossa Nova Rose in almost any embroidery book. Just look for "bullion rose", but remember that if you're stitching with 100% rayon Z-twist floss, you'll wrap your bullions clockwise around the needle. Some people stitch with Perle cotton which is S-twist and this makes the embroidery "dimensional embroidery". (The name "Brazilian" is added when you use Z-twist floss.)  Other fibers can be Z-twist or S-twist. Just remember that S-twist floss is wrapped counter-clockwise around the needle and Z-twist goes clockwise.

Working around the center, bullions are usually 10-wrap, 12-wrap, 14-wrap, etc., up to 20-wraps until your rose is the size you like.
Here a handy-dandy hint from the "What-Works-For-Me" department. Since I use a hoop when I embroider, whenever I make a really long bullion or cast-on stitch, I'll take my fabric bite and leave just the eye of the needle in the fabric. In the above photo I have 20 wraps on my needle (and lots of twists and kinks on the back side). So . . . .
I turn my embroidery over, pull ALL of the floss through the eye of the needle to straighten the thread and remove extra twists (shown above). Next, I back the thread out to a short floss tail again. On the right side of the fabric, you can now pull your needle through those wraps and settle the stitch in place without any kinky business going on at the fabric.
See how pretty those bullions are, one tucked beneath the other? 
     By the way, you can stitch this same flower with cast-on stitches and you'll have one of our Brazilian dimensional embroidery favorites -- Maria's Rose.

Here's another picture of the finished Bossa Nova Rose. Some day soon, I'll show you what I'm using all of these flowers for!
Rosalie