It all depends on one's color direction/choice. This is my Millefiori design #8006 (details at my website, www.Millefiori-BE.com). I've seen it at pinterest.com so often that I thought I'd write about it here, too.
I named it "South of the Border" and described it as a "lily bouquet" with lacelike chiffon lilies, Amazon asters, fan flower, Argentine weeping lilies, a lollipop lily and the rain lily.
This is scaevola, or an Australian native also known as the "fan flower" and is usually blue, pink or white.
To make a Brazilian dimensional embroidery version of this flower that attracts butterflies (shown) and repels deer (too big for this design...), I selected the blanket stitch.
To make it 'dimensional', I chose to make the bullion petals with blanket stitch, worked clockwise with our 100% rayon Z-twist floss (manufactured by www.EdMar-co.com).
It helps to make really 'good' bullions, but in case they don't all work out, I decided to cover the base of the stitches with a cast-on cover-up.
Here's the short version of what I did, in pictures.
Above: I started with a lazy daisy bullion. The second bullion is anchored into a blanket stitch as shown at the upper right. Sometimes you need to convince these bullions that you and they are on the same page. You can do that by going through the fabric and bringing the needle up in the correct position (especially if you work with a hoop or frame). That's what I did in the three pictures shown below.
It really works - you just need to convince it that you are running the show and that it will be beautiful and lovely and gorgeous when it's all finished. See, below? It's starting to agree with me.
Here's the basic process, and below is the finished flower:
--with any little 'disagreements' covered with the cast-on calyx. Here's a close-up of the finished flower on the design:
It's always fun to play with leaves, too. Here I stitched the leaves with pink veins. Because the green is so dark, there is space between two of the leaves to give them a bit of separation:
This is a detail picture of another of the flowers - the Teacup Flower:
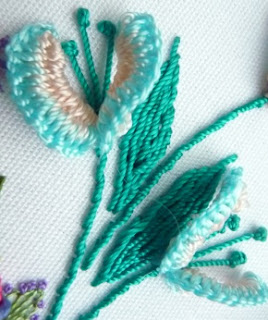
The focal flowers at the top of the design are Chiffon Lilies. At various times, I've stitched them with different colors, or reversed colors:
I used the cast-on pistil stitch to make the stamens (I've described this step-by-step on this blog if you do a search). The petals are drizzles, stitched with a variation of the "Archie" we all know and love. Remember: Archie R.A. Drizzle (the Latin: Archiara drizzle)
I have these and a lot of other flowers and dimensional stitch techniques in "My Book of Stitches" (Millefiori #8000) - aka, The Pink Book:
Oh~ And here's the butterfly. When I stitch butterflies, or flowers, or anything, I'm always trying to think of how I can use our B.E. dimensional stitches. This little one, though, is not - I used just simple stitches. By the way, I like to make a bullion for the butterfly by starting with a fly stitch and using the bullion (body) as a tacking stitch. The wonky eyeballs shown below are French knots (although colonial knots are more dimensional).
And now I think I'll flutter away -- I am working to finish my new book of fifty brand new flowers, "Forever Flowers". I'll let you know as soon as it's ready, will also post pictures.
Rosalie


love to see this blog
ReplyDelete